Lesson Modules
Teaching Tips:
Contrary to popular belief, deer do not freeze in front of your headlights because they are scared. They freeze because they are nocturnal, and they're eyes are adjusted to see in the dark. When we flash bright lights on them, we blind them! Rather than run somewhere blind, they wait for their eyes to adjust to the new surroundings. As soon as they realize they're standing next to a car they run away.
The phrase "he froze up like a deer in the headlights!" has been around as long automobile headlights, but the phrase was first popularized when it was used on television during the 1988 presidential election. It means "to freeze in shock in response to an unexpected event" like a deer as it crosses the road at night and sees a car.
- from fear
- blinded by the light
- interested in the car
- tired of walking
So, how should a self driving car deal with an obstacle like an animal at night? And how can you combine two different programs into one? In this lesson we'll find out!
- by stopping
- by stopping and turning off the headlights
- by honking
- by stopping and honking
Teaching Tips:
Take a look at your lesson 2 pseudocode:
get DISTANCE from sensor (over and over)

log distance

IF (distance > 8 units away)

        drive

ELSE

        stop
Now look at your lesson 4 pseudocode:
use the light sensor AltinoCDS

if (light-in-the-room < some-number) {

        turn headlights ON   }

if (light-in-the-room > some-number) {

        turn headlights OFF   }
- IR sensor
- CDS Sensor
Teaching Tips:
Here are the parts of the previous pseudocode we should combine:
** get DISTANCE from sensor (over and over) **

** log distance **

** IF (distance > 8 units away) **

        drive

** ELSE **

        stop
use the light sensor AltinoCDS
if (light-in-the-room < some-number) {
** turn headlights ON } **
if (light-in-the-room > some-number) {
** turn headlights OFF } **Notice thast we are combining the logic and sensor data of the first program with the functionality of the second program.
Most people’s code doesn’t work on the first try, that’s ok. It is a part of the coding process.
As you can tell, in this pseudocode a couple assumptions have been made about the environment. You may have make different ones and that's ok. Now it's time to translate the pseudocode into real code!
Here's something to get you started:
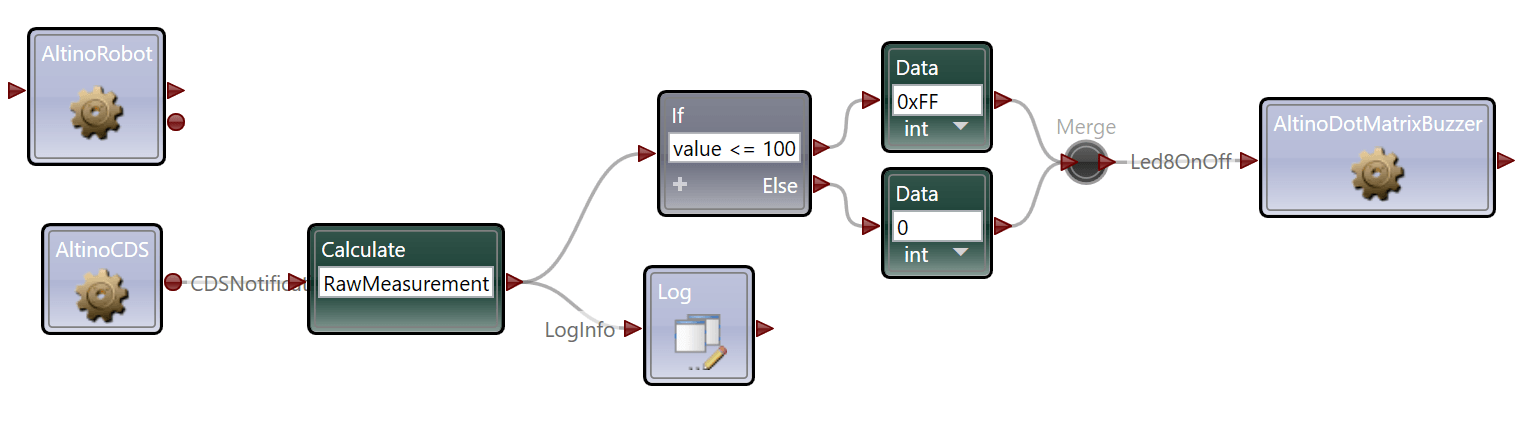
Code from lesson 2:
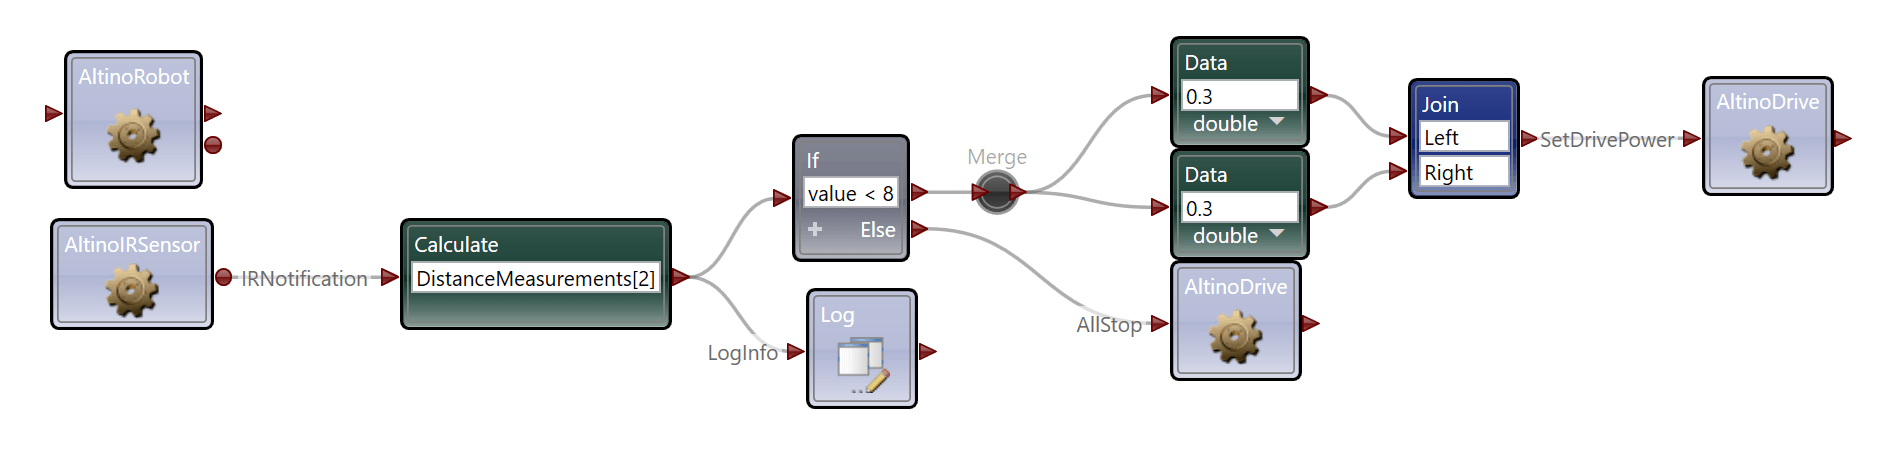
Code from lesson 4:
Remember, writing code is like writing a poem, there are many correct answers. Maybe you answered differently. If so, I encourage you to convert your pseudocode into code and see how it works!
Teaching Tips:
Question 1: Today, you combined Lesson 2 with Lesson 4 to create something new. Can you think of a way to combine Lesson 4 with Lesson 3 (acceleration)?
1. When the car accelerates at a fast enough rate, it is stopped.
2. As the car decelerates, the back lights turn on.
Question 2: Check the concepts you understand. Don’t worry, this isn’t for a grade, it’s just so your teacher can check the classes’ understanding.
This is the students' self-assessment of their understanding of the material. You will see a bar graph once all the poll answers are submitted.
Question 3: When you combined the code you took the structure of one and the input of another to create something new. Describe the pseudocode you wrote to come to this conclusion:
This answer should be similar to the pseudocode shown in the Explore section.
- CDS sensor
- IR sensor