
Lesson Modules
Teaching Tips:
As a teacher, you know your students. So use these lessons as a guide and feel free to make adjustments that facilitate your students learning.
Materials to run lesson:
- Pepper robot
- Student computers (either individual or 1 per small group)
- Teacher computer
- Choregraphe program for Teacher/Students computers
- Choregraphe file for this lessons downloaded to the Teacher computer
- Projector
- A place for projection (projector screen/large blank wall space)
- Project the observation questions on the Class View. Tell your students that “We are going to listen to the Three Little Chickens story again and then answer the questions. So think about your answers as you listen”.
- Have students make a circle around the robot to listen to the story.
- Connect the robot and run the Choregraphe file.
- Pick 1 student to respond to the robot when the robot asks “Should the chickens trust the wolf and let him in?”. For this lesson, the student needs to say NO. Make sure the student is facing the robot when they respond “NO”.
- Play the “Three Little Chickens” story using the robot.
- Show the Class View directions on how to access the observation questions.
- Direct students to answer the observation questions on their computers.
- Once students are finished, show their responses on the Class View and to facilitate a conversation.
Sandy said to the wolf “I am not sure that I trust you! Please leave” and she shut the door. The wolf couldn't help but cry. He had lost his pack and wanted some friends. Brad heard the wolf's sobs and felt that he had misjudged the poor wolf. He grabbed a box of tissues and went outside. “I am sorry that I hurt your feelings, wolf” said Brad. “What is your name?”. ”My name is Arnold” the wolf said as he took one of the tissues to dry his tears. “Thank you for the tissues”.
At this point, Sandy and Kara came outside. Sandy put her wing on the wolf's shoulder and apologized for her behavior. “I'm so sorry Arnold, I hope we can still be friends”. And so began a most unlikely friendship between a wolf and three little chickens.
Teaching Tips:
- Show the Class view. Discuss the information.
- Discuss the example story (Harper and Mason). Students should use the list of character traits on their computers.
- Show the goal on the Class View. Tell the students “In order to create dialogue, you need to create another character. You will plan out your character on your computer”
Suggestions on age groups: Older students can write more than 4 lines of dialogue.
/4%20Dialogue/personality.jpg)
Authors use dialogue to further develop characters. The way a character talks to another character shows the audience what kind of person they are.
Harper: “Hey Mason how are you doing today?”
Mason: “I am not doing well. I forgot my lunch today so I am hungry”
Harper: “You can have some of my lunch”
Mason: “Thank you, Harper. I really appreciate that!”

Create Another Character!
Teaching Tips:
Students may plan to make too many function choices for their characters (talks fast, high pitch, has 1 green eye, 1 blue eye, blinks...etc.). Depending on the skills and age of your students give them a number of modifications they can make (ex: only 2 modifications). Then if they are successful and finished early they can add more.
You need to help your audience recognize the difference between your characters.
You can do this by:
- Changing the speed of their voices (ex: character 1 speaks slowly, character 2 speaks at an average speed)
- Changing the pitch of their voices (ex: character 1 speaks slowly, character 2 speaks at an average speed)
- Changing the light colors of the robot as the characters are speaking (ex: when character #1 speaks the robot’s eyes are brown when character #2 speaks the robot’s eyes are yellow)
Do you remember how to change the robot’s voice?
/Changing%20voice-270731-edited.png)
What's LED?
Answer: Light Emitting Diode -----------> /4%20Dialogue/LED%20GIF.gif)
Predict:
What do you think these functions do?
/4%20Dialogue/LED%20functions%20in%20library.png)
What's Light Intensity?
How bright the light is.
/4%20Dialogue/light%20intensity%20dimmer%20gif.gif)
Blink | Robot blinks once |
Random Eyes | The color of the eyes changes randomly |
Twinkle | The selected LEDs flash on and off during the amount of time you choose. |
Ear LEDs | Set the intensity of the LEDs in one of both ears. |
Eye LEDs | Set the color of the eyes. |
Set LEDs | Set the intensity of the LEDs of a given group (eyes, ears, ) |
Set Single LED | Set the intensity of a single LED |
Single Ear LED | Set the intensity of one ear LED. |
Single Eye LED | Set the color of one eye LED. |
Time to Plan!
Programming Time!
How to write your program: | |||||||||||||||||||
(Open code from Lesson 3 and proceed from there) |
| ||||||||||||||||||
1) Go to the Box libraries area on the bottom left of your screen. Click LEDs. |  | ||||||||||||||||||
2) Add a change to eye color using one of these tools.
| | ||||||||||||||||||
3) Attach the LED block of your choice the way you did with Animated Say. Double click the LED box. | 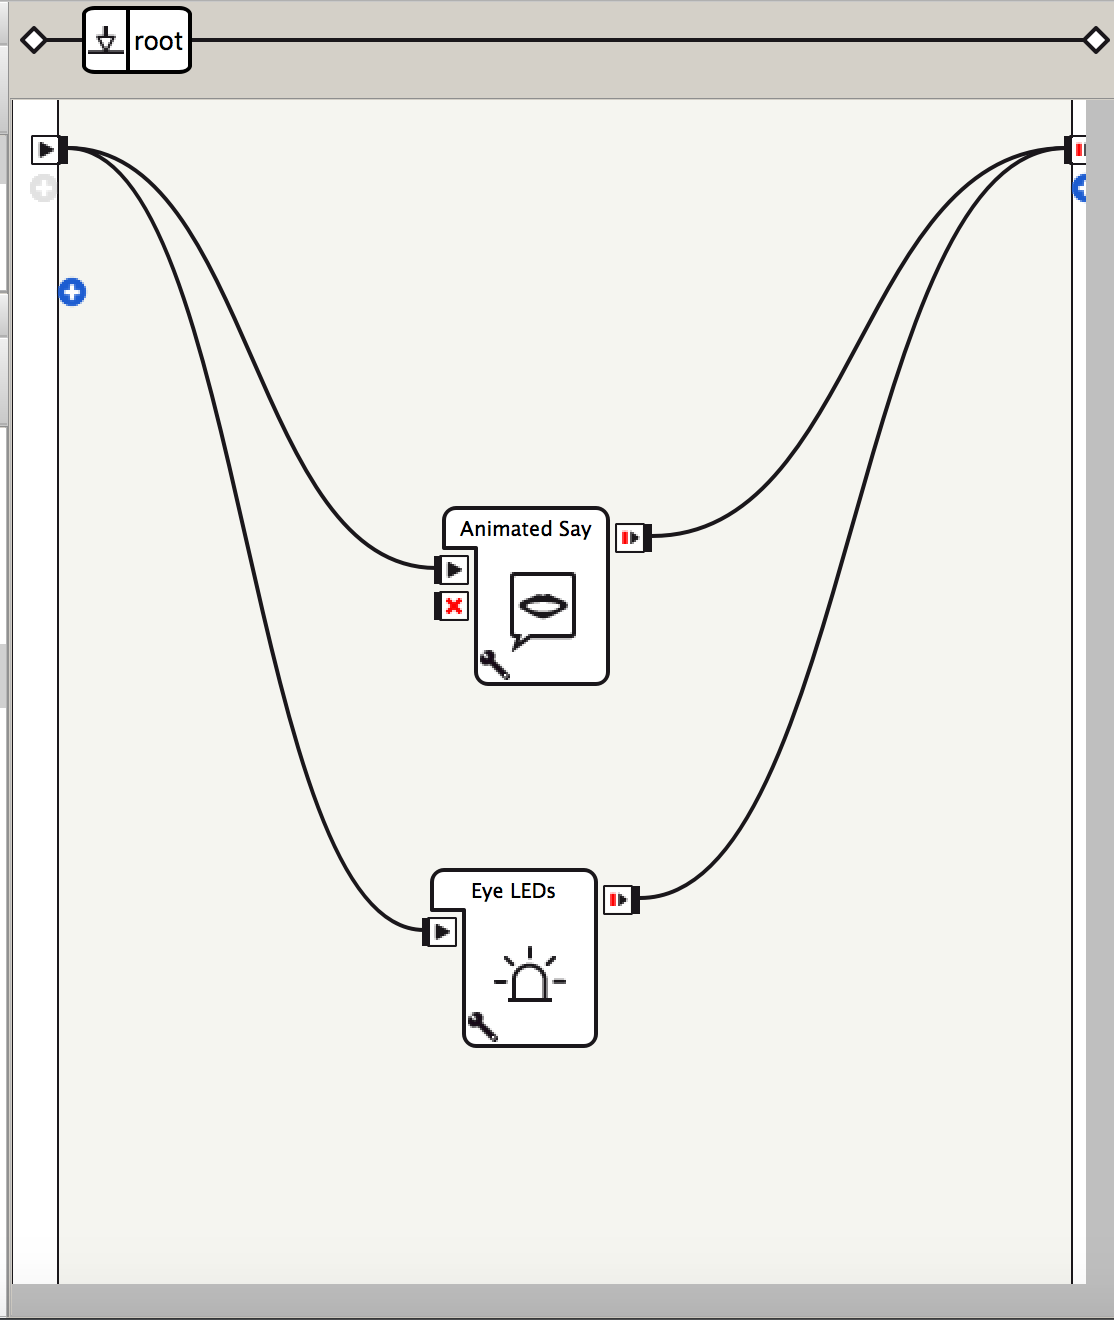 | ||||||||||||||||||
4) You will see this page. Click “Color Edit”. | 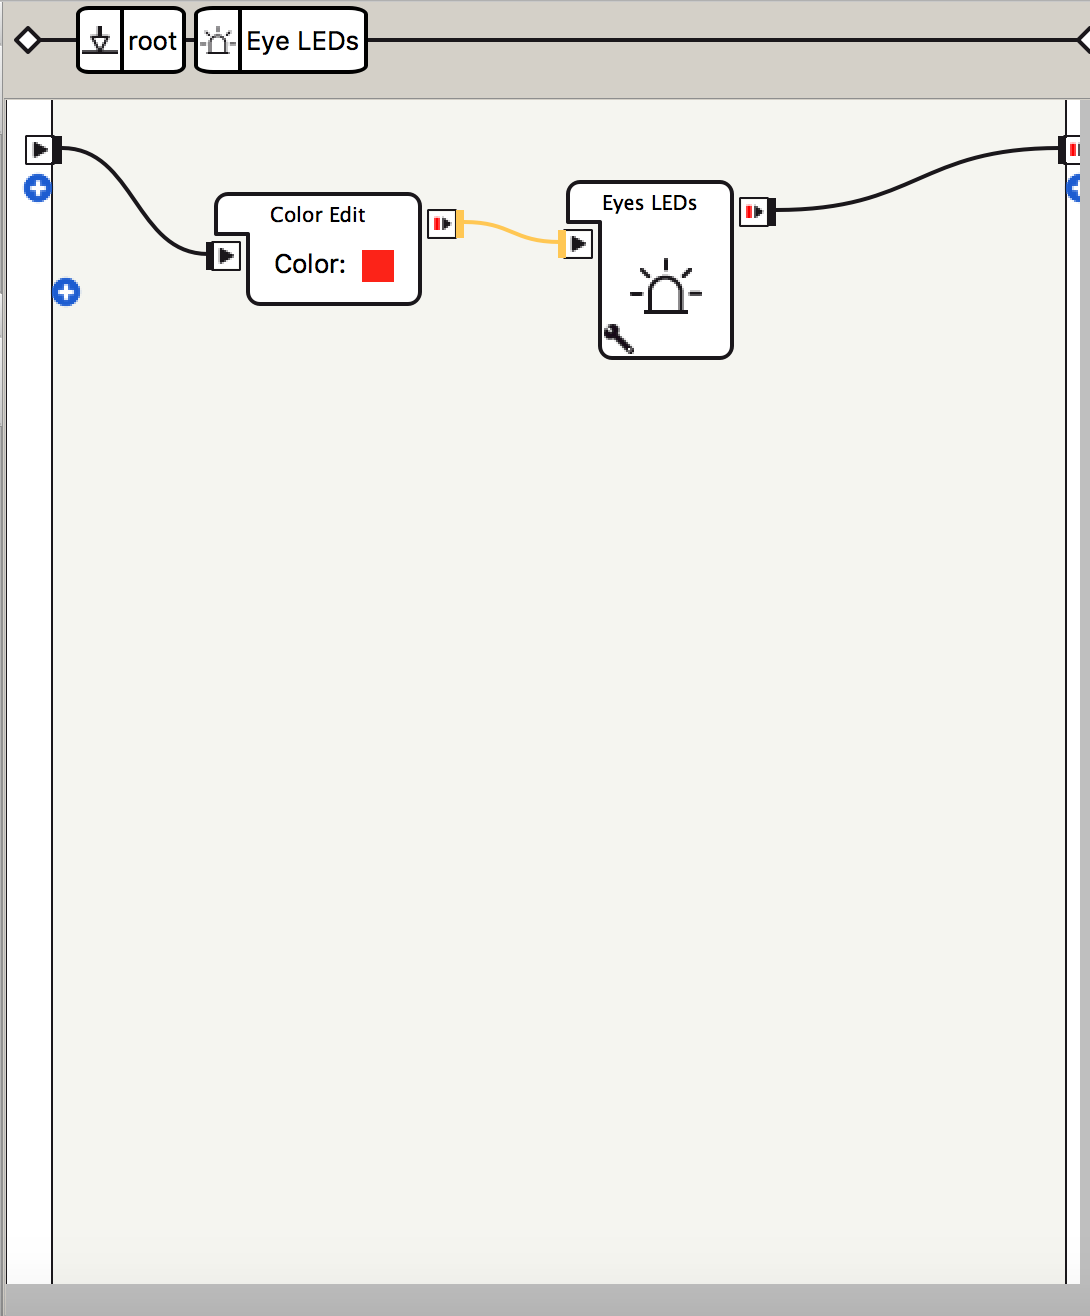 | ||||||||||||||||||
5) Choose a color you like. |  | ||||||||||||||||||
6) Return to the main page by clicking “root” at the top of the screen |  | ||||||||||||||||||
Now click the green play button at the top of the screen to run your code (and remember to save)
| |||||||||||||||||||


Teaching Tips:
If the students are struggling to get the robot to do what they want it to do - do not tell them their error, instead, ask them guide questions to assist in their development of independent problem-solving skills. This takes time to build so be patient with your students.
Some examples of guiding questions:
- What is not working the way you want it to? Let’s look at your code together.
- Can you show me where you think the problem might be?
- What resources could you use to find the solution to your problem?
If students finish early they can:
- Show each other their character (play the project)
- Have their peers discuss each other’s characters (when your character Bradley said...I thought he was (character trait) because...)
- Peers can also give feedback to each other on how to improve their story.
If you are struggling to get the robot to do what you want it to do - do not feel bad. It takes time to build programming skills so be patient with yourself.
Ask the questions to yourself:
- Where do I think the problem might be?
- What resources could I use to find the solution to the problem?
Teaching Tips:
Store student files: Put the student files on a thumb drive or store them in some way so that the students can continue working on their project in the next lesson.
Computers/Tablets: Make sure all student computers/tablets are plugged in.
Take silent time to reflect on your learning today by answer the following questions.
Store your files: Put your files on a thumb drive or store them in some way so that you can continue working on the project in the next lesson.
Computers/Tablets: Make sure all computers/tablets are plugged in if you are storing them in a charging case.