Lesson Modules
Teaching Tips:
Teacher Demo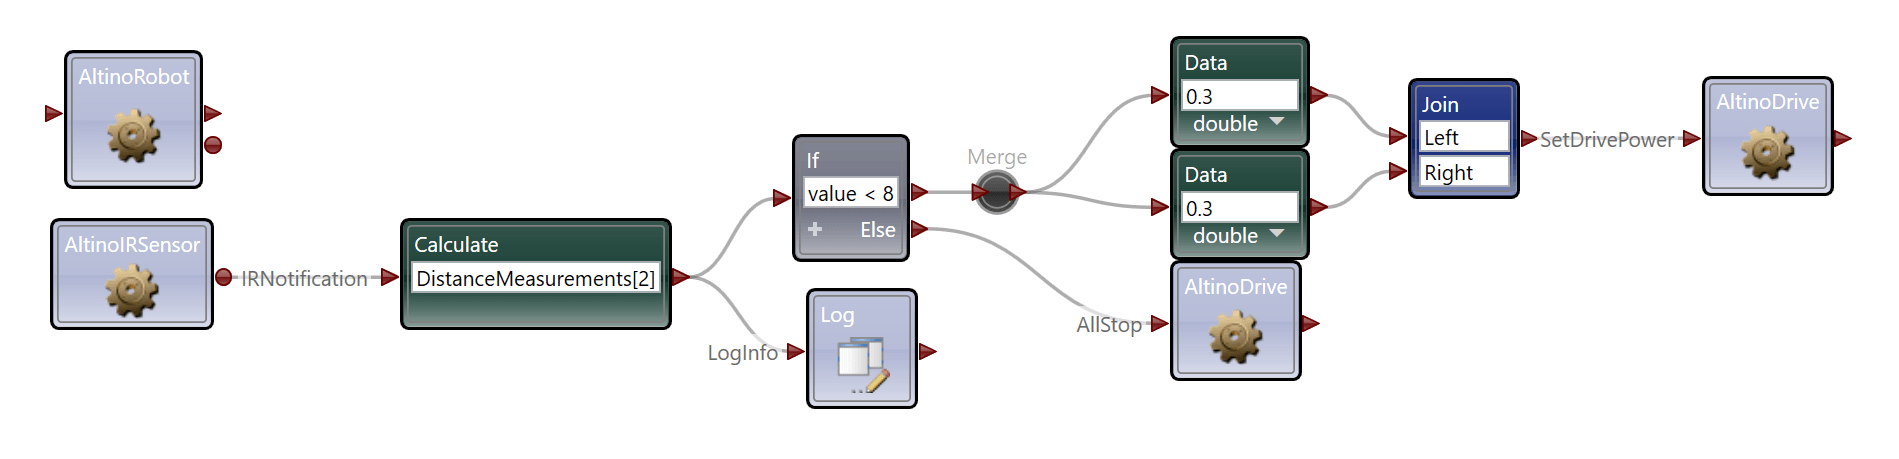
Run this code on a robot (or simulation) for the students to see.
Here is the demo code: Lesson 2 Demo Code
If you’re having trouble, think about these:
What external factors can contribute to how humans react to a potential collision?
The distance to the obstacle
The speed of the vehicles nearby
How well the buman is paying attention
Question 1: And which of these factors can be sensed on the Altino?
The distance to the obstacle
In the last lesson, you were asked to brainstorm what features you might want in an autonomous car. Hopefully one of your features was the ability to stop before running into an obstacle in the road. That feature is commonly called collision avoidance. It’s useful to keep passengers and pedestrians safe when traveling at high speeds, and reduce fender benders and cosmetic damage at low speeds.
How does automatic collision avoidance work? To answer this question, it is helpful first analyze how humans control cars to avoid collisions. Sometimes drivers stop when they hear a horn or an ambulance siren, but most often we stop when we see something in the road blocking our path. We do this with the amazing sensors humans come equipped with called our eyes.
What kind of sensor is the human eye? What can it detect? The human eye does the work of many mechanical sensors. Think of some of the things you can detect with your eye.
Think back to the Services you saw in Lesson 1.
Which one would be most useful for our goal, making collision avoidance for the RobotLAB Autonomous car?
If you’re having trouble, think about this:
What external factors can contribute to how humans react to a potential collision?
- speed limit
- distance
- speed of the cars ahead
Teaching Tips:
Collision Avoidance Algorithm
Recall that an algorithm is a series of specified steps used to solve a problem. What series of steps could work to keep the Altino from running into things?
Put these steps in order
| get DISTANCE from sensor | IF | (distance > some number away) |
| stop | (distance < some number away) | ELSE |
| SWITCH | log distance | drive |
Here is a possible answer that makes logical sense
get DISTANCE from sensor (over and over)
log distance { }
IF (distance > 8 units away)
drive
ELSE
stop
Here is another
get DISTANCE from sensor (over and over)
log distance { }
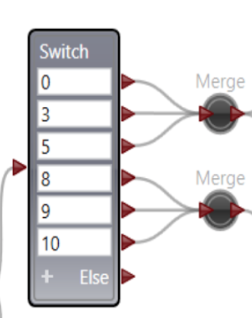
SWITCH
distance = 0 OR distance = 3 OR distance = 5
drive
distance = 8 OR distance = 9 OR distance = 10
stop
Now try combining the activities and services from the last lesson with the IF, WHILE, or FOR loops we just learned.
Choose all that apply:
|
| Question 1: get DISTANCE from sensor (distance < some number away) Connect the IR sensor to the calculate activity to convert the sensor data to a number we can understand |
|
| Question 2:
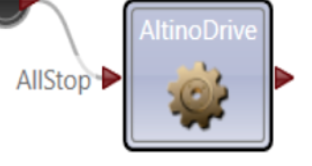
stop Use a SWITCH statement the sensor comes back 0, 3, or 5 { one result } the sensor comes back 8, 9, or 10 { other result } |
|
| Question 3: log distance stop Log the distance at the same time so you can see it pop up in a window. That makes it easier to see how your code is working. |
|
| Question 4:
the sensor comes back 0, 3, or 5 { Set the power to 0.3 on the left and right side so the car drives forward. } |
|
| Question 5:
SWITCH the sensor comes back 8, 9, or 10 { Stop the car } |
Is that starting to make sense?
Try running it on the simulation and see how it works!
Collision Avoidance Algorithm
Recall that an algorithm is a series of specified steps used to solve a problem. What series of steps could work to keep the car from running into things?
Challenge: If there is an obstacle in the way, stop the car before it hits it!
Put these steps in order to complete your pseudocode:
| get DISTANCE from sensor | IF | (distance > some number away) |
| stop | (distance < some number away) | ELSE |
| SWITCH | log distance | drive |
Now try combining the activities and services from the last lesson with the IF, WHILE, or FOR loops we just learned.
Choose all that apply:
|
|
How would you describe the functionality of this code?
|
| |
How would you describe the functionality of this code?
|
| |
How would you describe the functionality of this code?
|
| |
How would you describe the functionality of this code?
|
| |
How would you describe the functionality of this code?
|
Is that starting to make sense?
Try running it on the simulation and see how it works!
Teaching Tips:
The full code is provided here for teachers:
Here is the demo code: Lesson 2 Demo Code
For this lesson, we will go through the code step-by-step.
(You may find it helpful to use this as a template to solve coding problems in the future.)
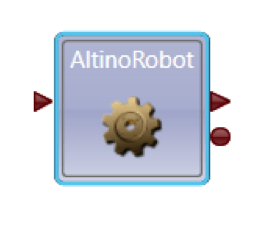
1. Recall the AltinoRobot Service from lesson 0. It is necessary for every program we will create.
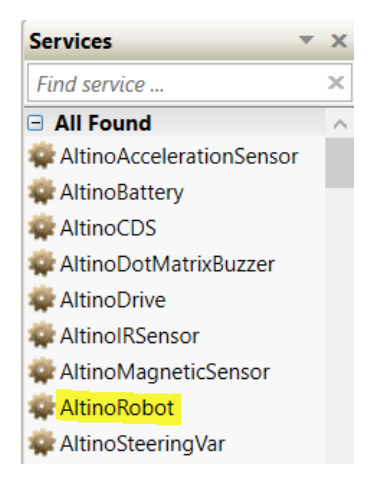
2. Find it in your services toolbox. Double click it and it will appear in your workspace.
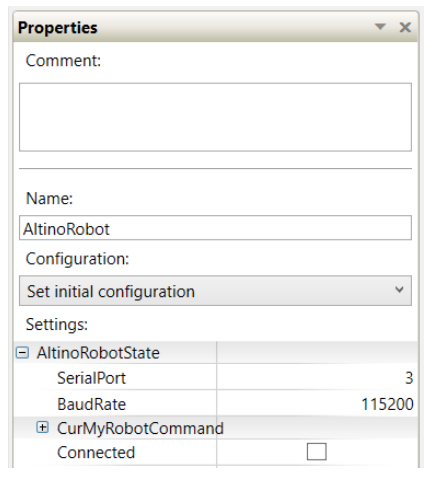
3. Click the block and you will see its properties appear in the Property panel to the right.
| SerialPort | find yours in your bluetooth settings |
| Baudrate | always 115200 |
Feel free to skip this section if you already understand.
4. Now that you have created a connection you can use the other services to control your robot.
Think back to pseudo code you wrote, and the algorithms module to complete this code.
What service do you need for this lesson?
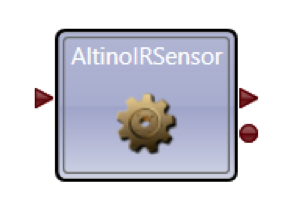
This service can get the distance measurement from any of the car's six distance sensors.
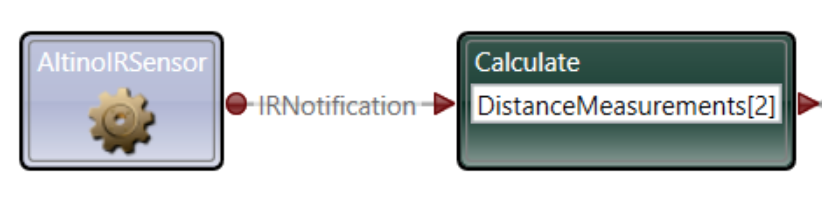
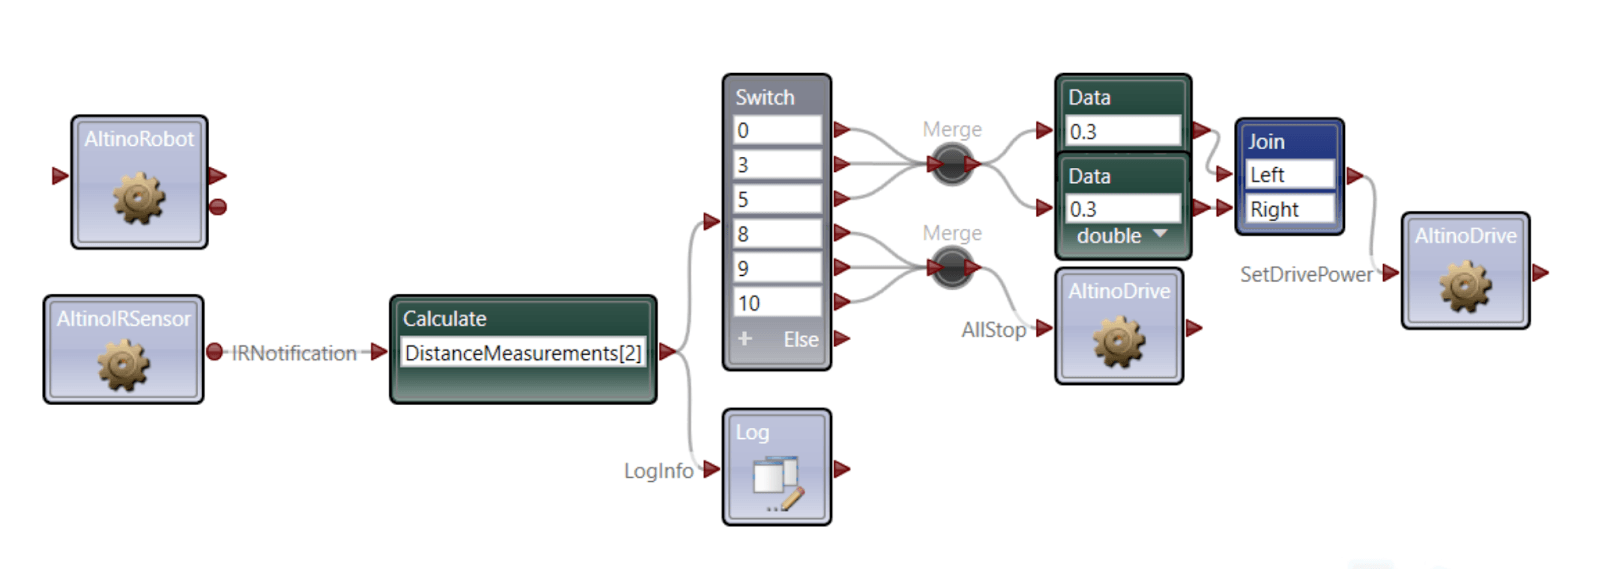
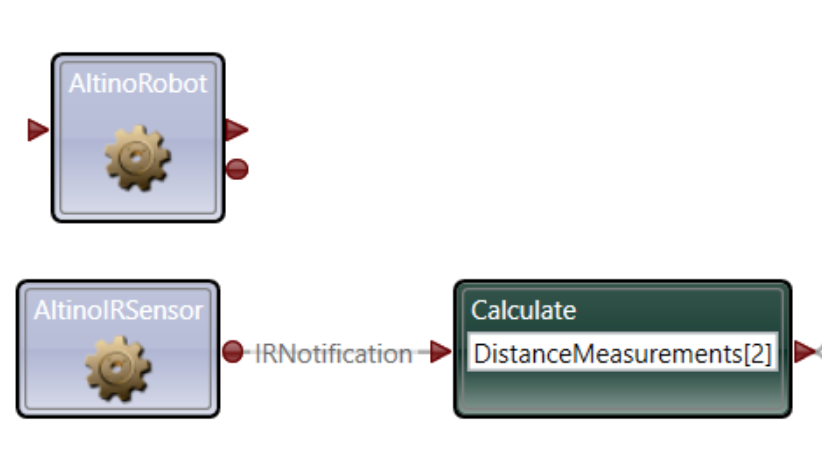
5. To get the distance measurement you need, you have to connect AltinoIR to the Calculate activity then connect the Calculate activity to the Log activity.
Why is that?
The Calculate activity does more than just arithmetic. It can also take an IRNotification from the IRSensor and translate it into a usable number.
The code for that looks like this:
6. A word about the distance sensors
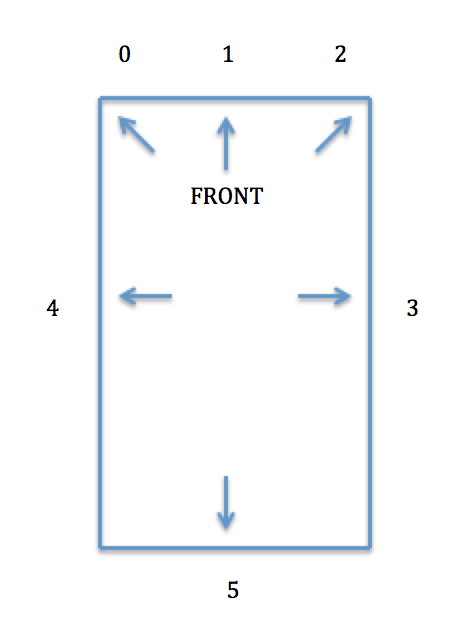
| DistanceMeasurements[0] - front left |
| DistanceMeasurements[1] - front center |
| DistanceMeasurements[2] - front right |
| DistanceMeasurements[3] - right |
| DistanceMeasurements[4] - left |
| DistanceMeasurements[5] - back |
7. Log the result of the Calculate activity and see what happens!
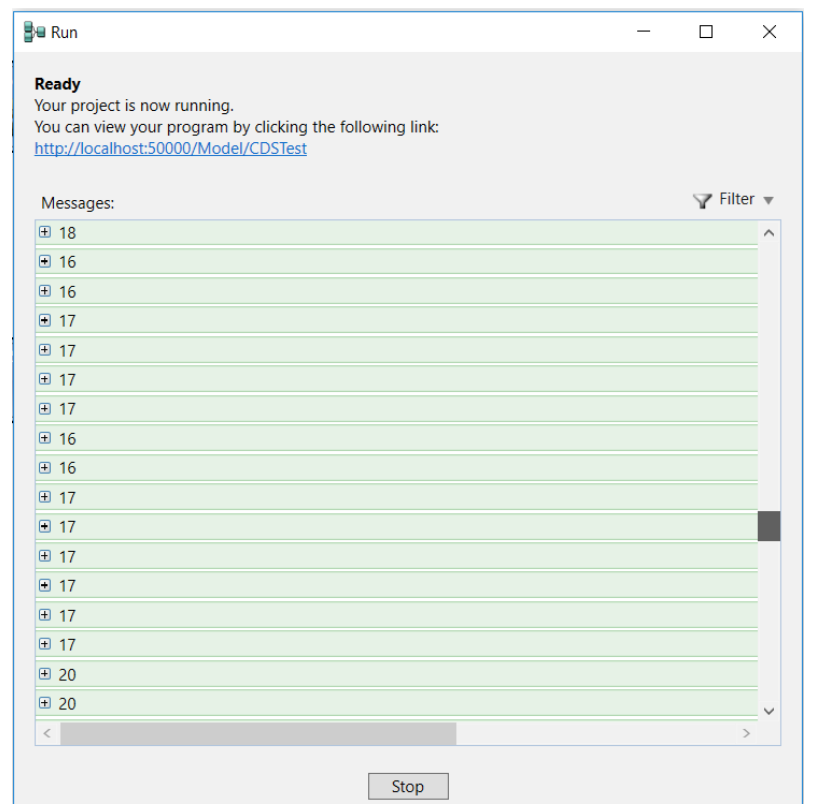

8. Time to do some experimentation! Hold the Altino, run your current program, and watch the Log print the distance measurement. Choose the distance from the wall where you'd like the Altino to stop.
The Altino drives pretty quickly, so you will need to choose a range of numbers in case your exact choice is not logged as it drives.
I chose these numbers. You may choose differently.
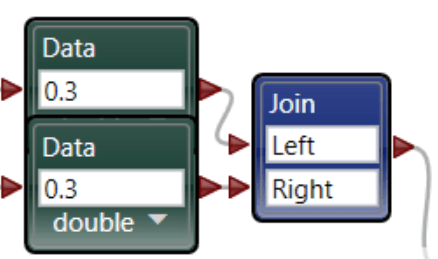
9. Now add this code to the first merge:
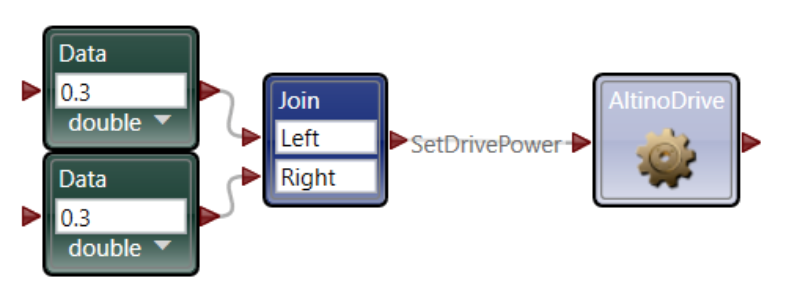
a. The Altino has 10 speeds (0.1 to 1.0)
b. Put the speed you want in the data blocks
c. Left and right represent the left and right sides of the car
d. connect it to AltinoDrive
As you can probably tell, this code makes the Altino drive forward.
In the end, your code will look like this:
Teaching Tips:
Question 1: What was the coolest thing you learned today? Write your answer in the box, and see it appear which your classmates answers!
Discuss answers with students if time permits.
Question 2: Check the concepts you understand. Don’t worry, this isn’t for a grade, it’s just so your teacher can check the classes’ understanding
IR sensor
Calculate
- Switch
Question 3: How do you connect your computer to the car?
1. Turn on the car
2. Use AltinoRobot Service
3. Set Baudrate and port
- IR sensor
- Calculate
- Switch