Lesson Modules
Teaching Tips:
RAISE THE ROOF
Problem of the Day:
"How can I make NAO move his arms to music in unison?"
Vocab:
- Mirroring
Students will be able to...
Make the robot’s arms move in unison and transition it from one action to another.
Content
Students will continue to familiarize themselves with negative numbers. In addition, they will experiment with symmetry and mirror.
Learning Overview:
- Intro: Students will follow NAO in a dance
- Problem Solving: Students will explore how to control the arm motors and use the mirroring feature.
- Creative Time: - Students will use these skills to create their own arm movements
- Reflection: The class will discuss what they learned and show off their creations
Before the Lesson:
Download the Choregraphe files onto your computer
For the intro dance activity, load lesson3_1 choregraphe file onto one of the robots. Leave at least 2 feet on all sides to do his dance. Clear an area for students to gather and watch the NAO. They will be mirroring NAO’s movements, so be sure to leave enough space for them to move! Read the reference sheet for this lesson.
LESSON INTRO
The students should stand arms-distance apart. Play the lesson3_1 choregraphe file and have the students mirror NAO’s movements.
If you don't have a NAO robot, use this video in class view so the students can mirror the dance.
BEFORE THE CLASS
Before you begin, wash your hands. This should be a daily routine because the robots are white and get dirty easily.
OBSERVATION
Teaching Tips:
PROBLEM SOLVING
Student Discovery (5 minutes)
Pose the problem of the day to the students. Then have them fill out the “Make a Plan” section of their student book. This is a complex problem so make sure your students break it down into smaller parts. They need to know how to
- Control the arm angles
- Save arm positions in keyframes
- Make the arms mirror each other
They should do this breakdown independently, with prompting as needed from you and your assistants. Do not worry about how good the breakdown is.
Note: For the Question 3, the students’ answers must be only one word. If there is a space in their answer, the system won't read the answer properly. For example, if the answer is "Animated Say", students should type "AnimatedSay" or "Animated_Say".
Teacher Talk Time (5 minutes)
Walk the students through all the motors in the robot’s arm. Specifically, show them the two rotational directions of the shoulder and elbow. Demonstrate the mirroring feature and the difference between the arms when starting in identical positions vs. different positions. Explain that mirroring is like having a mirror down the center of your body. What one arm does, the other must also do. Additionally, demonstrate how to change perspective in Robot View. Details can be found in the reference sheet.
Solve the Problem (10 minutes)
Have the students work individually on the “Simon Says!” activity. This activity’s purpose is for students to get a feel for how the arm motors work. The students must mimic the picture and record the angles of each motor.

Example Program for transitioning between looped motions.
MAKE A PLAN
Draw a picture of what you want NAO to do.
SIMON SAYS
Click on the virtual NAO’s arms to change the positions. Try to match your virtual NAO to the pictures below. Fill in the motor angle measures, rounding to the nearest integer (whole number).

Teaching Tips:
CREATIVE TIME
Teacher Talk Time (5 minutes)
Show the students what happens if you don’t include a transition box. See the lesson3_2 Choregraphe file for an example. Encourage students to come up with two motions for the arms and transition between them.
Plan (10 minutes)
Have the students fill out the “Your Dance!” section to plan out their dance moves.
Implement (15 minutes)
Students will work on programming their planned movements. They must test their motion on the virtual robot before they are allowed to test it on the real robot. Be sure to sketch the program.
YOUR DANCE
Find the angles of the arm joints that will make the robot "raise the roof".
Action 1:

Transition:

Action 2:

HAVE NAO DANCE!!
When you are ready - it's time to run it on the real robot!
Open Choregraphe. Ask the teacher before connecting and running the real robot.
NAO has six motors in each arm. They are called,
- Shoulder Roll
- Shoulder Pitch
- Elbow Roll
- Elbow Yaw
- Wrist Yaw
- Hand
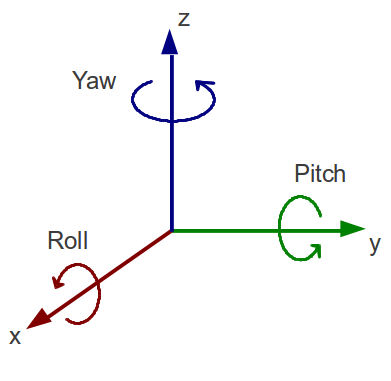
The terms yaw, roll and pitch refer to the orientation of the axis of rotation of each motor. Refer to the diagram on the right or below.

When you click on the arms you might notice that the right and left arms control boxes are mirror images. Additionally, some angle measures are negative of one another. This is because angles are commonly measured so that counterclockwise is the positive direction and clockwise is negative. Play around with the angles to get a feel for the different motions NAO can do.
Teaching Tips:
Reflection (10 minutes)
Have the students fill out the “Reflect” activity. Give them 2 minutes to journal silently. Then have them volunteer their responses to help stem a discussion.
After the Lesson:
- Remind the students to save their Choregraphe files before closing the program.
- Pack up the NAO’s, computers and router.
- Encourage students to review the students' reference sheet.
REFLECT
Answer the following questions. Be honest. Your teacher will use your answers to help plan future lessons.
After the Lesson
- Save your Choregraphe files.
- Help your teacher pack up the NAO robot computers and router with an extreme care.
- Use the reference sheet to review what you have learned today.


