Lesson Modules
Teaching Tips:
The lesson will cover the topic of the cameras of NAO. More specifically we will see how to use the cameras to detect and recognize an object. The first module explains the concept of pixel and the answer to the question can be displayed with CLASS VIEW.
Digital Images and Pixels
You may have used a digital camera and heard of phrases such as “10 megapixels”. What is a megapixel? A megapixel is 1,000,000 pixels. What is a pixel then? ‘Pixel’ stands for picture element. A pixel is the smallest part of an image or screen. In a digital image or photo, a pixel is the smallest area that is a single color. The figure below is taken from the Wikimedia Commons. It shows an image of a computer, with a zoomed-in section of the individual pixels.
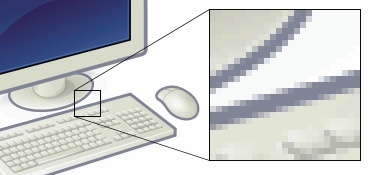
Similarly, a digital photo is composed of pixels. Thus, photos taken by a “10 megapixel” camera have 10 million pixels. Every digital camera has a sensor that converts the light coming in through the lens into digital signals. These digital signals are then used to create the pixels of the image.
The NAO has video cameras that do the same thing. However, the NAO’s camera doesn’t take a single image when a button is pressed. Instead, it takes a video - a continuous stream of images. The NAO’s cameras are capable of a resolution of 1280 pixels by 960 pixels, at a frame rate of 30 frames per second (fps).
Teaching Tips:
The module explains some concepts in computer vision and finishes with a multiple choice question with one good answer.
the answer is Edges and texture
Computer Vision
From a single digital image, we humans are able to identify the objects within it. For example, when presented with a picture of a beach, we can readily say that it shows a beach. We can also point out the sand, sea, clouds, and trees in the image.
For a computer, this task, known as computer vision, is not easy at all. Firstly, the image is entirely made up of pixels. This means that all the computer has are a series of numbers that represent the colors of each pixel. Given an image of a cup on a table, it is hard for the computer to tell that one pixel is part of the cup while the next pixel is the table. Also, the computer must have some concept of “cup” and “table” in its memory. As humans, we have a large memory, or database, of objects that we know and have interacted with. This database helps us to identify objects just from a quick, small view of it.
In computer vision, the algorithm first finds features in the image. Features are distinguishing parts of an image that aid the computer vision algorithm in deciding what object is present. Typical features include edges and texture. Edges occur because objects tend to look different from the background. Some objects tend to have uniform textures. Another feature that usually comes to mind is color. However, it is difficult for an algorithm to use color as a feature. This is because the same color looks very different under various lighting conditions. In most situations, our eyes are capable of adjusting for the color of the light source so we can tell if an object is red, but computers are unable to do so robustly.
Another aspect of features used in computer vision is that a feature should be scale-invariant. Invariant means “never changing”. So, a scale-invariant feature means that the same feature is detected regardless of how big or how small the object is in the image. A common feature set used in computer vision is the scale-invariant feature transform (SIFT) feature set. We will not describe the details of what SIFT features are. The main idea is that these features are extracted from an image. They are then used to detect the objects in the image. One method is to have a database of images that are labeled. Given a new image, the features of the new image are compared to the features of images in the database. The object in the database with the closest features is then chosen. For example, suppose there is an image of a cup with SIFT features A, B and C. If the new image also has SIFT features A, B and C, then it is likely that the new image is an image of a cup.
- Edges and colors
- Colors and textures
- Edges and textures
- None of the above
Teaching Tips:
This module will use NAO marks as an identifiable pattern for the NAO robot. You can download a set here.
For this class, you will need to print few of them to distribute to students when they test their code with the NAO.
The code for this module can be downloaded here.
Basic Task: NAOMark-Controlled Robot
In this exercise, we will be using the NAO to perform computer vision. NAOMarks are circular designs that look like the figure below:

Choregraphe comes with an automated algorithm that detects these NAOMarks. The program returns their identification number, which is located on the top left of each card. The algorithm detects the unique shape of the NAOMarks, and divides them up based on the sizes of the white and blue regions within the mark.
We will be using these NAOMarks as input to control the NAO’s actions. In the earlier modules, we created a voice-controlled robot. In this exercise, we will build a robot that walks based on visual cues.
1. Create a NAOMark box from the Vision category, and connect it as shown below. 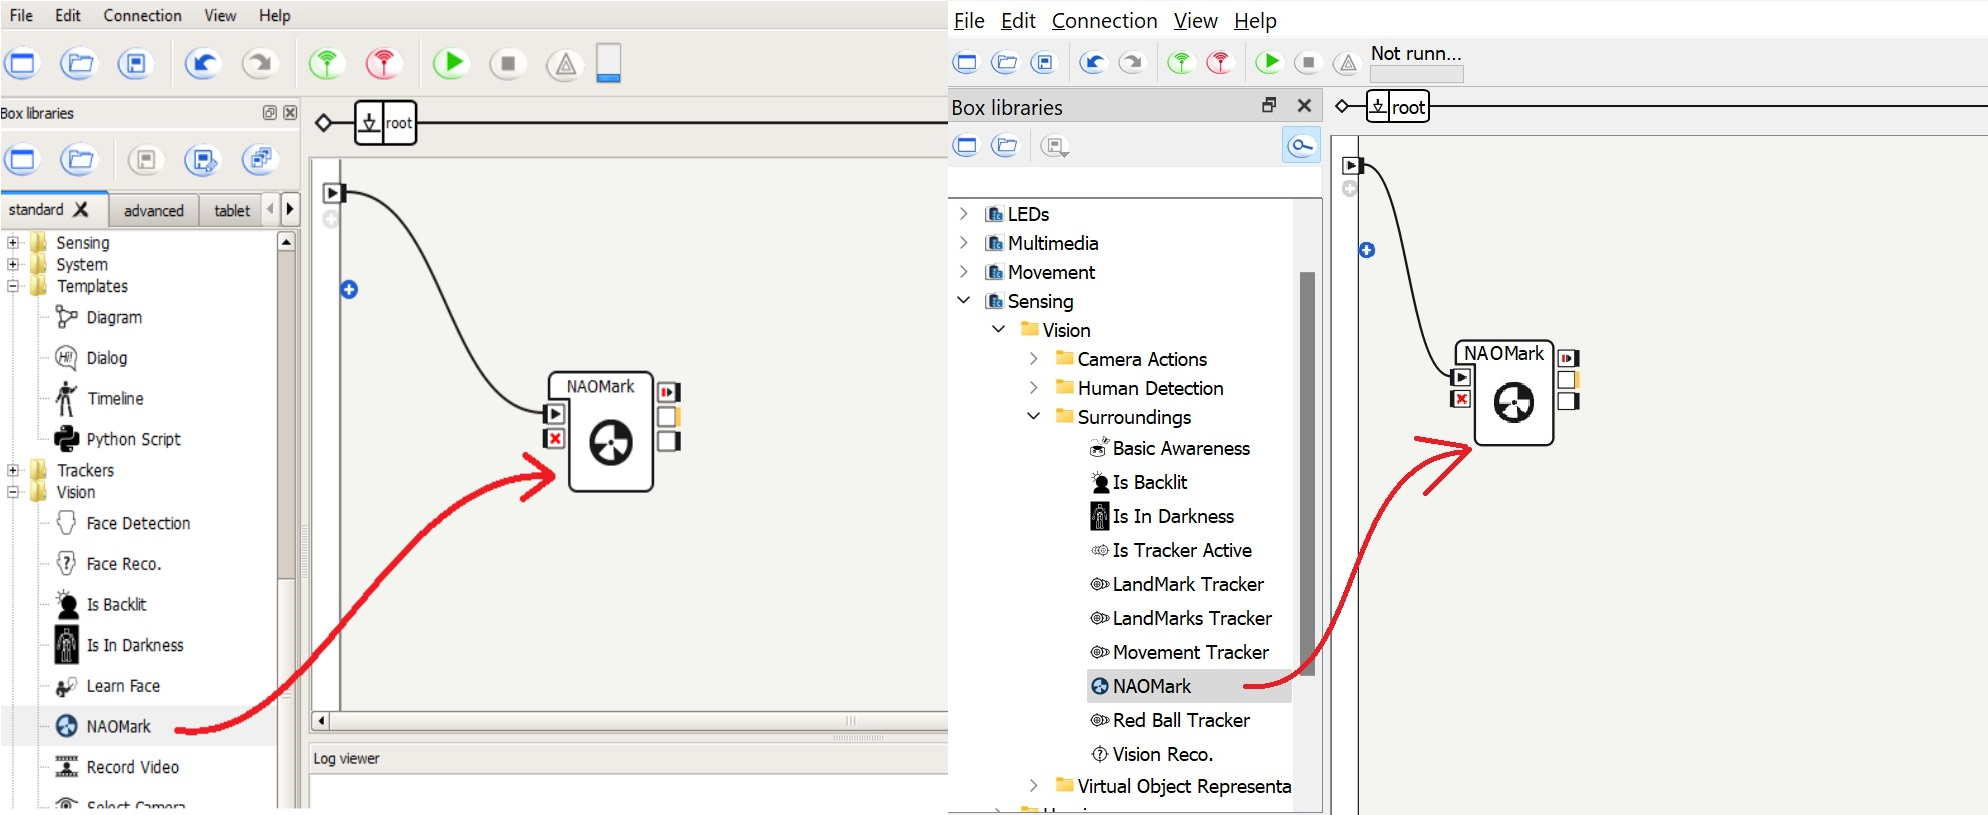
2. Try running the behavior as is. Print out 3 NAOMarks, and show it to the robot. You should see the NAOMark number appear in the middle-right box of the NAOMark box in Choregraphe.
3. Using a switch case make the NAO robot go to three different directions as a response to the NAO marks detected.
Teaching Tips:
This module will go over Object Recognition. In order to teach an object to the robot students need access to the real robot.
You can download the code for this module here.
The first 10 steps are guided to show how to teach object and store them on NAO. The rest of the code to use the database and the vision recognition and make the robot do things is for the students to create.
The steps can be seen under CLASS VIEW and shown to the class.
Intermediate Task: Object Recognition
In the previous exercise, we detected NAOMarks with an algorithm in-built into Choregraphe. In this exercise, we will explore defining and detecting general images.
1. First, we need to create a library of known objects for the NAO. To do so, connect to the robot in Choregraphe, and then click View -> Video Monitor in the top menu bar. The window below should pop up. Click the New Vision Recognition Database button if it is not grayed out.

2. Click the play button in the Video Monitor (not the “play behavior” button in the Choregraphe toolbar, although it looks the same), and you should see a video stream from the NAO. Move your hand in front of the NAO’s face and ensure that you are streaming the video correctly. The NAO has two cameras, so check both of them to see which camera the NAO is using. You can switch the cameras using the Select Camera box under the Vision category. 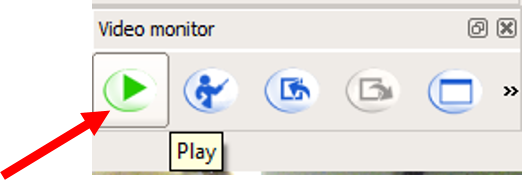
3. Now, place the object you want the NAO to learn in front of the camera, and click the learn button. A countdown will appear on the Video Monitor, after which a single image will be paused and shown in the window.
Hint: For this exercise, we recommend using a flat object with pictures, such as the NAO DVD sleeve that is included in the NAO package. Other alternatives could be the cover of a book, or a page from the newspaper. 
4. You can now click on the border of the object to trace its outline. To end the trace, click on the first point of the border again. The features of the object will then be extracted within this outline and saved. 
5. Enter a name for the object, and the features will be associated with this object in the local Choregraphe database. 
6. If you want to learn more objects, you can repeat steps 2 to 5.
7. Before we can do object recognition on the NAO, we need to send it the database of objects that we have created. Click the right-most button to send current vision recognition database to NAO. 
8. Now that the NAO has a database of objects and their features, we can perform object recognition in Choregraphe. To do so, drag a Vision Reco box under the Vision category. 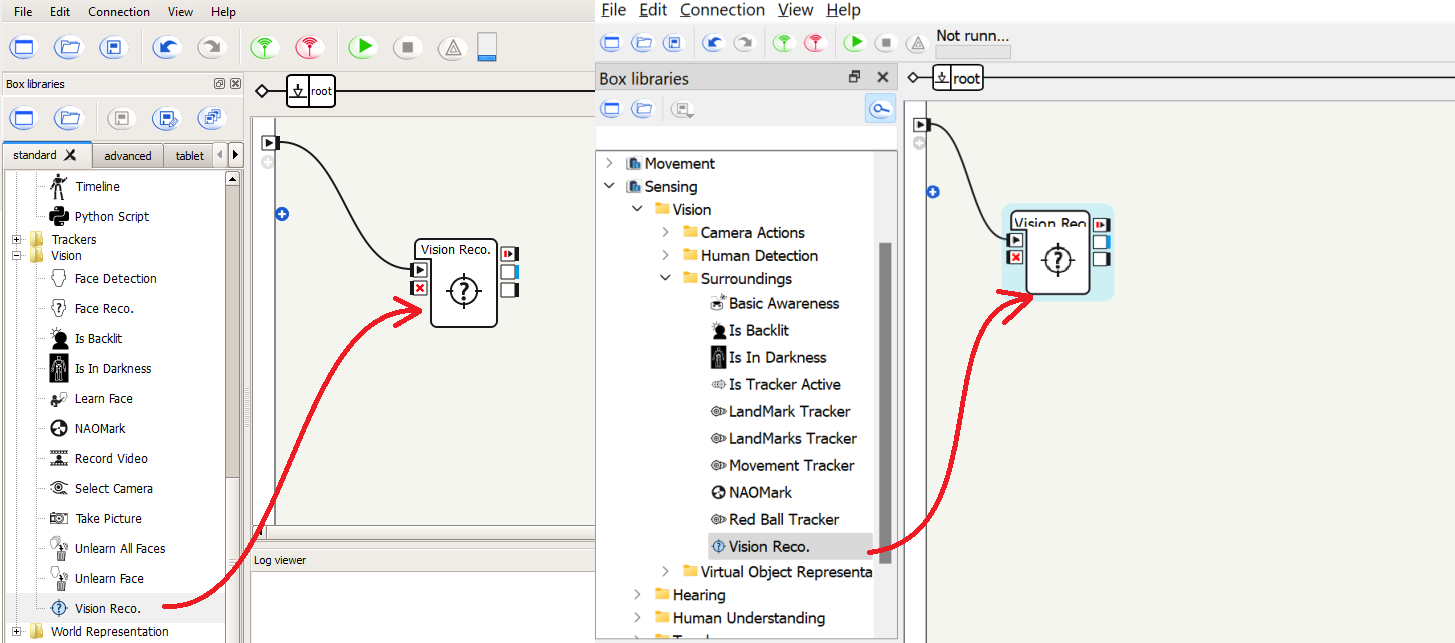
9. Start the behavior, and place the object in the NAO’s camera view. Ensure that the object gets detected, and the Vision Reco box returns the object’s name in its output box. If the object does not get detected, repeat the steps above to create a new database and send it to the NAO. 
10. We will now use the Vision Reco box to have the NAO walk until it sees an object that it recognizes, and is touched on the head. We will use a Move Toward box, from the Motions category, and a Tactile Head box from the Sensors category.
You need to create such a behavior. and run it.
Teaching Tips:
In this module, the students are creating a python code to make the NAO walk when he detected a certain object no matter which side despite multiple sides being stored.
The code for this module can be downloaded here.
Python concept of the module:
We have and if loop embedded in a function!
As you can see, the function takes in two arguments: “p” (the object your robot is looking to recognize) and “self”. Self-comes up a lot in Python, so it’s important to know what it means and what it does.
“Self” is a keyword that references the instance of a class. When we use “self” as one of the inputs in the function we are making sure that all the attributes (things that have been defined) and methods (functions that “belong to” an object) are accessible to us.
Advanced Task: Walk to an Object
We made the NAO perform object recognition on a flat object like a DVD sleeve in the previous exercise. However, many objects in our environment have complex shapes, and look different from different perspectives. For example, a mug looks different when you look at it from the side compared to looking at it from above. A book looks different depending on which page it is open to.
1. For this exercise, we will use a complex object such as a book or a brochure, that either can change its shape (like opening a book) or has a complex shape (like a mug).
Hint: use an object with multiple colors or a complex texture.
2. Create a new vision recognition database in Choregraphe (refer to step 1 of the previous exercise).
3. Repeat steps 2-5 of the previous exercise to save different images of the object. However, besides giving the object the same name, also fill in the field on the page of the book, or side of the object 

4. Drag out a Vision Reco box, and run the behavior. Ensure that the object can be detected from different distances and angles.
5. Create a custom Python box and connect it to the output of the Vision Reco box. Change the input type of the Python box to be String, instead of “Bang”. 
6. Connect the outputs of the Vision Reco box to the Python box, such that onStart is triggered when an object is detected, and the x is triggered when no object is detected. 
7. When the object is detected, the Vision Reco box returns the name of the object as well as the side/page. For example, page 1 of the book would be returned as a string “book 1”, and page 2 would be “book 2”. For the purposes of this exercise, we don’t distinguish between the pages and sides and only care that the book was detected. However, we do care that the book was detected and not the mug, if there are multiple objects in the database.
To do so, we can check that the input starts with the name of the object, e.g., “book 1” and “book 2” both start with “book”.
8.Create a python code to implement this feature.
9. Run the behavior. Place the object within the camera view of the NAO, and it should walk towards it. Once the NAO is close to the object, it will be outside the camera’s field-of-view and not be seen by the NAO. As such, it will not be detected and the NAO will no longer walk forward.
Warning: be careful that the NAO does not walk over the object. It may cause damage to the object, the NAO, or both.
Teaching Tips:
- Use one NAOMark to start the NAO turning in one direction, and another NAOMark to stop its motion. This will allow you to use visual landmarks to direct the NAO’s motions.
- Use Python to do the same behavior as above. You will still have to use the NAOMark box to detect the NAOMarks.
- Use the Switch Case box and enumerate all the sides/pages of the 3D object of the Advanced Task, in order to have the NAO walk to an object, without using Python.
- Using Python, have the NAO search for the object with its head when it doesn’t detect an object. Once it sees the object, use the HeadYaw angles of the head to determine which direction to turn and walk. For example, if head is pointed to the left, then the NAO should turn to the left and then walk forward.
Teaching Tips:
Solutions
Basic:
1. What is a pixel?
2. What does a NAOMark box in Choregraphe do?
Intermediate:
1. How does object recognition work?
3. When learning a complex object, why do we need to provide many different images of the object?
Advanced:
1. How do we use Python to determine if a string starts with a prefix, e.g., how do we check that a variable called mystr starts with “Abc”?
2. In the Advanced Task, why does the robot stop walking once it reaches the object?
Questions
Basic:
Intermediate:
Advanced:
