Lesson Modules
Teaching Tips:
In this lesson, the programming concepts will be taught by creating a behavior ( a code for the NAO). We will make the robot ask us a question and respond in multiple ways based on our answer.
With a computational thinking approach, we will understand the main steps needed for a conversation to happen and how to program these steps.
The three steps of a conversation between two persons or between a person and a robot are:
Step 1. Person 1 or robot starts talking and asks a simple question.
Step 2: Person 2 or robot needs to understand the question
Step 3: Person 2 or robot answers.
After the conversation steps, there is a 4th step, which is an action based on the answer. This 4th step could be repeating steps 1 to 3.
A way to get the students to get to this conclusion is by the following activity :
Step 1:
Let's take few minutes to turn to your neighbor and start a simple discussion.
Ask them: their name, where they come from and what do they do?
Step 2:
What are the main components of the simple discussion you had?
Describe it in words.
Can you categorize it?
Discussion
One of the most common ways for people to communicate is talking to each other. Today we want to create a program so we can talk to the robot!
First, we need to understand what a conversation is.
Teaching Tips:
The goal of this module is to teach about the difference in Choregraphe between two types of inputs and outputs:
You can download here the code needed for this module.
- A box output of type string ( blue colored)
- A box output of type bang ( black colored)
As a reminder, a box in Choregraphe is equivalent to a function in programming.
A function is simply a named section of a program that performs a specific task. It is characterized by its input, output, and parameters.
The inputs, outputs, and parameters can be of different types.
A type example is a string which is any finite sequence of characters (i.e., letters, numbers, symbols and punctuation marks).
to guide the students through the process follow the steps:
Step 1 :
Have the students look at the box in the program below.
What do you notice? (Hint: Look at the inputs and outputs).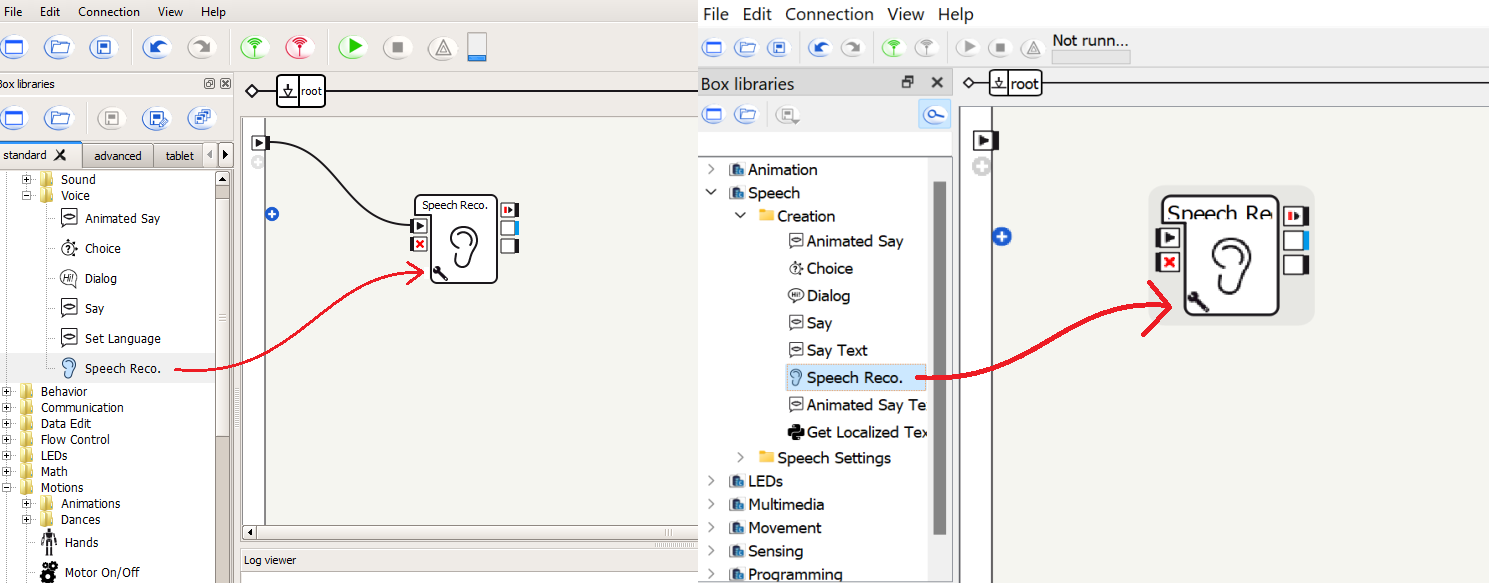
Step 2:
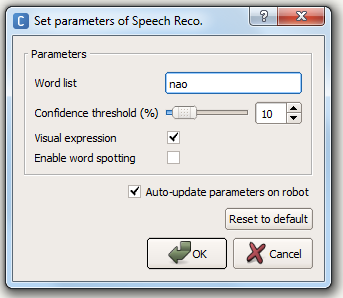
Describe the parameters we revealed by clicking the wrench.
What do you think their role is?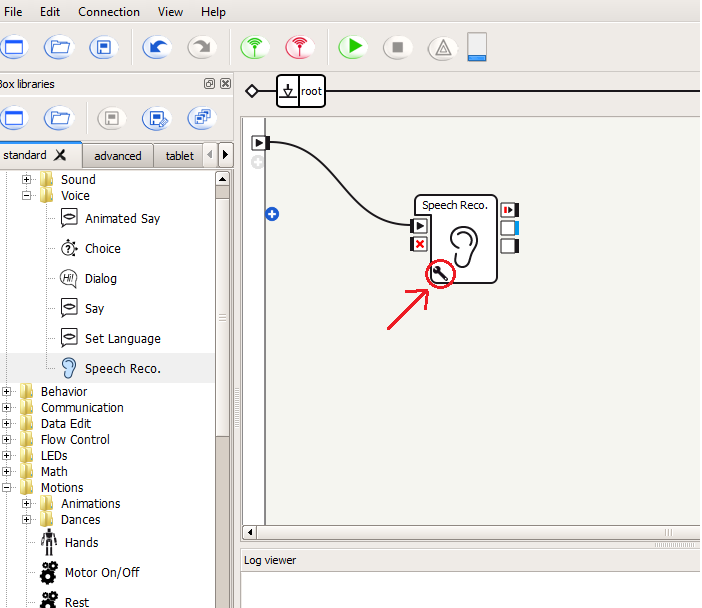
The step of a discussion which requires the robot to listen and understand is achieved with a Choregraphe box named: Speech Reco.
How does this box work?
Let's explore, look at the board and the box that is shown and identify the following:
- Inputs
- Outputs
- Parameters
Teaching Tips:
This module talks about conditional statement If.
It is the way to branch out a program based on input from the user or conditions in the program.
Tip: you can ask the students to define the word condition.
Then form this definition ask them what could be a condition in their life ( example, if I don't wake up on time I will be late).
Can they think of a conditional statement for the robot?
Teaching Tips:
You can download the code for this module here.
The step by step can be show using CLASS VIEW
Make the robot distinguish multiple names or words.
In this next exercise, we will program the robot to listen for different names and respond differently after hearing each one.
Open Choregraphe and look into the box library for Speech Reco drag it to the workspace.
Explore by clicking on the wrench to configure a word list.
Set the word list to “nao;r 2 d 2;c 3 p o”. The semicolons separate different words in the library. Do not forget to add the spaces. Once again, set the threshold to 10%.
Next, add a Switch Case box. This is found in the list of flow control tools.
Change the predefined inputs of the Switch Case box to match the words in the speech recognition library. You need to add quotation marks around each word to indicate that it is a string, e.g., “nao”. Note also that the capitalization should be the same as in the speech recognition library—the strings must match exactly. When a word in the speech recognition library is heard, the Speech Recognition box sends that word to the Switch Case box.
Now add four Say boxes, and connect the boxes in order for each say to be triggered by the right word.
Add relevant messages to the Say boxes.
Find a way to stop the robot listening function when a word is passed by the speech recognition box.
Press play and try saying the different names.
You may notice that the speech recognition is not perfect. For example, the robot may hear “c 3 p o” when you said “r 2 d 2”. Or, the robot may not understand what you said, even though you said “nao”. The level of recognition can be adjusted via the threshold in the Speech Recognition box.
Recall that we set the threshold to 10% in the Speech Recognition box. This means that the robot has to only be 10% sure of what it hears to recognize the word. Why not set the threshold to a much higher number like 90% then? If the threshold is too high, then the robot may not understand the words you say because it is unsure.
Try changing the value of the threshold, to get a better idea of what it does and how it affects the speech recognition. What value works best?
Teaching Tips:
You can find the code for this module here.
This module will use python to create a box that captures whichever name is said by a user.
Let the student explore and try by themselves. A step by step guide can be shared with CLASS VIEW and here :
Advanced Task: Self-Introductions
In this exercise, we will create a box using Python that introduces the NAO based on whichever name a human says.
1. Create a Speech Recognition box and connect it to the start arrow 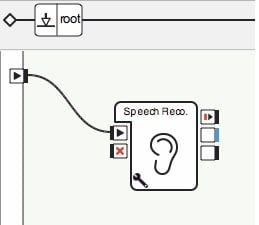
2. Set the word list and threshold as in the previous exercises.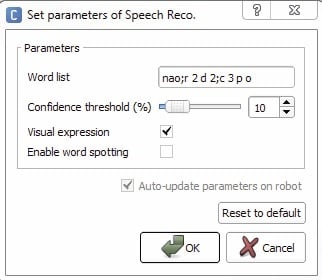
3. (Right click, choose “Add a New Box”) and select a python box. Choose an appropriate name (for example- Speech box), tooltip and image. In the Inputs / Outputs / Parameters section, click the center button to the right of “Inputs: onStart”, the first line. This allows us to set the properties of the onStart input. 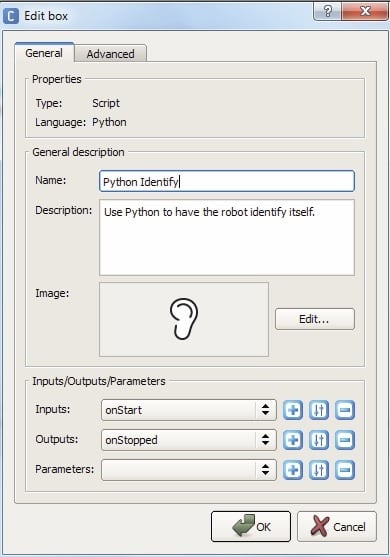
4. A dialog box appears. Change the type to string, and click OK. This makes the input to the box take a string (a sequence of characters). 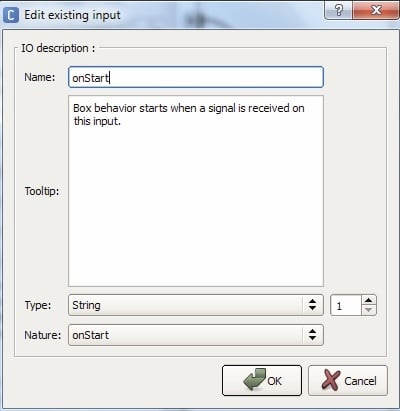
5. The Speech Recognition box outputs a string, the word that has been recognized. Now we can link the two boxes together since the onStart input accepts a string.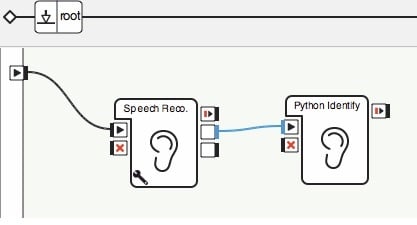
6. Double-click on the new box to edit the Python source code. Add the following two lines to the onInput_onStart method.
ttsProxy = ALProxy(“ALTextToSpeech”)
ttsProxy.say(“Hello, I am ” + p)
In the earlier exercises, we created an ALTextToSpeech proxy and called the say method. What’s new is the addition of “Hello, I am ” + p. This is called string concatenation or appending two strings together. The p is a parameter to the onInput_onStart function. This parameter is set to the value arriving at the onStart input, in this case, sent by the Speech Recognition box.
For example, if the Speech Recognition box heard “nao”, then the expression
“Hello, I am ” + p would evaluate to “Hello, I am nao”.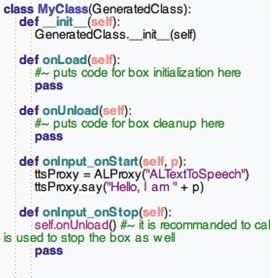
7. Next, add a Say box which says “I did not understand,” and connect it to the bottom output of the Speech Recognition box. Link the two bottom right outputs of the Speech Recognition box to the X mark on the same box, as we have done before. 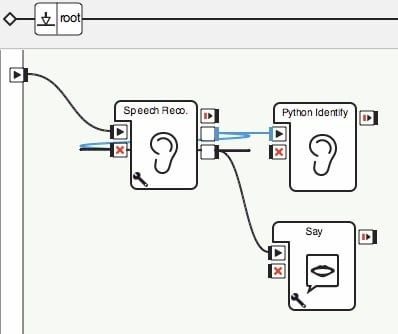
8. Hit play and try speaking the different names.
Advanced Task: Self-Introductions
In this exercise, we will create a box using Python that introduces the NAO based on whichever name a human says.
1. Drag and drop a Speech Reco box, click the wrench and insert the following words:“nao;r 2 d 2;c 3 p o”
2. (Right click, choose “Add a New Box”) and select a python box. Choose an appropriate name (for example- Speech box), tooltip and image. In the Inputs / Outputs / Parameters section, click the center button to the right of “Inputs: onStart”, the first line. This allows us to set the properties of the onStart input. 
3. A dialog box appears. Change the type to string, and click OK. This makes the input to the box take a string (a sequence of characters). 
4. The Speech Recognition box outputs a string, the word that has been recognized. Now we can link the two boxes together since the onStart input accepts a string.
5. Double-click on the new box to edit the Python source code.
hint: You need a function that will make the robot speak and a way to get the string from the input.
6. Next, you need to add a way for the robot to communicate when he doesn't understand.
7. Hit play and try speaking the different names.
Teaching Tips:
You can find the code for this module here.
In this module we want the students to understand what this code will be doing :
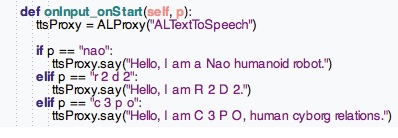
The if statement checks if the following condition is satisfied, and if so, executes the code after the colon. The p == “nao” condition is satisfied if and only if the string p is “nao”. The two elifs (short for “else if”) are the same as the if statement, except they are executed only if the previous if statement was not satisfied (this is the “else” part). So, this code speaks a specific message based on the output of the speech recognition box.
Advanced Task: Specialized Introductions with if Statements
Until now, we have always executed the same code in each program. But we can also use conditionals to execute code only if some condition is satisfied. We will modify the previous exercise to give specialized greetings for each robot name.
- Begin with the result of the previous exercise.
- Double click on the custom box to edit the Python source code.
4. Run the program and try speaking the different names.
Teaching Tips:
Additional Exercises
- Have the NAO ask “How are you?” Depending on what you say, the NAO should reply “That’s good to hear” or “I hope your day gets better!”
- Create a chain of interactions with the NAO, where it first asks if you like cake or pie. If you like cake, it asks if you like chocolate cake or cheesecake. If you like pie, the NAO asks if you like apple pie or pumpkin pie. Finally, depending on the type of cake or pie you like, the NAO will say something appropriate and relevant, such as “I like chocolate cake too, especially with whipped cream on top.”
- Create a voice-controlled robot, where you can tell the NAO to walk forward, turn left or turn right, and the NAO executes the action you said.
- Write a Python script to execute the actions in the exercise above.
Teaching Tips:
Solutions
Basic
- What hardware devices does the robot use for speech recognition?
Microphones in its head.
- What is a conditional statement?
Depending on the value of a true / false condition, a segment of code is or is not executed.
- What is the threshold for speech recognition with NAO? What value did you find to work well?
The threshold is how confident the NAO must be to claim it recognized speech. Lower values are more tolerant.
- Where is the Speech Recognition box found?
In the Audio -> Voice section of the box list.
- Explain the three parameters of the Speech Recognition box.
The word list is the set of words the NAO attempts to listen for. The threshold is how confident the NAO must be to decide it recognized speech. The Visual Expression checkbox enables setting the lights to indicate it is listening or heard a word.
- Explain the two outputs of the Speech Recognition box.
The top output is triggered when a word is recognized with that word. The bottom output is triggered if speech is heard but no word is recognized from the word list.
Intermediate
7. Which conditional box is used to control program flow from multiple answers?
The Switch Case box.
8. What punctuation is used to distinguish strings, in both Choregraphe and Python?
Quotes, double “ or single ‘.
Advanced
9. What module is utilized in TextToSpeech (the parameter to ALProxy)?
- ALTextToSpeech.
10. Define string concatenation.
- Appending two strings together. For example, “Hello “ + “NAO.” gives “Hello NAO.”
11. What are the differences between inputs and parameters of Choregraphe boxes?
- Parameters can be set by clicking on the wrench, inputs must be sent from another box. Additionally, parameters are values which can be set in advance.
12. What is the syntax in Python for a chain of conditional statements?
if condition_1:
…
elif condition_2:
…
else:
…
Questions
Basic
Intermediate
Advanced

