Lesson Modules
Teaching Tips:
Lesson Plan:
Cartesian Coordinate Plane
Objective:
In this lesson, students will learn:
- How to make the NAO walk using Choregraphe
- The (x, y) coordinate plane of the NAO
- How to convert an (x, y) coordinate into an angle to turn, and a distance to walk (polar coordinates)
- How to make the NAO turn and walk to an (x, y) point using Choregraphe
- How to use Python to program the NAO to walk.
- How to use Python to program the NAO to calculate the angle to turn and distance to walk, and then actuate the robot to walk to that point.
Materials:
Index cards with coordinates
Masking tape
Example of a coordinate plane (transparency, on chalkboard, LCD projector)
Vocabulary:
Abscissa, axes, coordinate, coordinate plane, ordinate, ordered pair, origin, quadrant, x-axis, y-axis
Procedure:
- Set up classroom as a coordinate plane. Use masking tape to make an x-axis and y-axis. Put desks in rows over the axes, making sure one of the desks is on the origin.
- Make a card for each desk with the correct ordered pair.
- Class discussion of the Cartesian coordinate system. Many students have already been exposed to the coordinate plane. Use their prior knowledge to create an example of a coordinate plane, and label all parts. As plane is created, students should copy example in their notes, as teacher creates it on the board, transparency, or computer.
- Ask students such questions as
- Who is sitting at the origin?
- Who is on the x-axis?
- Who is on the y-axis?
- Who is in Quadrant I?
Students could also be asked to stand if at origin, on x-axis, etc.
- After reviewing all key vocabulary, have students stand along wall and give each an index card. One by one have students find their new location starting at the origin. Students need to walk along x-axis, then y-axis to find seat. Discuss any problems that arise, such as two students at one seat.
- Students can move back to original seats after everyone is seated.
- Students then should be called on to give coordinates of their original seat.
- Discussion for later class: Was there a shorter walk to the new desk? How would you direct someone to the desk without giving coordinates (assuming you could walk through desks)?
Assignment/Extension:
- Assign a worksheet or book problems that has students label missing parts of the coordinate plane, plot coordinates, and name coordinates.
- Use graphing software, such as Geometer’s Sketchpad, to plot and name coordinates. This could be done as a group activity, or individually on computers.
- Have students visit graphing websites and practice skills or see more examples. Some examples are
//www.purplemath.com/modules/plane.htm
//www.wisc-online.com/Objects/ViewObject.aspx?ID=ABM201
//mathforum.org/cgraph/cplane/pexample.html
The (x, y) Coordinate Plane of the NAO
You may have learned about the (x, y) coordinate plane, and plotting points in the coordinate plane. The NAO also uses the (x, y) plane to refer to places! The figures below show the NAO’s coordinate frame. The figure on the left shows the (x, y) coordinate plane, when viewing the NAO from above. The figure on the right shows the same coordinate frame in 3 dimensions.
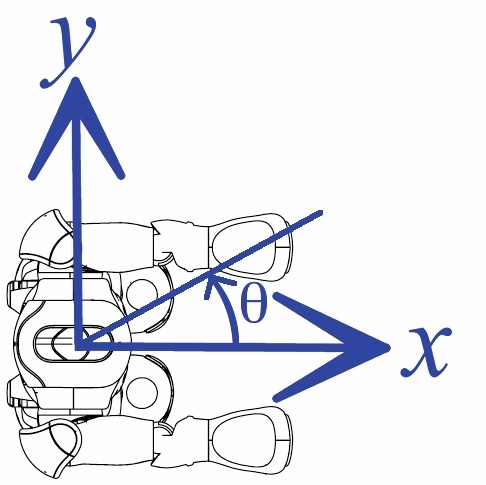
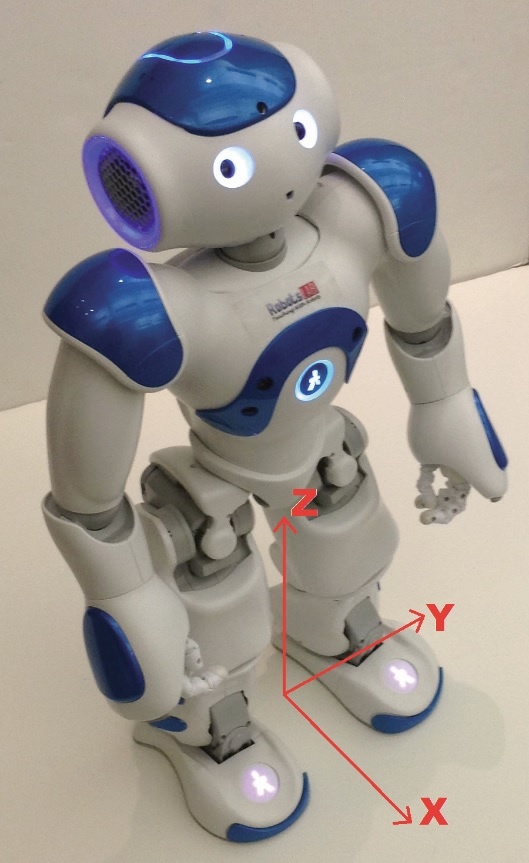
The x-axis of the NAO points forward, and the y-axis points to the left of the robot. The z-axis, which is perpendicular to both the x- and y-axes, points up.
The units of the NAO’s (x, y) coordinate plane are meters. So, for example, (1, 2) refers to a point 1 meter in front of the NAO, and 2 meters to its left.
In addition to points in the (x, y) coordinate plane, angles are also defined. An angle is measured counterclockwise from the x-axis, as shown by theta in the figure above on the left.
Teaching Tips:
The Choregraphe file to download can be found here.
The step by step guideline on how to make the robot walk with Choregraphe is under the CLASS VIEW tab.
Basic Task: March Forward
Your task is to make the NAO stand up, walk forward, and sit down.
1. Make sure the NAO is in a stable position. Turn the NAO on and connect to it with Choregraphe.
2. Go to the box library and get from the there the relevant boxes to accomplish the task.
Teaching Tips:
The Choregraphe file to download can be found here.
The step by step guideline on how to make the robot walk with Choregraphe is under the CLASS VIEW tab.
Intermediate Task: Walk to a Point
In addition to walking forwards, the NAO can turn in place. In fact, the NAO has an omnidirectional walk that can move in any direction – forward, sideways, backward, or diagonally. But first, we will learn how to turn.
Use the Box library in Choregraphe to find the box to use to make the NAO robot move and turn.
Once you played the behavior on the virtual robot, when you have access to the real robot experiment with the following:
1. Consider the floor as a Cartesian plane. The origin is between the NAO’s feet, the x-axis is in the forward direction, and the positive y-axis is to the robot’s left. Pick some coordinate on the floor, such as 1 meter forward and 0.5 meters to the left.
2. Using trigonometry, compute what angle the robot should turn and how far it should walk to reach this position. Set these values in the two Move To boxes.
3. Run the program again on the NAO. See that it goes where you asked.
4. In robotics, the estimated change in position of a robot measured from sensors is called its odometry. Using a ruler or tape measure, measure the exact position where the robot ended up.
This difference is called odometry error.
Much of the difficulty in programming robots as opposed to computers comes from the need to handle errors and noise such as this.
Teaching Tips:
The Choregraphe file to download can be found here
The step by step guideline on how to make the robot walk with Choregraphe is under the CLASS VIEW tab.
Advanced Task: Walk to a Point with Python
Next, we will learn to walk to a point using Python. Python is more expressive than chains of Choregraphe boxes, and allows us to do things like compute the trigonometric calculations that we did manually on the robot.
1. First, create your own box (right click on workspace, “Create a New Box”). Set a name, description and image, and click OK. Chain together a Stand Up Box with your new box as shown below.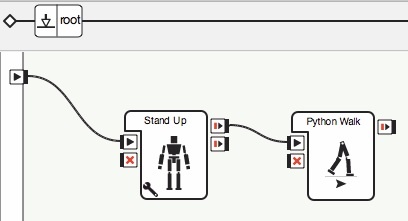
2. Double click on your custom box to open the script editor.
3. Enter the line of codes in the onInput_onStart method to call the proper API to make the robot walk.
4. Turn stiffness on and click play. The simulated robot should walk forward.
5. (Optional) Try other combinations of parameters to the moveTo method, and observe what happens.
Teaching Tips:
The Choregraphe file to download can be found here.
The step by step guideline on how to make the robot walk with Choregraphe is under the CLASS VIEW tab.
Advanced Task: Turn and Walk to a Point with Python
Now, we will implement our behavior to turn and then walk forward to a point using Python.
1. Create a new Choregraphe box, with appropriate name and picture
2. Our box will have two parameters: the x and y coordinates on the Cartesian plane that the robot should walk to. Click the plus button on the line that says “Parameters” to add a new parameter.
4. A dialog box will appear. Set the parameter’s name to “x”, enter a description, set it to type float, and enter a default value of 0.2. Set the minimum and maximum values to -2.0 and 2.0, respectively. Then click OK.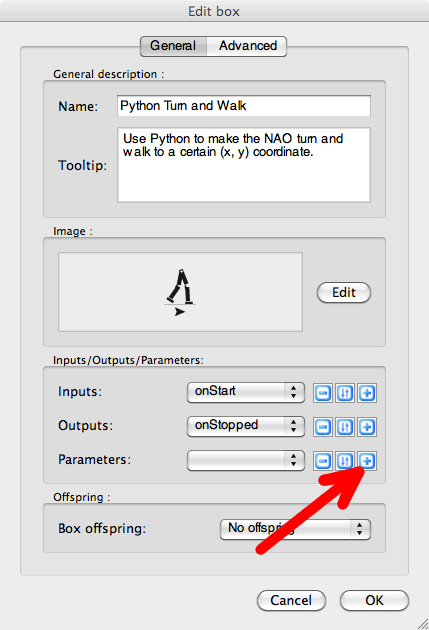
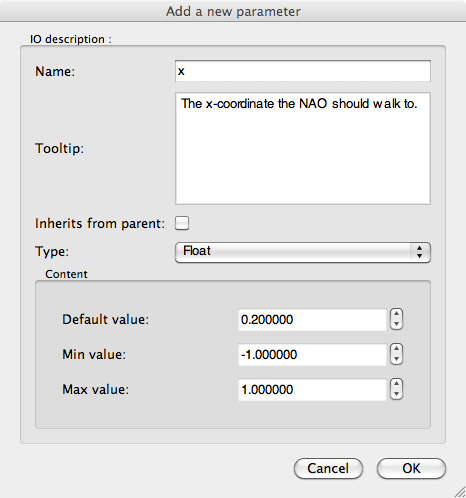
5. Add a second parameter, “y”. Enter the same values as you did for “x”, aside from the name and description.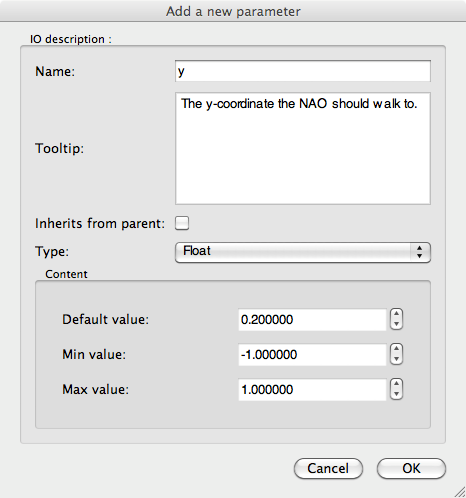
6. Click OK to construct the box, and connect it to a Stand Up box connected to the starting arrow.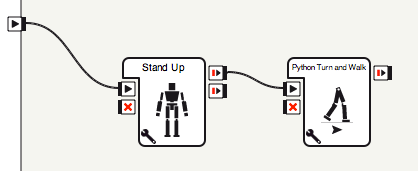
8. Double click on the box you created to edit the python source code. Enter the contents of the onInput_onStart method.
Type your code
tip: add import math to the top of the script, which allows usage of some math functions (such as atan2 and sqrt).
10. Turn stiffness on and hit play. The robot should walk to the location you specified.
Teaching Tips:
- Have the NAO walk in a square, that is, walk forward and turn, walk forward and turn, walk forward and turn, and walk forward again.
- Have the NAO walk in a triangle.
- Program a Python script that causes the NAO to walk in a square or triangle.
- Program a Python script that causes the NAO to walk in any regular polygon with n sides (n > 2).
Teaching Tips:
Solutions
The Coordinate Plane
Optional: 1. Sketch the coordinate plane of the NAO, and plot and label the following points:
- The point (0.5, 2).
- The point 3 meters directly in front of the robot?
- The point (5, 3)?
- The point 1 meter to the left of the robot?
- The point at an angle of 60 degrees from the robot and 3 m away.
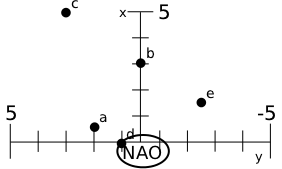
Optional: 2. Compute the angle from the robot to each of the above five points.
a) 75.96 degrees,
b) 0 degrees,
c) 30.96 degrees,
d) 90 degrees,
e) -60 degrees
Basic:
- What are the three parameters in the Walk To box?
The amounts in the x, y and theta directions to walk. x is forward, y is side to side, and theta is rotation.
- What unit of measure is used for x and y coordinates?
Meters.
- What is theta?
The amount the robot should rotate in degrees. Positive angles are counterclockwise.
- What unit of measure is used for theta?
Radians.
- For the NAO, what does “stiffness” mean?
How much resistance should be provided by the motors.
- What problems do you face if stiffness is always set to 100%?
High stiffness consumes battery power more quickly and heats up the motors.
Intermediate:
7. What is odometry?
The robot’s model of how it has moved.
8. Why do odometry errors occur?
Effects of the real world: imperfectly modeled motors, imperfect assembly of the robot, unexpected floor conditions (the floor surface matters a great deal), and outside forces acting on the robot.
9. Define the Cartesian plane, and explain how it relates to the NAO walking.
Points on a plane are specified using coordinates along two perpendicular axes. The coordinates for NAO to walk to are specified on a Cartesian plane.
Advanced:
10. What is a parameter?
An input to a function.
11. Name the parameters used to make NAO walk.
The x, y and theta coordinates of its destination.
12. Name three math functions used in programming walking for robot.
Three of multiplication, division,sqrt, atan2.
13. What do atan2(1.0, 0.0), atan2(0.0, -1.0), and
atan2(sqrt(3)/2, 1/2) evaluate to?
(pi)/2, pi ,(pi)/3 and .
14. Why is atan2 used instead of a single-argument arctan function?
The arctan function is undefined at x = 0. Also arctan returns values in (-(pi)/2, (pi)/2) , while atan2 covers the entire circle.
Questions
The Coordinate Plane
- Sketch the coordinate plane of the NAO, and plot and label the following points:
- The point (0.5, 2).
- The point 3 meters directly in front of the robot.
- The point (5, 3).
- The point 1 meter to the left of the robot.
- The point at an angle of 60 degrees from the robot and 3 m away.
- Compute the angle from the robot to each of the above five points.
Basic:
Intermediate:
Advanced:

