Lesson Modules
Teaching Tips:
PROCEDURE
Caution: NEVER wire anything to the Dobot Magician or the Magic Box while it has power on. ALWAYS turn it off before making connections or damage to the robot could occur. Be sure to ask your instructor if you have any questions.
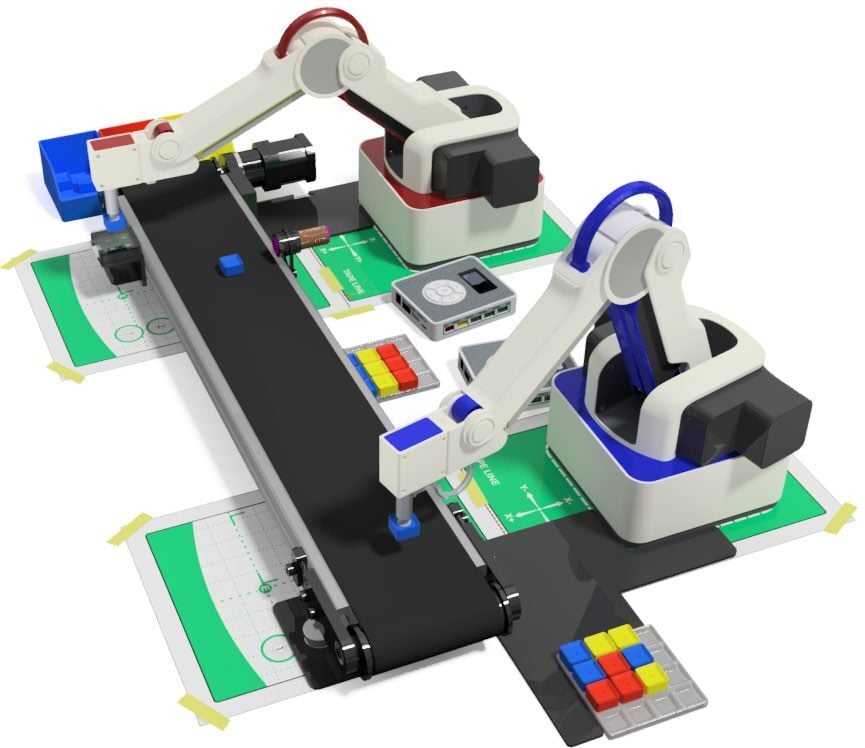
Create a fully integrated WORKCELL using the following scenario.
MAGICIAN LITE – 1
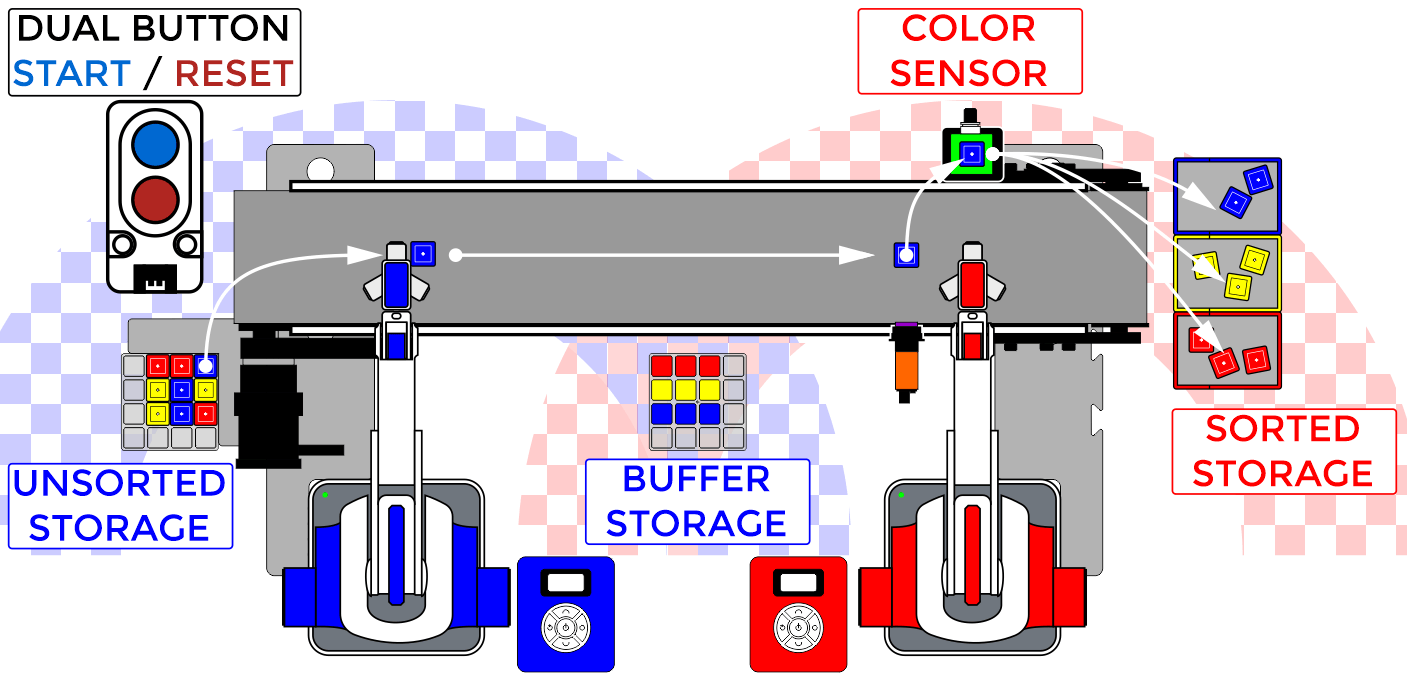
- Primary sequence is initiated by a DUAL BUTTON (RED BUTTON – START) that sends a signal to ROBOT 1
- Once the sequence is started, ROBOT 1 will look to see if the UNSORTED MATRIX of cubes is empty.
- If UNSORTED STORAGE MATRIX is NOT empty, ROBOT 1 will take one cube at a time and place it onto the conveyor. This process will repeat until the matrix is empty.
- If UNSORTED STORAGE MATRIX is empty (all nine cubes have been sent to sorting), ROBOT 1 will take parts from the matrix of cube parts in the BUFFER STORAGE. ROBOT 1 will check to see if the UNSORTED STORAGE MATRIX has been refilled (DUAL BUTTON / RED BUTTON – RESET switch has been pressed again) after each part is taken from the BUFFER STORAGE.
- After a part is placed on the CONVEYOR system, ROBOT 1 will return home
- ROBOT 1 checks if ROBOT 2 is sending a busy signal
- If ROBOT 2 is sending a BUSY signal, ROBOT 1 will wait
- If ROBOT 2 is NOT sending a BUSY signal, ROBOT 1 will start the CONVEYOR system.
- ROBOT 1 will stop the CONVEYOR system when an object is detected by the IR SENSOR
- ROBOT 1 will send a PICK UP signal to ROBOT 2. Continue sending the signal until ROBOT 2 sends back a BUSY signal
- Once the busy signal is received, ROBOT 1 will loop back to pick another cube
- ROBOT 1 will take a cube from the UNSORTED STORAGE MATRIX and place it in the CONVEYOR system.
MAGICIAN LITE – 2
- ROBOT 2 waits for signal
- If NO PICK UP signal is received from ROBOT 1, ROBOT 2 waits
- If a PICK UP signal is received from ROBOT 1, ROBOT 2 will start sending a BUSY to ROBOT 1. ROBOT 2 will then pick up the cube sitting on the CONVEYOR system at the IR SENSOR.
- ROBOT 2 will evaluate the cubes color by hovering it about 3 mm above the COLOR SENSOR.
- If the color is BLUE, the robot will place the cube in the BLUE STORAGE
- If the color is YELLOW, the robot will place the cube in the YELLOW STORAGE
- If the color is RED, the robot will place the cube in the RED STORAGE
- ROBOT 2 will return home and stop sending the BUSY signal to ROBOT 1.
- ROBOT 2 will then loop back to waiting for the PICK UP signal from ROBOT 1.
Be sure to consult the Dobot Input/Output manual if you want to use other inputs and outputs, as damage to your robot or your other equipment may result.
Teaching Tips:
CONCLUSION
- What are the inputs you used in your workcell?
- What are the outputs you used in your workcell?
- What was the hardest part of this activity for you? Explain how you made it work.
- Describe the process that you and your team went through to complete this project by inserting at least 5 pictures, with captions, that you took throughout the project. Be sure to include programming, designing, wiring, building, and testing.
GOING BEYOND
Finished early? Try some of the actions below. When finished, show your instructor and have them initial on the line.
Be sure to consult the Dobot Input/Output manual if you want to use other inputs and outputs and consult with your instructor before turning the robot on, as damage to your robot or your other equipment may result.
- _________ 1. Replace the human component of starting the system with a sensor. What sensor did you use and why?
- _________ 2. Could you use other sensors in this project? Which ones, and how would you use them? Check with your instructor once you come up with an idea, and be sure you get approval before you try it.
- _________ 3. Integrate a stack light with your robot so that you know when the signals are being sent.
- _________ 4. Incorporate the Camera from the Sensor Kit and have robot two announce what is going into the bins… (example: red block = case of wrenches, yellow block = case of screwdrivers etc.)