
Lesson Modules
Teaching Tips:
Caution: NEVER wire anything to the Dobot Magician while it has power on. ALWAYS turn it off before making connections or damage to the robot could occur. Be sure to ask your instructor if you have any questions.
SECTION 1 – SETUP BOTH ROBOTS
Step 1 – Typical Start Up Procedure
- Disconnect any existing END of ARM TOOLING (EoAT).
- Carefully disconnect any existing vacuum tubes.
- Press and hold the release button on the bottom of the arm and pull off the EoAT.
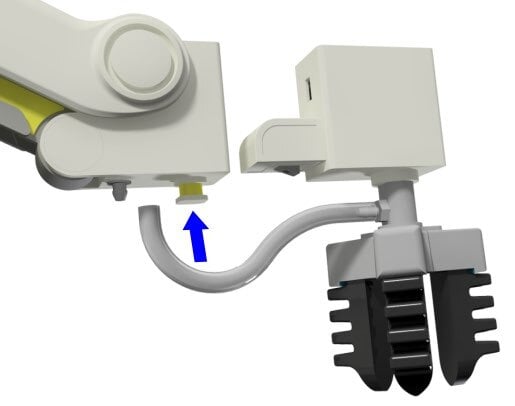
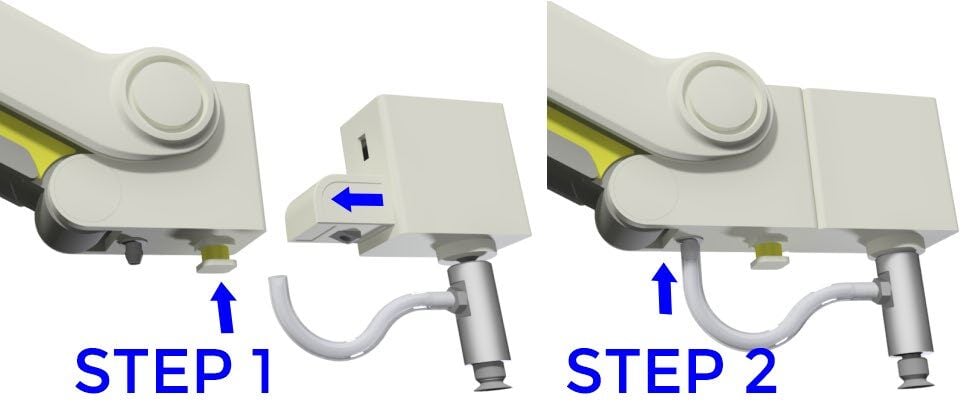
Step 2 – Attach the Suction Cup
Attach the Suction Cup as the END EFFECTOR or END of ARM TOOLING (EoAT) on both robots.
- STEP 1 – Push the Suction Cup in until it snaps in place.
- STEP 2 – Attach the hose to the air nozzle.
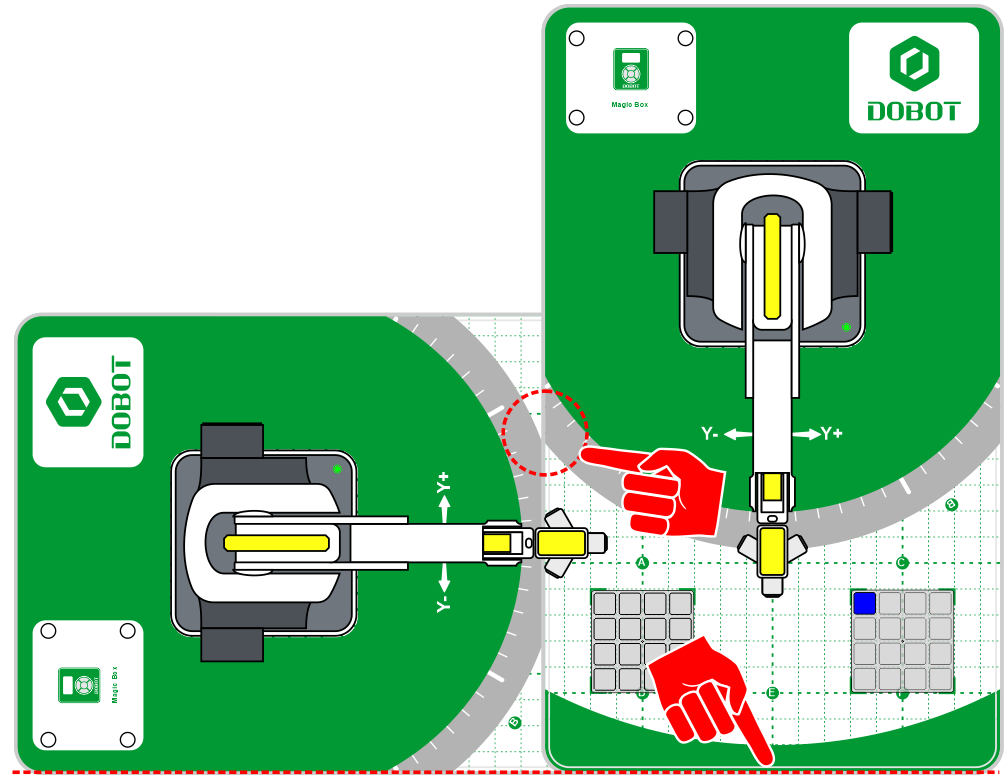
Step 3 – Included Robot Mats / Printed Templates
Line the edges up along the red dotted line. Overlap the mats where the grey arcs intersect. Line up the work-area page with the other two pages. Tape them together. Tape them to the table if needed.
SECTION 2 – CONNECTING ROBOTS to the COMPUTER & DOBOTLAB
Step 4 – Connect & Power On
- Connect both robots to the computer using their included USB cables.
- Open up DobotBlock Lab in the software.
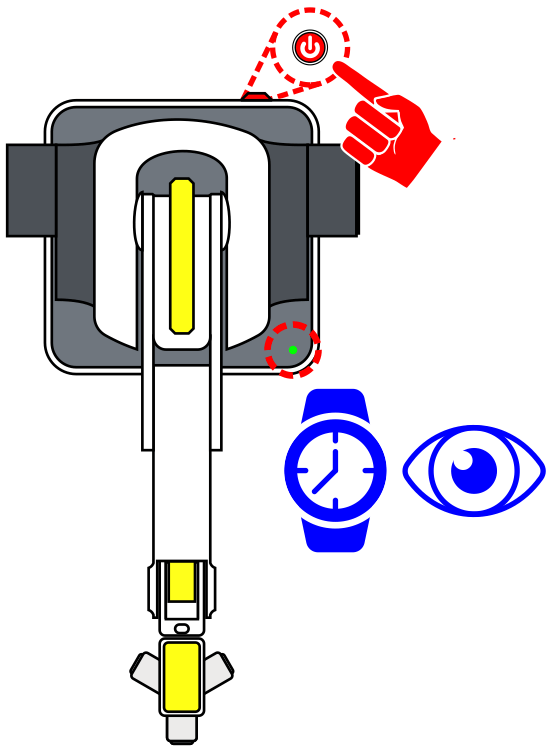
- Once ALL of the wiring is done (power cables and robot arm connected), power ON both robots.
WATCH and WAIT for the robots to completely power on (GREEN INDICATOR).


Step 5 – Set Up Robots on the Mats
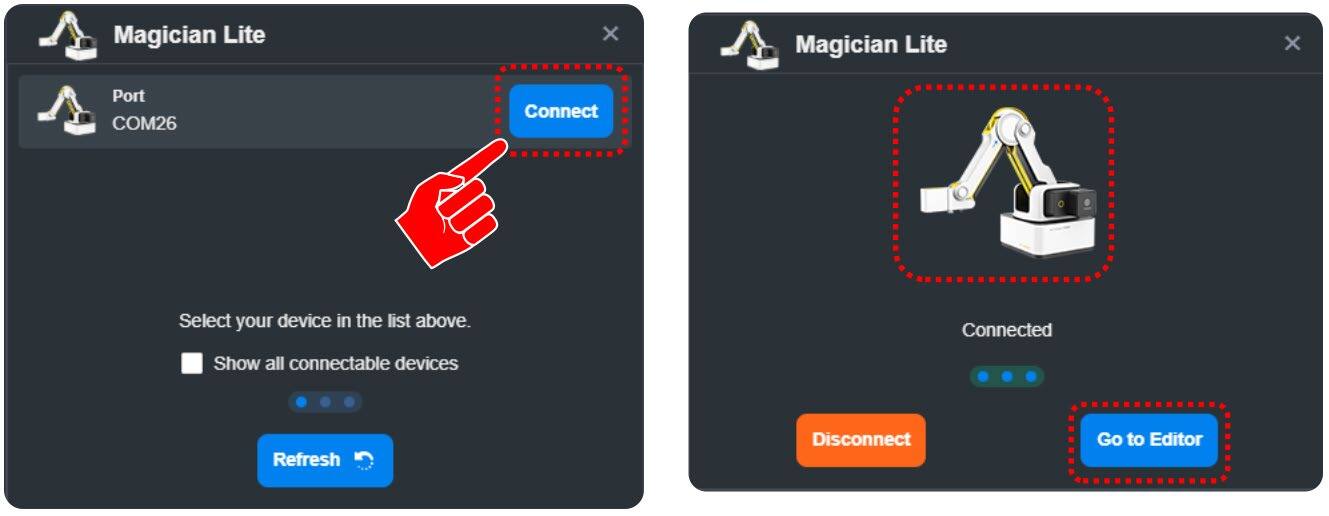
Select the connect icon to establish control from the siftware ro ROBOT 1. A connection window should pop up.

Step 6 – Connect Robot 1
Select Connect from the pop-up window. A new window should appear and show that the robot is Connected.
HOME ROBOT 1 to ensure communication.
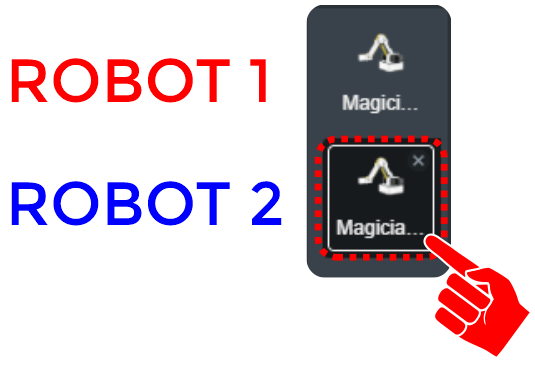
Step 7 – Add & Home Robot 2
![]() Two robots can be plugged into the same computer at the same time!
Two robots can be plugged into the same computer at the same time!
Select Choose a device and add a second Magician Lite. Connect to this device and home it just as we have done with previous activities.
As you click back and forth between the magician devices (icons), you will see a different programming page, one for each. When you save the program, you will save both programs at the same time.

SKILL BUILDER 1 – BROADCAST / Internal Handshaking Between Robots
For this skill builder, test the ability to send a signal from one robot (ROBOT1) to another robot (ROBOT2) as long as they are plugged into the same computer and running off the same file.
The process of sending a signal from one robot to another robot can be done with messages.
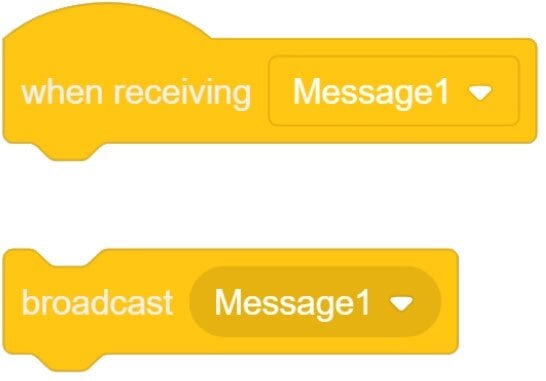
Step 8 – Add Broadcast & When Receiving Blocks
Drag over WHEN RECEIVING and BROADCAST blocks from the EVENTS toolbox.
- The WHEN RECEIVING works the same as the WHEN STARTED, but instead of selecting the START FLAG, the program waits for a message to be received.
- The BROADCAST block is the tool that initiates the message. Both blocks also have the option to create new messages in their drop-downs.
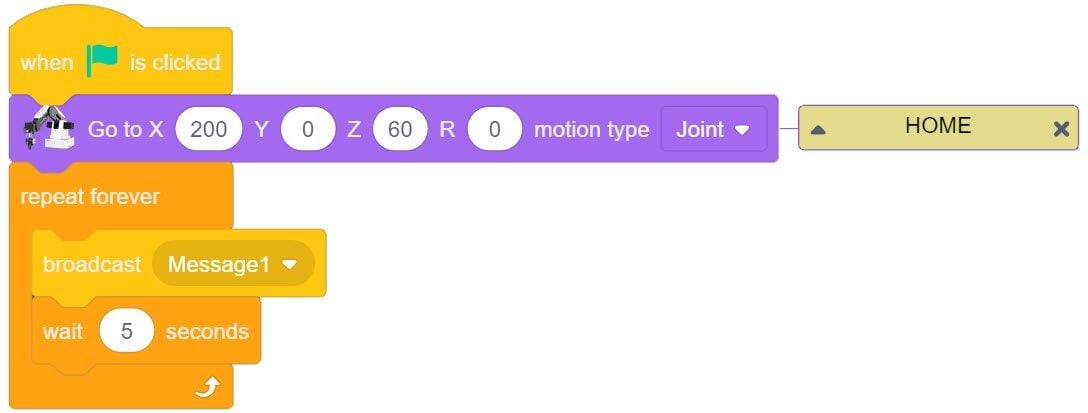
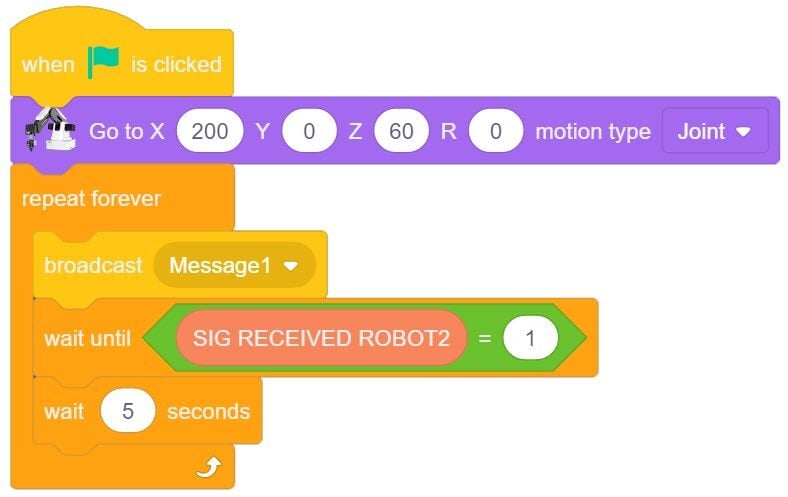
Step 9 – Program ROBOT 1
Create a program similar to the one on the right for ROBOT 2:
- WHEN STARTED – send ROBOT2 HOME
- BROADCAST MESSAGE
- WAIT 5 seconds and repeat
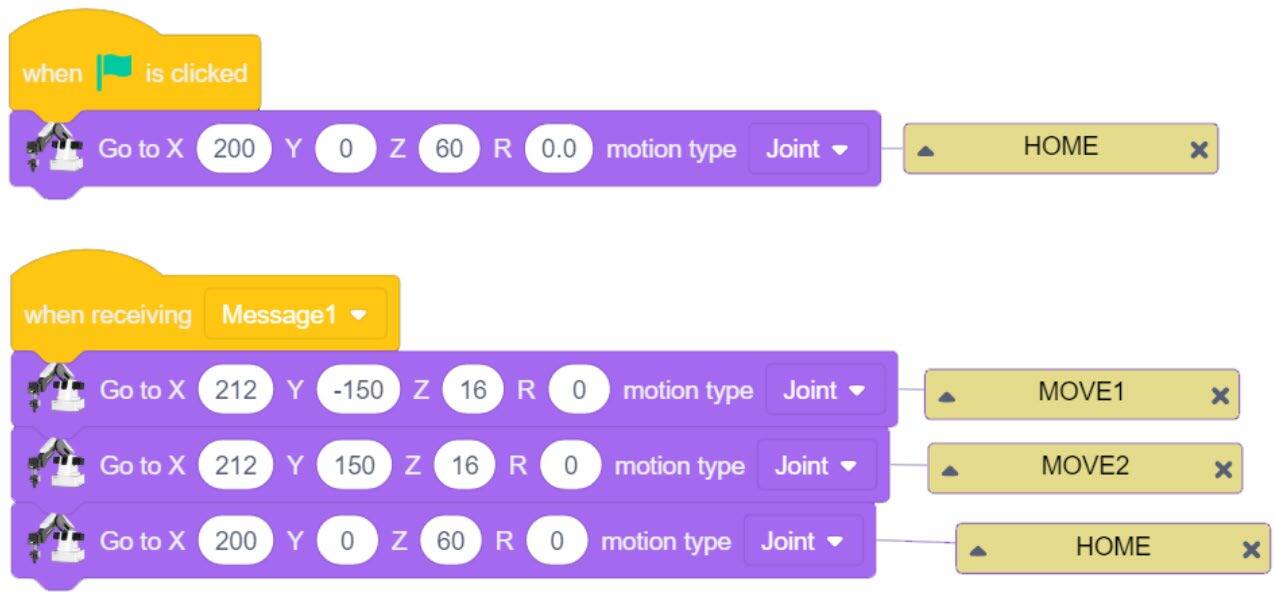
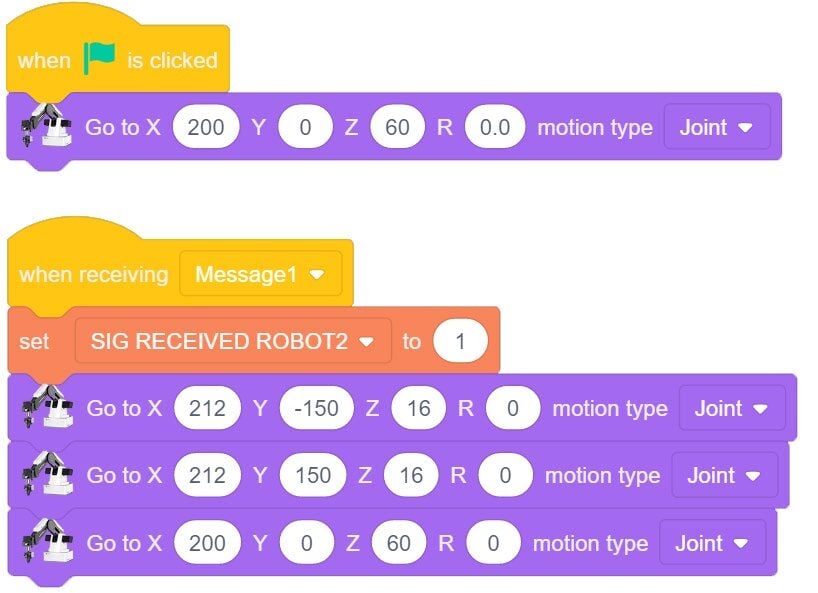
Step 10 – Program ROBOT 2
Create a program similar to the one on the right for ROBOT 2:
- WHEN STARTED – send ROBOT2 HOME
- WHEN RECEIVING MESSAGE – once received, move ROBOT2 to one or two new positions and then back to home. ROBOT2 needs to be back at the home position in less than the 5 seconds to receive the next message.
The program created is an OPEN LOOP system. ROBOT1 does not know ROBOT2 has received the signal.
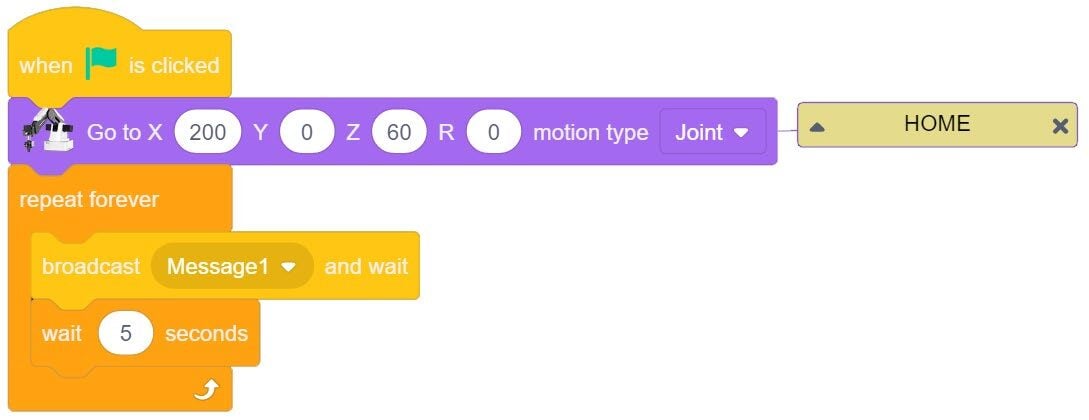
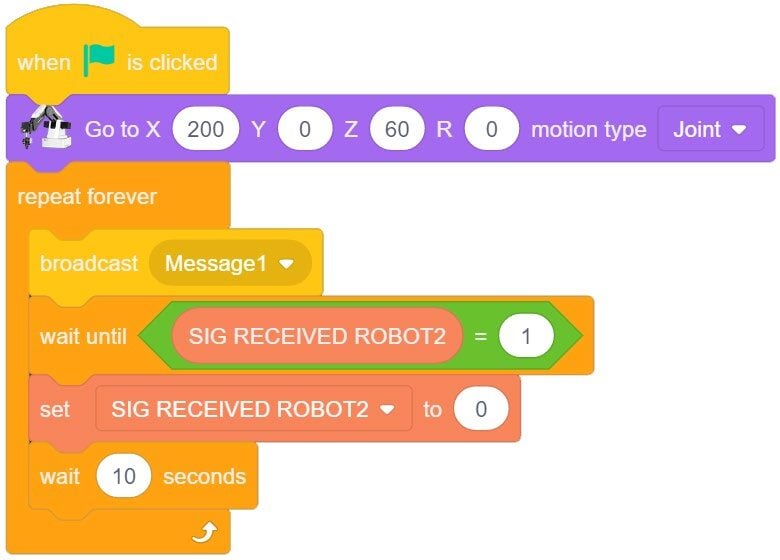
Step 11 – Broadcast and Wait
Change the BROADCAST MESSAGE to BROADCAST and WAIT. ROBOT1 will now send the signal and wait until the broadcast is received by ROBOT2.
Recreate the CLOSED LOOP process using VARIABLES:
Step 12 – Re-create Using VARIABLES
- Create a VARIABLE called SIG RECEIVED ROBOT2 and alter the two programs.
- Is the program really working correctly? It may look like it is working, but once the variable is set to TRUE it never changes. Alter ROBOT1’s program to change the variable back to 0 once it is received.
- Change the time to 10 seconds to make sure it is working correctly. Run the program.
These tools are great for one way communication, but the trick is how to wait for a message in the middle of a program rather than just using it to start the ENTIRE PROCESS… Is there a better way to do this?
…Notice that there is only one list of variables for the SPRITE
…NOTICE that variables are not only GLOBAL for one robot’s program but for all of them!! (each robot can SET AND USE the same variables)
If the program can use WHEN MESSAGE RECEIVED blocks to control variables… we can then handshake in the middle of a program.
The program can use the variable in the middle of the program to tell the robot when to proceed. (each time the message is received, set a variable to tell the program the message has been received)
The WAIT UNTIL with the SIG RECEIVED block is a great way to make this happen.

SKILL BUILDER 2 – VARIABLES ONLY / Internal Handshaking Between Robots
Step 13 – Create Additional Variables
Create an additional variable:
- SEND SIG ROBOT1
- SIG RECEIVED ROBOT2
ROBOT1 will use SET SEND SIG to TRUE (1) to start ROBOT2.
ROBOT2 will use SET SIG RECEIVED to TRUE (1) to let ROBOT1 know the signal has been processed.
The variables will be SET to FALSE (0) to reset them for the next loop.
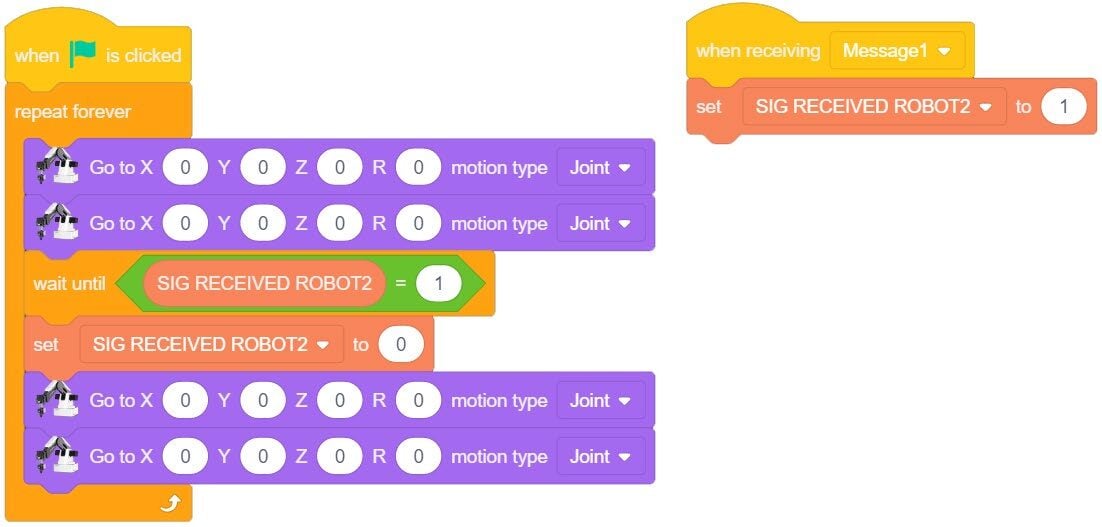
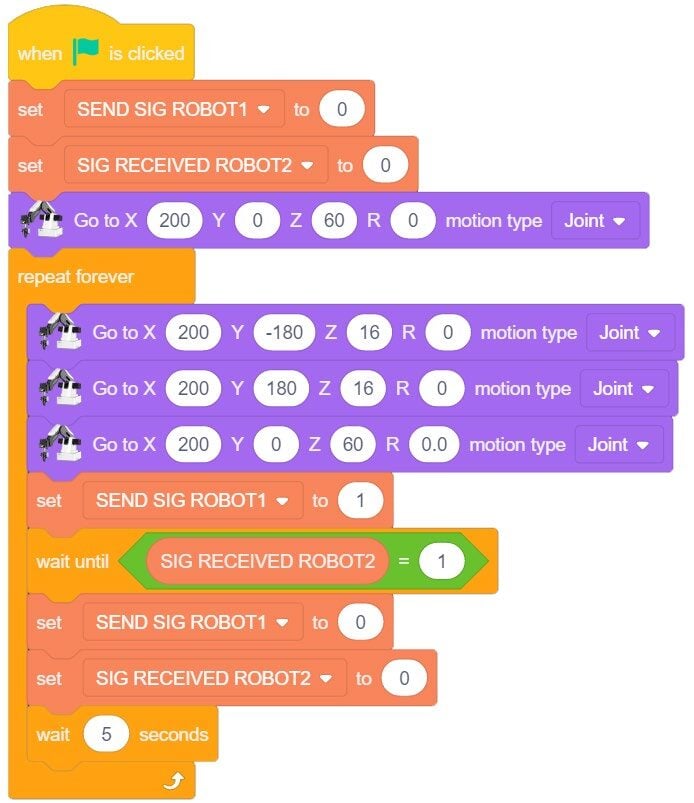
Step 14 – Operation ROBOT 1 (Control Robot)
Outline:
- Initialize variables to ZERO (only one robot needs to do this).
- GO TO HOME → Start FOREVER LOOP:
- Move to location “A”.
- Move to location “B”.
- GO TO HOME.
- SEND the signal to start ROBOT2.
- WAIT until ROBOT2 has received the signal.
- Turn off the SEND signal and the RECEIVE signal.
- Wait 5 seconds.
- Loop the process.
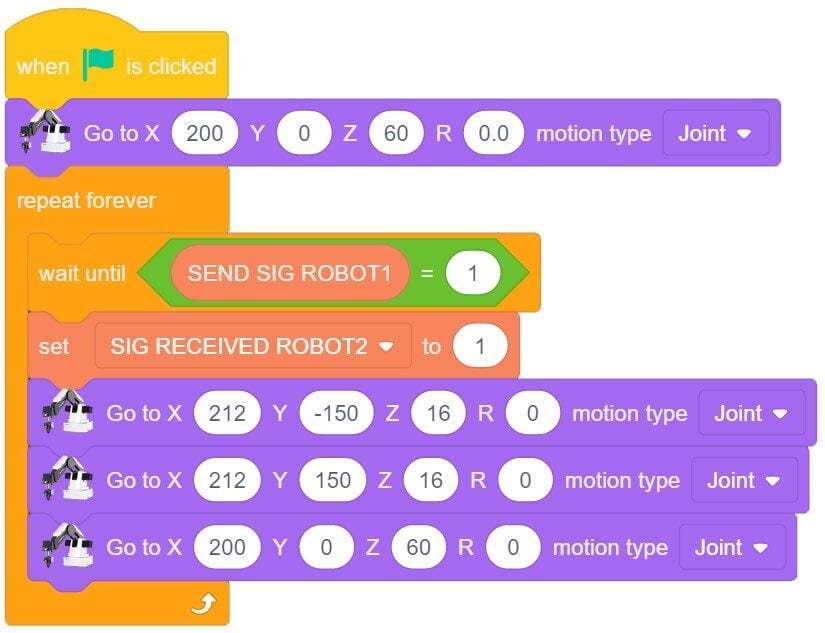
Step 15 – Operation ROBOT 2
Outline:
- GO TO HOME → Start FOREVER LOOP:
- SEND a signal to ROBOT1 that the sequence has been started (ROBOT1 resets variables).
- Move to location “A”.
- Move to location “B”.
- GO TO HOME.
- Loop the process.
SECTION 3 – PASS the BLOCK
HOME both robots before placing them on the templates. NOTICE there is an overlap in their work envelopes. The robots can run into each other during the homing operation.
Order of operations
- ROBOT 1
- Move – SAFE HOME
- Move – Cube from Position #1 to #2
- Move – SAFE HOME
- Send START SIGNAL to ROBOT2
- WAIT for START SIGNAL from ROBOT2
- Turn OFF Signal from ROBOT2
- ** LOOP
- ROBOT 2
- Move – SAFE HOME
- WAIT for START SIGNAL from ROBOT1
- Turn OFF Signal from ROBOT1
- Move Cube from Position #2 to #3
- Move – SAFE HOME
- Send START SIGNAL to ROBOT1
- ** LOOP
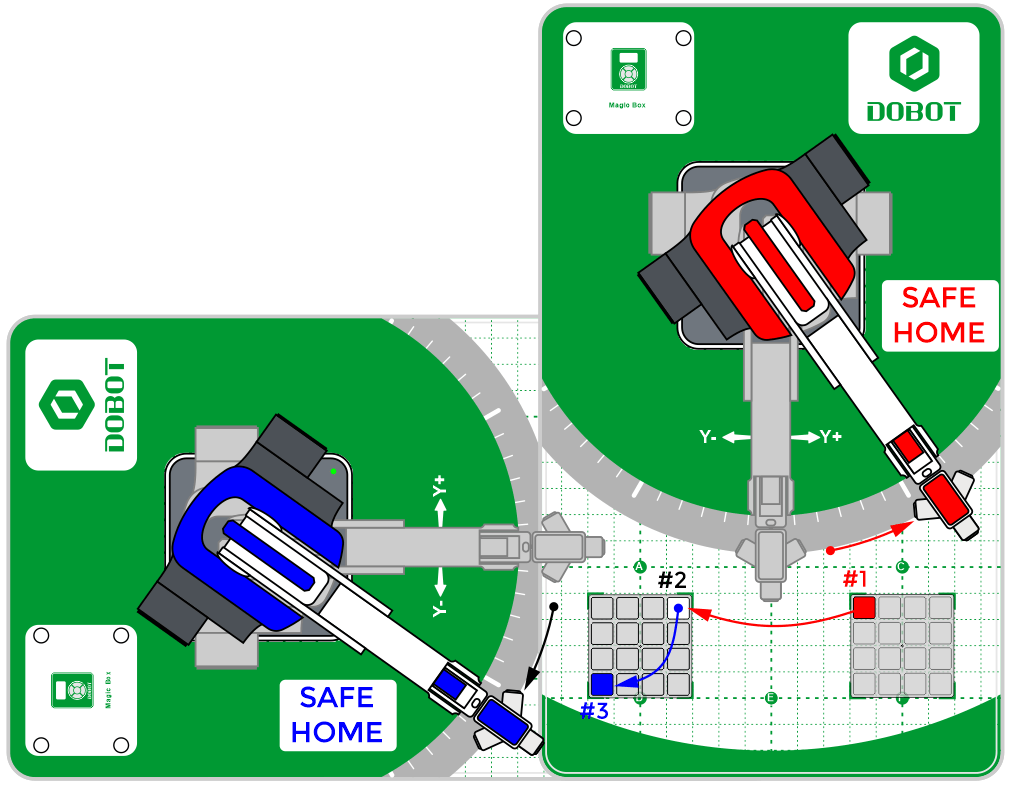
Give each robot a SAFE HOME position. A position that is out of the way of the other robot, so that they never run into one another.
Fun Fact: If they did run into each other, the robots are intelligent enough to know they have run into something along their path and will stop immediately so that there is minimal damage to the equipment, and everyone working around them is a lot safer!
Teaching Tips:
CONCLUSION
- Explain why you would ever want to make two robots communicate with each other. What are the benefits? Use at least three bullet points.
- What is the advantage to using variables in this program? Use at least three bullet points.
- Look up the word “Cobot” or “Collaborative Robot” on the internet and find a definition that you understand. Is the Magician Lite, the robot that you are using in this activity a Cobot? Explain why it is in your own words.
GOING BEYOND
- Use what you learned in previous activities and make ROBOT 1 move to the other two spots in the row automatically, and make ROBOT 2 stack the three blocks on pallet 2.
- Use two robots where:
a. ROBOT 1 picks up the first block on Pallet 1 in a row of three.
b. ROBOT 1 places it on the corner of pallet 2.
c. ROBOT 2 then moves it to another part of pallet 2.
d. ROBOT 2 stacks the block on the other one.
e. ROBOT 2 goes home.
f. Repeat this multiple times.
g. How many can you get them to stack successfully?
Teacher Initials _________