Lesson Modules
Teaching Tips:
PROCEDURE
Caution: NEVER wire anything to the Dobot Magician while it has power on. ALWAYS turn it off before making connections or damage to the robot could occur. Be sure to ask your instructor if you have any questions.
Step 1 – Initial Setup
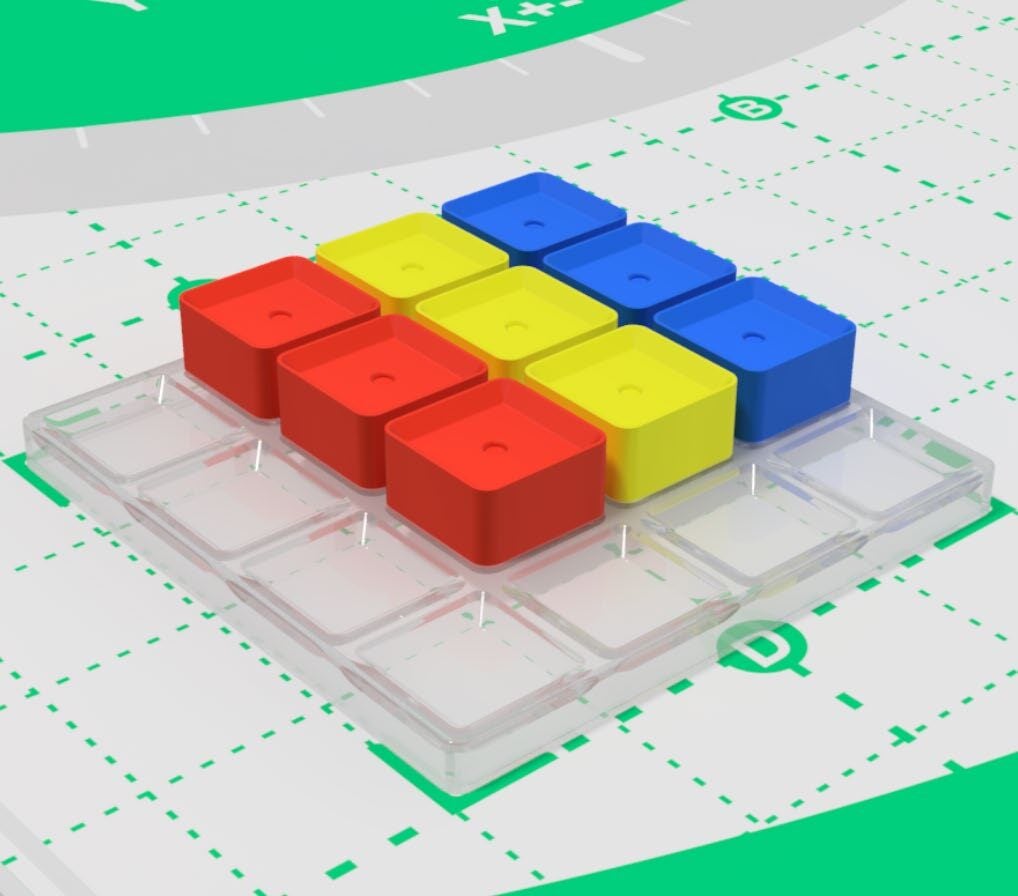
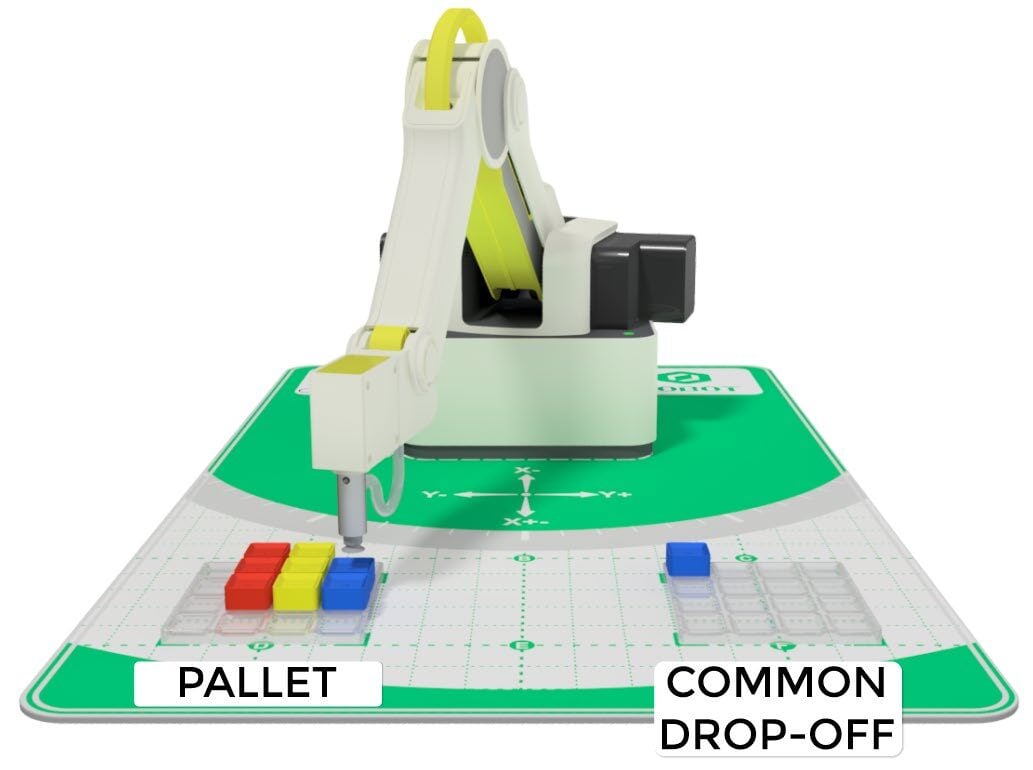
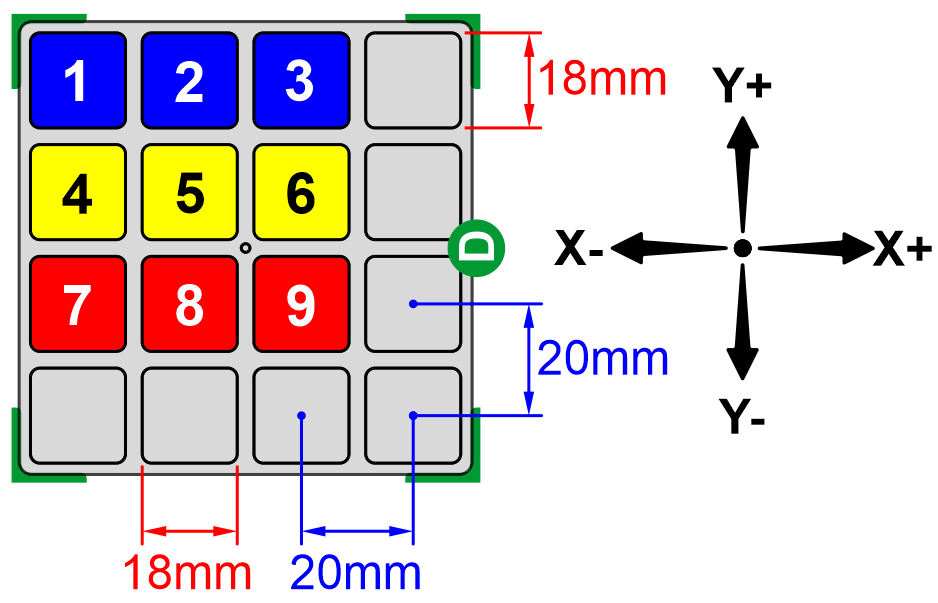
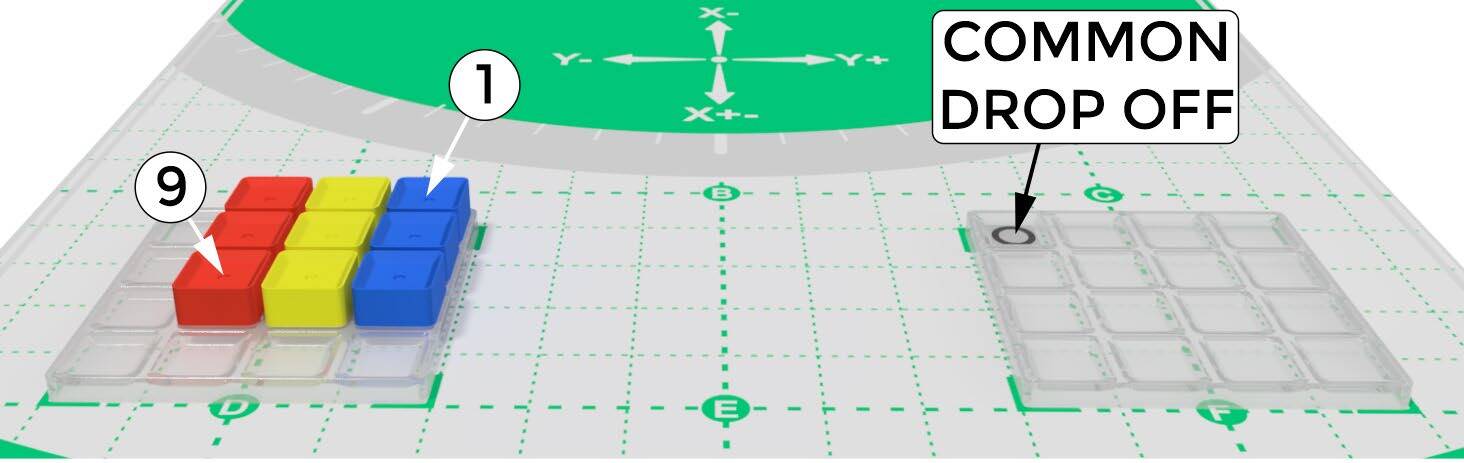
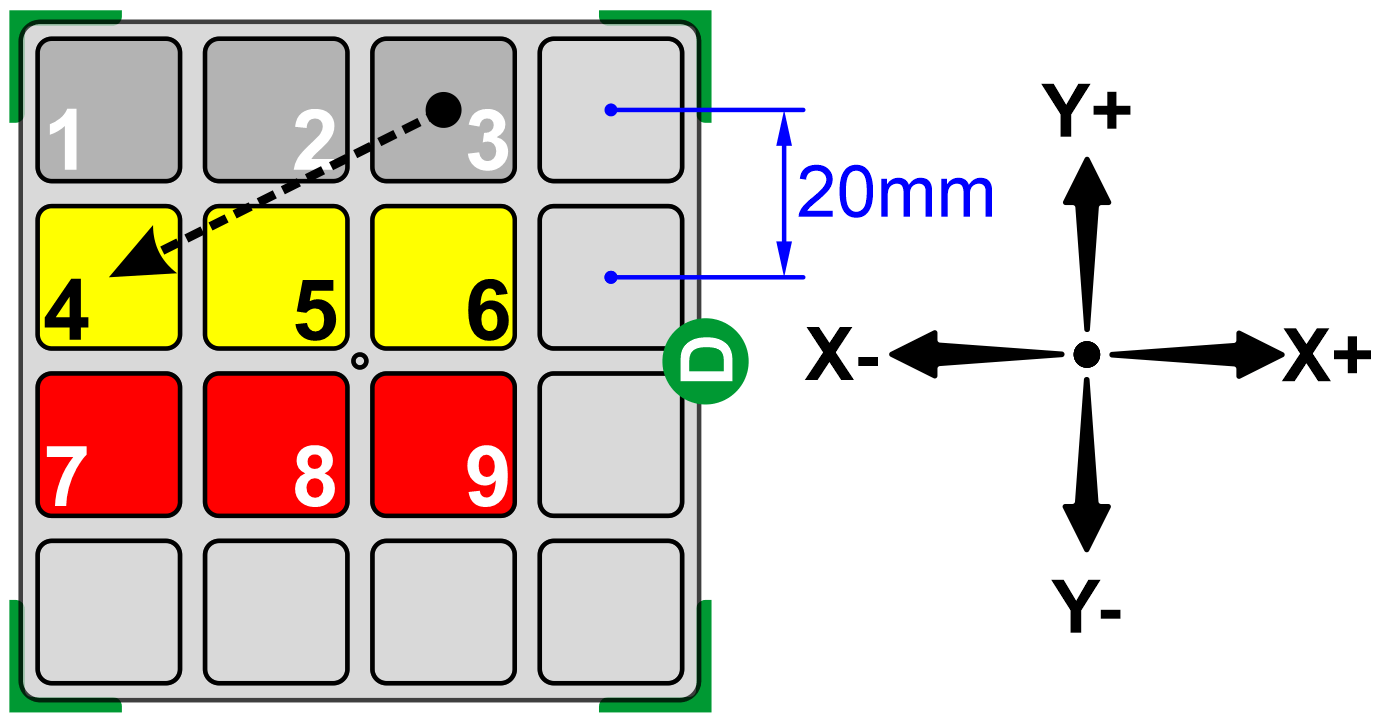
Set up the robot with the Magician Lite work mat with the pallets and cubes as shown below.
Step 2 – Place Cubes
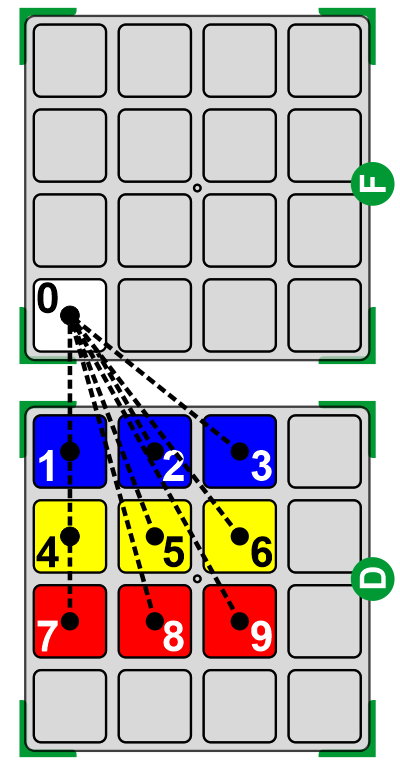
Set up the robot with a suction cup and place a cube on all of the empty squares on the field diagram provided. (Cube color does not matter for this activity.)
Step 3 – Launch DobotBlock Lab
Open up DobotBlock Lab in the software and connect the robot.


Step 4 – Why Simplify?
Programming the robot to pick up each cube from a matrix of cubes and drop them all off at a common location is not necessarily hard to do, just tedious, time-consuming, and numerous lines of code that are repetitive motions. This same process can be done in reverse, such as when you move parts from a feeder and place them on a pallet. This is called palletization.
From this activity we can learn how to condense and simplify our program when we have things in common or repeated.
In this exercise we have the following constants:
- Above Z locations are the same
- At Z locations are the same
- Place X and Y locations are the same
- They are all evenly spaced in a regular matrix.
The only thing that keeps changing is called a variable. In this case it is the X and Y coordinates of the cubes on the pallet.
Step 5 – Introduce My Blocks
We can use these common factors to simplify our operations and our code. We will do this with user-defined variables and MyBlocks.
MyBlocks are called Functions or Voids in programming language. These are just a named section of a program that performs a task that will be repeated over and over again in our program. This is a routine that will make a long program shorter.
We use My Blocks when:
We will start our program by defining a set of variables. Think of Variables as a group of lockers where information can be stored. The names of the lockers can be made by you. Each time the locker’s name is used in the program, the name is replaced in the program by the value stored inside it. Variables can also be updated in a lot of different ways.
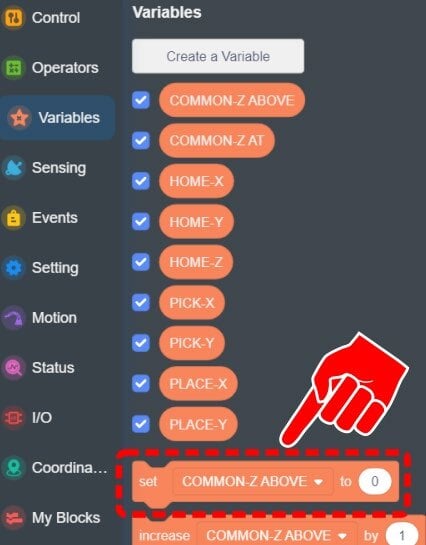
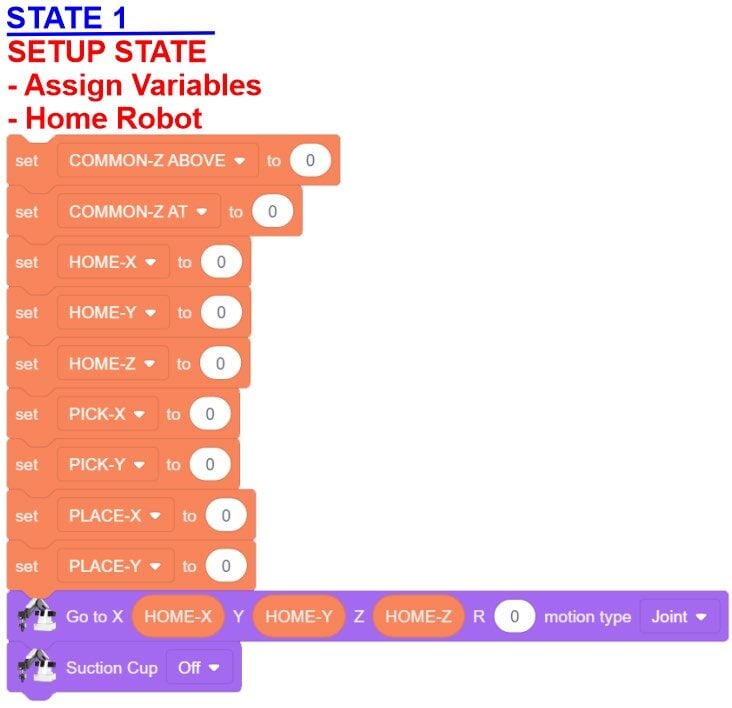
Step 6 – Declare Variables
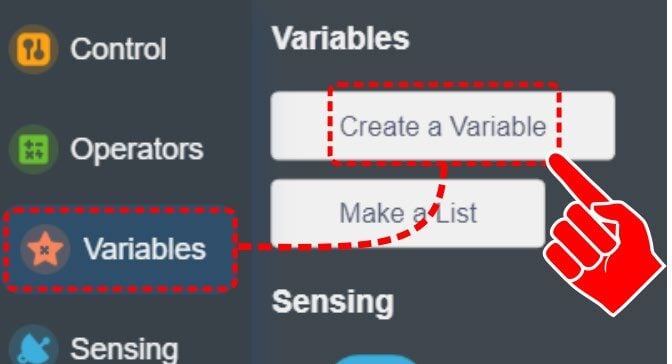
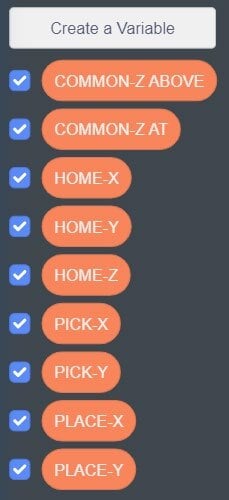
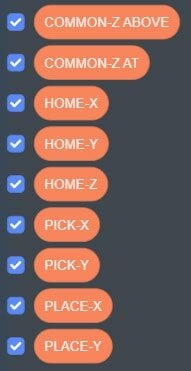
Start by creating the list of variables below:
- COMMON-Z ABOVE
- COMMON-Z AT
- HOME-X
- HOME-Y
- HOME-Z
- PICK-X
- PICK-Y
- PLACE-X
- PLACE-Y
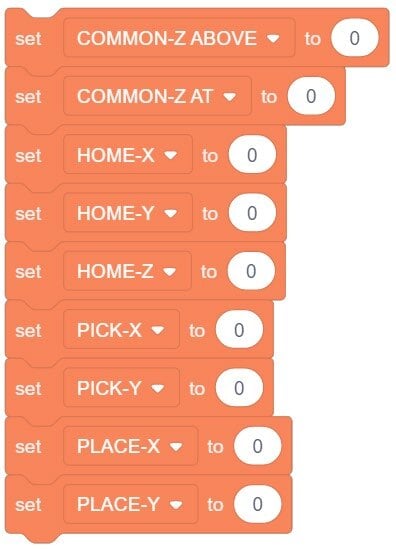
From the Variables section, drag over a Set Variable block into the programming field. Either duplicate this block or drag over a total of nine Set Variable blocks.
Change the variable names by clicking the down arrow on the Set Variable block
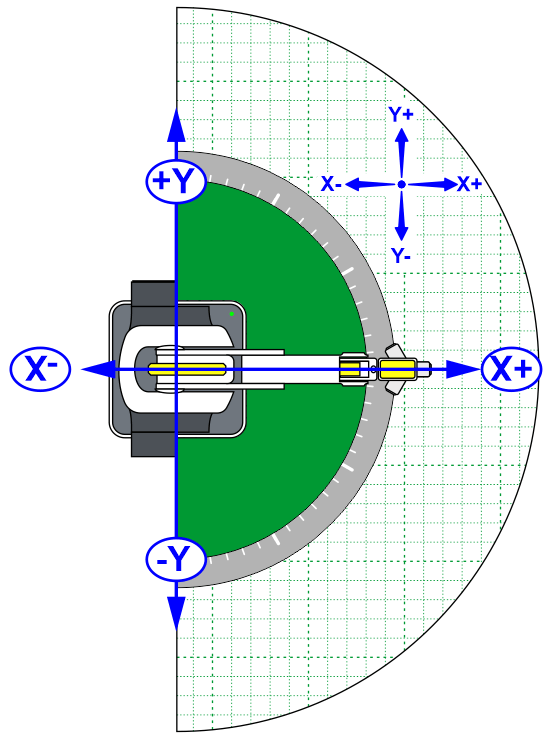
The next step is to start finding each of our starting values. Using either the Jog Controls, or the Lock Button find the values for the table below.

![]() It makes it easier to use the Lock Button to get close to the desired position and then use the Jog Controls for smaller movements.
It makes it easier to use the Lock Button to get close to the desired position and then use the Jog Controls for smaller movements.
Step 7 – Find Starting Values
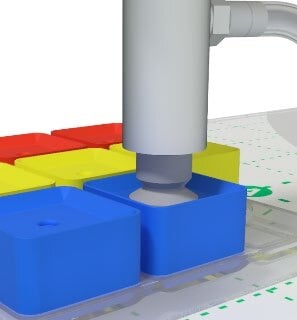
Using either the Jog Controls or the Lock Button, find the values for the table below. Align the center of the vacuum gripper to the center of the cube:
- HOME-X, HOME-Y & HOME-Z: Find a comfortable Home position that can be used for the project.
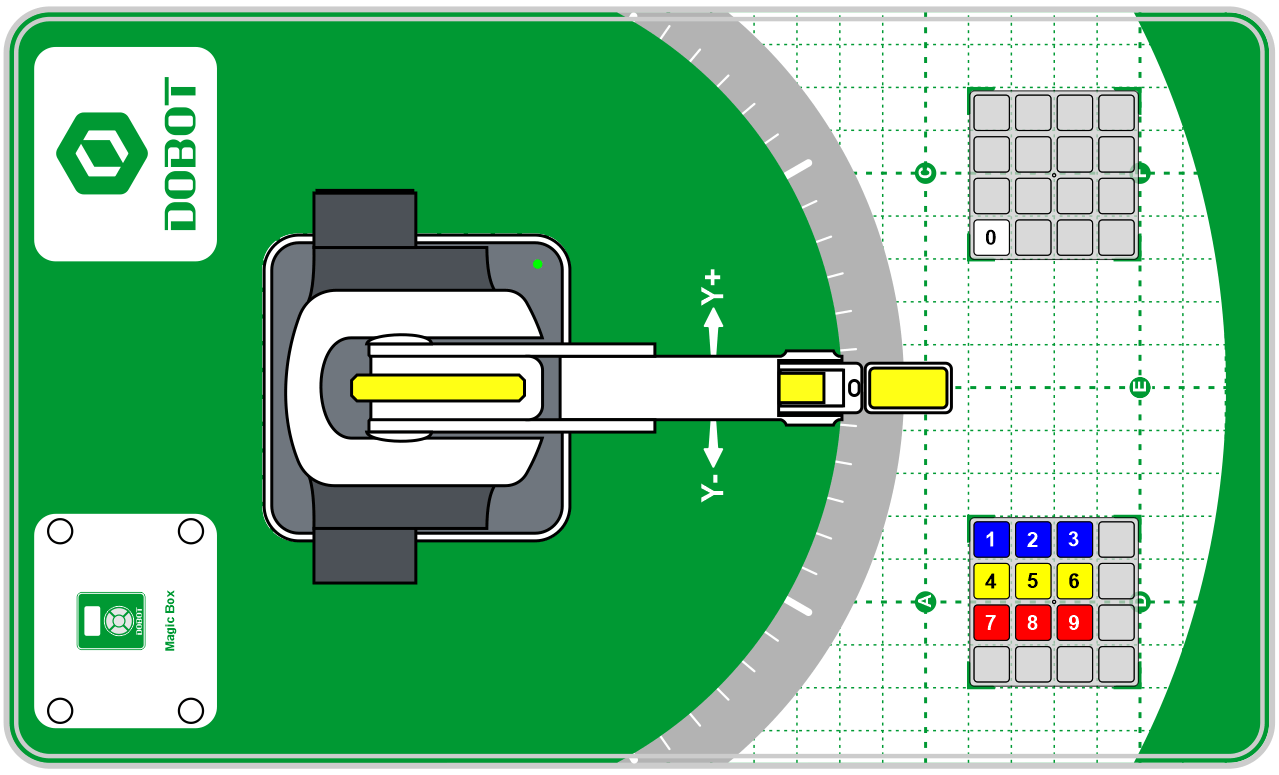
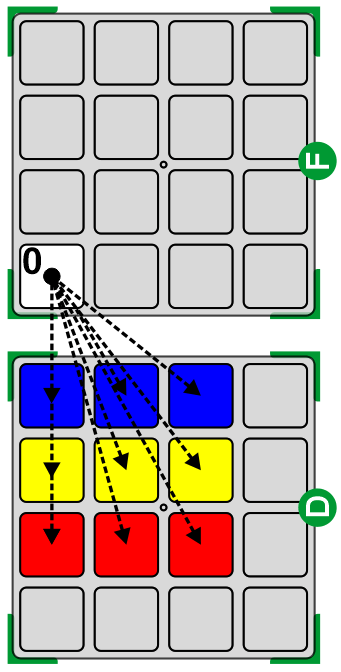
- PICK-X & PICK-Y: Use the center of Cube “1”, from the diagram, as the X and Y location for the Pick Location.
- PLACE-X & PLACE-Y: Use the location of Cube “0” for the common Drop-Off point.
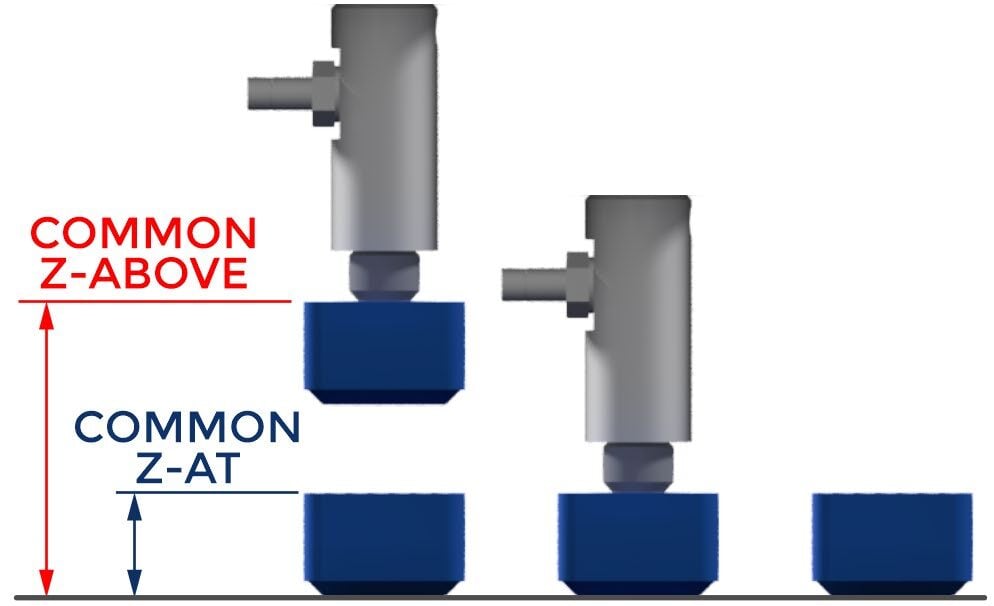
- COMMON-Z AT: Find a common Z value that can be used to pick up all of the blocks.
- COMMON-Z ABOVE: Find a common Z value that can be used to raise up and carry all of the cubes. Ensure this position is high enough to clear the other blocks.
Step 8 – Set the Variables in Code
Record the COMMON-Z ABOVE position in the number window of the corresponding Set Variable block. The order in which we set the variables does not matter in this program.
![]() If you select Rename Variable, it will Rename that variable and everywhere it has been used in the program
If you select Rename Variable, it will Rename that variable and everywhere it has been used in the program
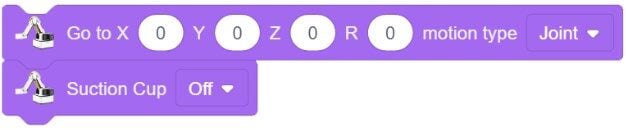
It is good practice to start each program by sending the robot to a HOME position, turning off or opening the EoAT, and turning off any digital outputs. Drag over a GO TO (JOINT) and a SUCTION CUP (OFF).

![]() Remember that these tools come from the Motion section.
Remember that these tools come from the Motion section.
We will now use some of the user defined variables that we just created. From the Variable section, you should see that all of the variables that we have created are now options to use.
Step 9 – Use Variables in the GO TO Step
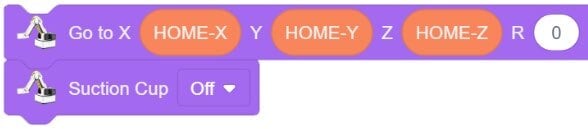
From the Variables section, drag your HOME variables (not the Set blocks) into their corresponding positions for the GO TO step. Leave the Roll value as “0”.
![]() Note: Do not use the HOME block; that block runs the homing operation.
Note: Do not use the HOME block; that block runs the homing operation.
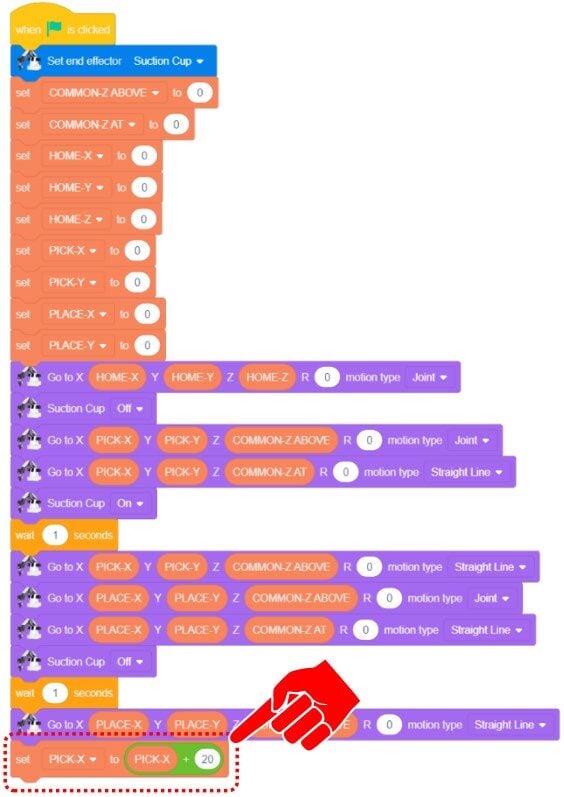
Step 10 – First Pick & Place Sequence
Add all the steps needed to go get the first block “0” from the first assigned pick location and move it to the place (BLUE) location. Link everything we now have as one program and add to the top of the program:
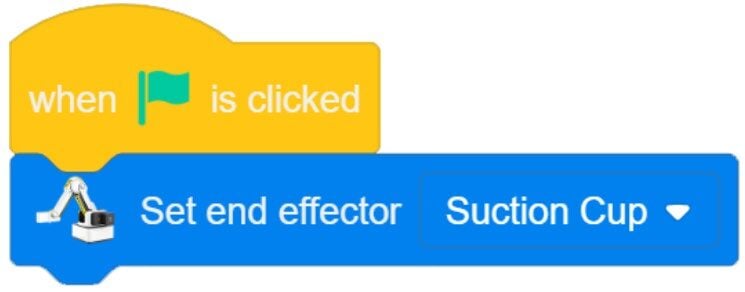
- EVENTS: WHEN STARTED
- SETTINGS: SET END EFFECTOR (EoAT)
Run the program and see if it works correctly. If it does not work, troubleshoot it until it does.
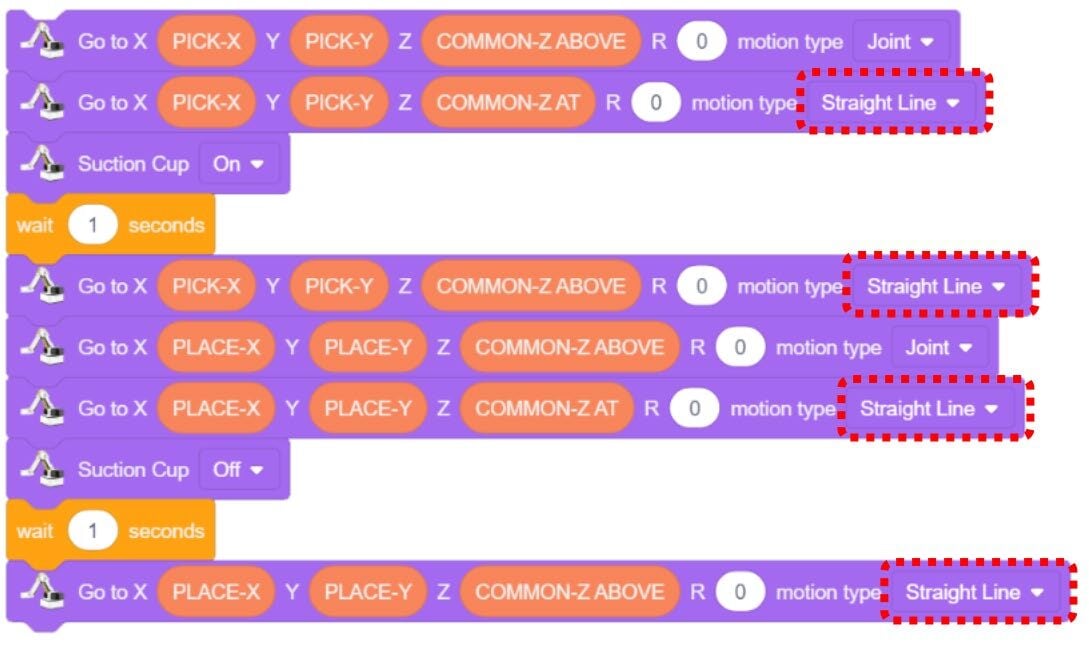
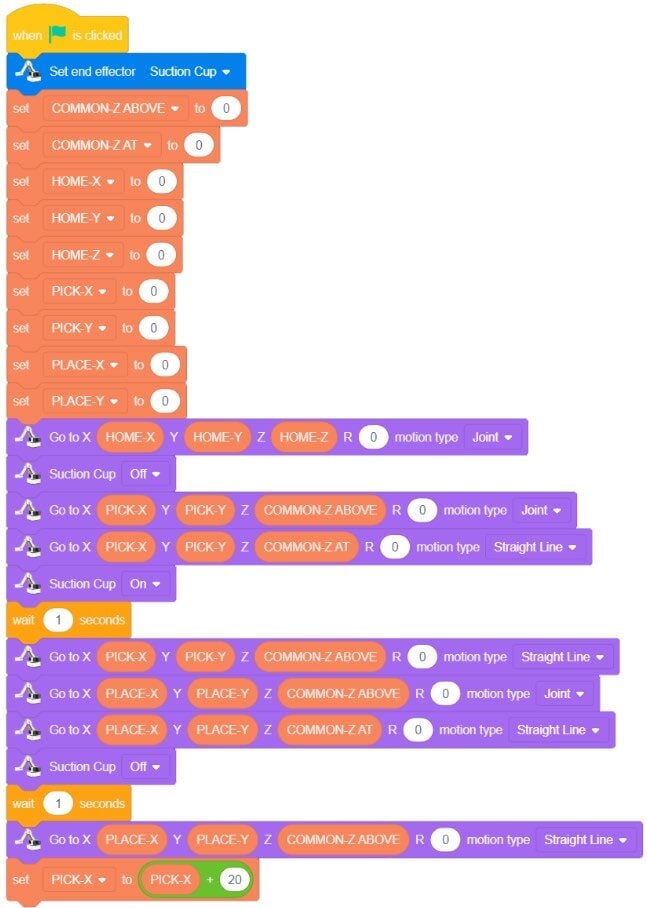
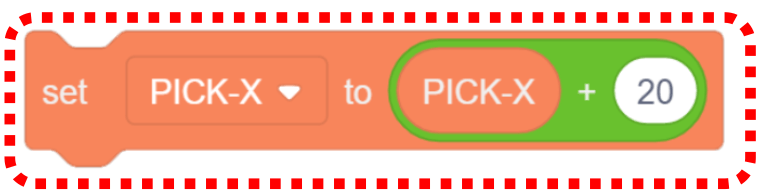
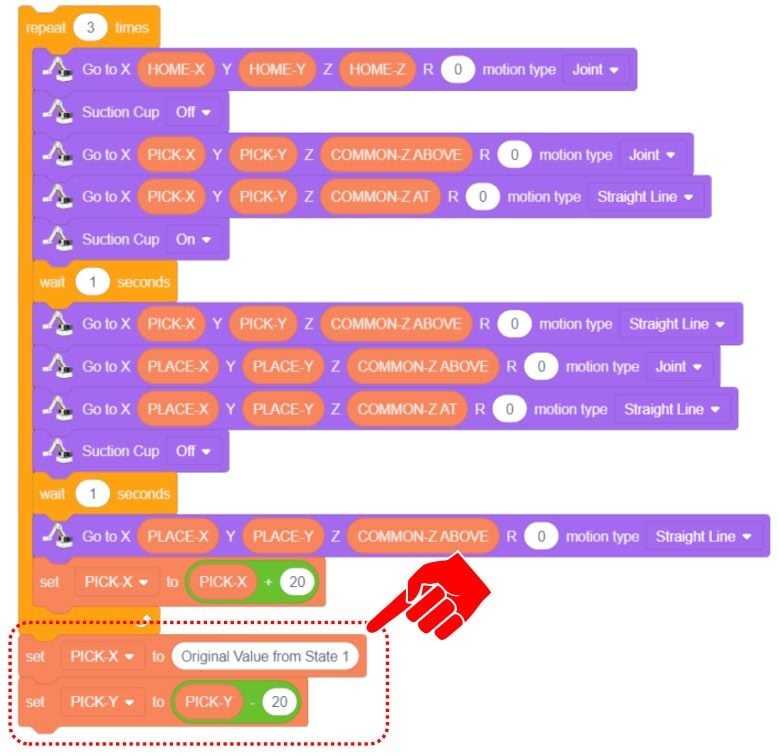
Step 11 – Adjust PICK-X for the Next Cube
The only difference in the programming for the second cube would be the X Position. From the diagram, the blocks are 20 mm apart (center-to-center) and the block values are moving away fro
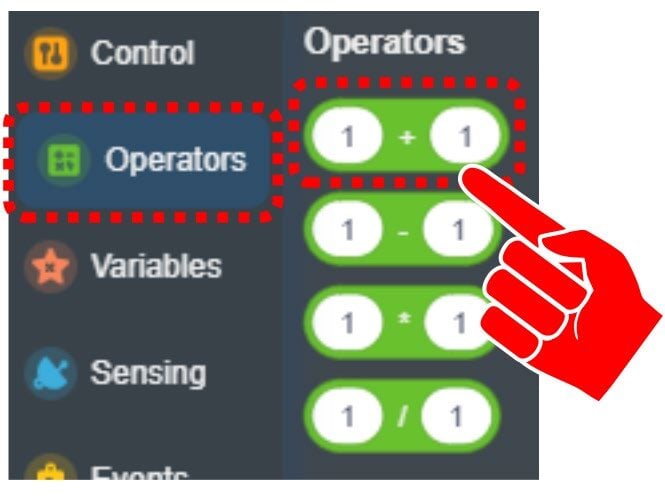
From the OPERATORS section choose an ADDITION block, insert the PICK-X variable and the constant 20, then add this line at the bottom of your program.
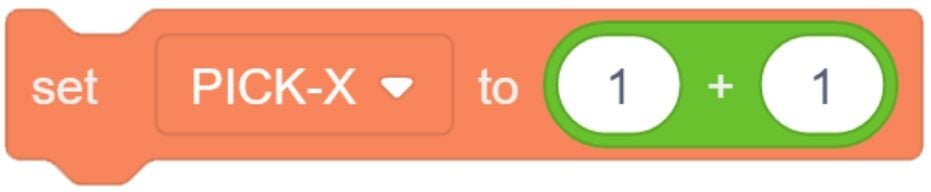
In order to add 20mm from the current PICK-X value and assign that value to the new PICK-X value, we will create a computation block that replaces the first value with PICK-X and the second value with 20. Current X value equals itself minus a constant of 20 (Positive due to the direction of motion) Mathematically: PICK-X = PICK-X + 20
Step 12 – Create States & Loops
Divide the program into three separate thoughts called STATES:
- STATE 1 – SETUP: Assign variables, send the robot to Home, turn off the EoAT & outputs.
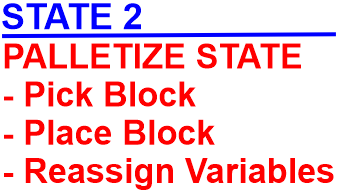
- STATE 2 – PALLETIZE STATE: Pick up the three cubes in one row and drop them at the place location.
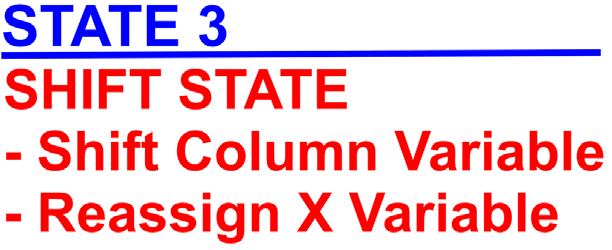
- STATE 3 – SHIFT Y & RESET X: Move over to the next column (Y-axis) and reset PICK-X to its initial value.
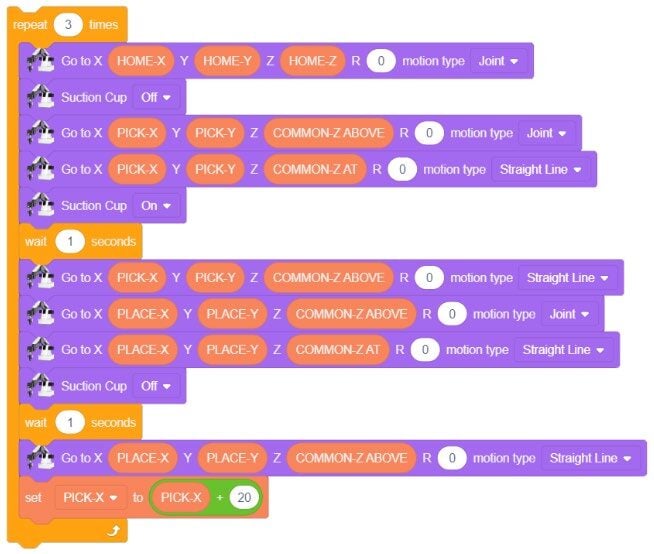
Place STATE 2 inside a REPEAT LOOP to run three times, then nest that REPEAT LOOP inside a second REPEAT LOOP to handle the columns.
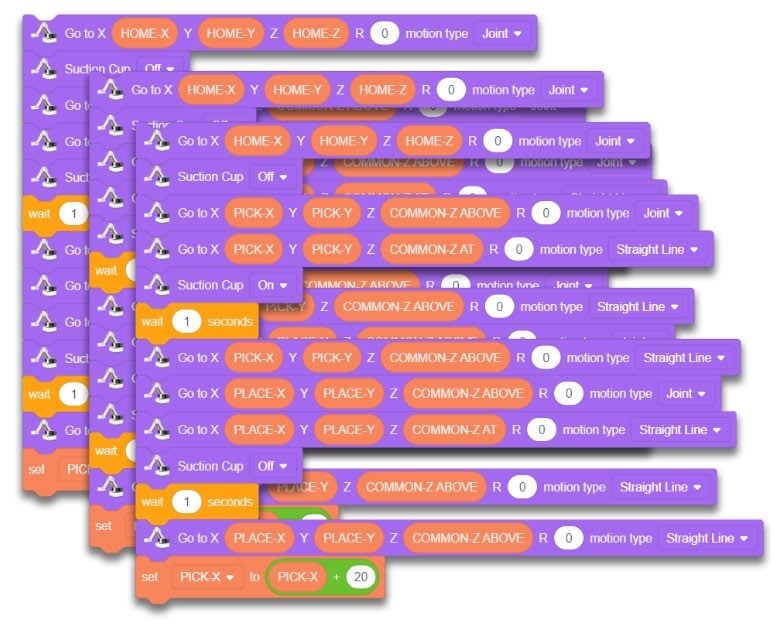
The robot now has the ability to empty one full row (Block 1, 2, & 3) along the X.

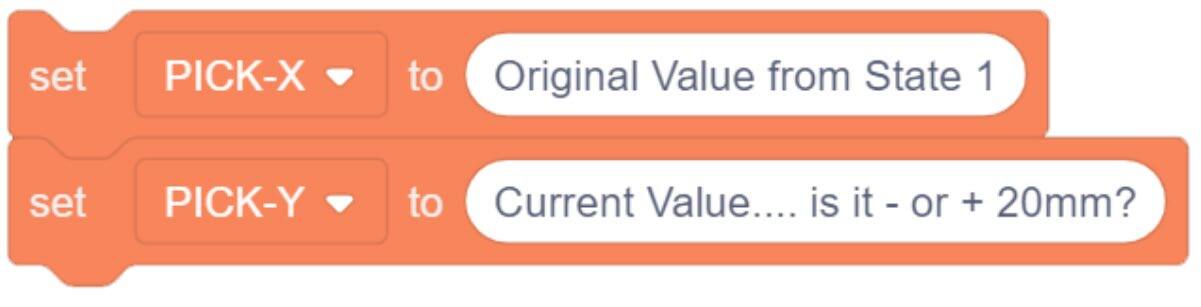
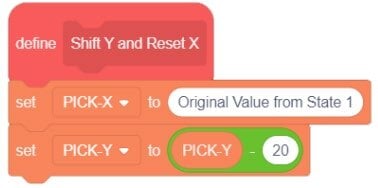
Now is the fun part. At the end of the 3 times loop, the program needs to SHIFT over to the next column (Y Axis) and reset the PICK-X to its initial value. This will be STATE 3
Drag over the 2 set variable blocks. The 1st one will set PICK-X back to its original value. Get the value from State 1
The 2nd one will need some math…. The column needs to shift in the negative direction on the Y-axis. Drag over a subtraction operator and place the PICK-Y variable inside it.
The program needs to subtract 20mm from the current value to shift to the correct location
Add these to the bottom of STATE 2

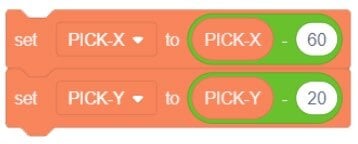
![]() ... There is also so cool math that could be done for resetting the X-Value that would not use a new constant value. The program could reverse the math... we took off added 20mm twice… so… (20+20=40)… PICK-X = PICK-X - 40?... Oh, Do not forget… the 20 was added at the end of each loop… so we accidently took off “x3” 20 increments… so (20+20+20=60) PICK-X - 60… This sets it back to what it was.
... There is also so cool math that could be done for resetting the X-Value that would not use a new constant value. The program could reverse the math... we took off added 20mm twice… so… (20+20=40)… PICK-X = PICK-X - 40?... Oh, Do not forget… the 20 was added at the end of each loop… so we accidently took off “x3” 20 increments… so (20+20+20=60) PICK-X - 60… This sets it back to what it was.
Once the variables are updated. The program needs to re run STATE 2 for the next two rows.
We could then duplicate the entire process two more times…
However, using this method, the program becomes very long, and we would have to do a lot of scrolling to move around in our program. Editing or updating the program can also be tedious and leaves a lot of room for errors.
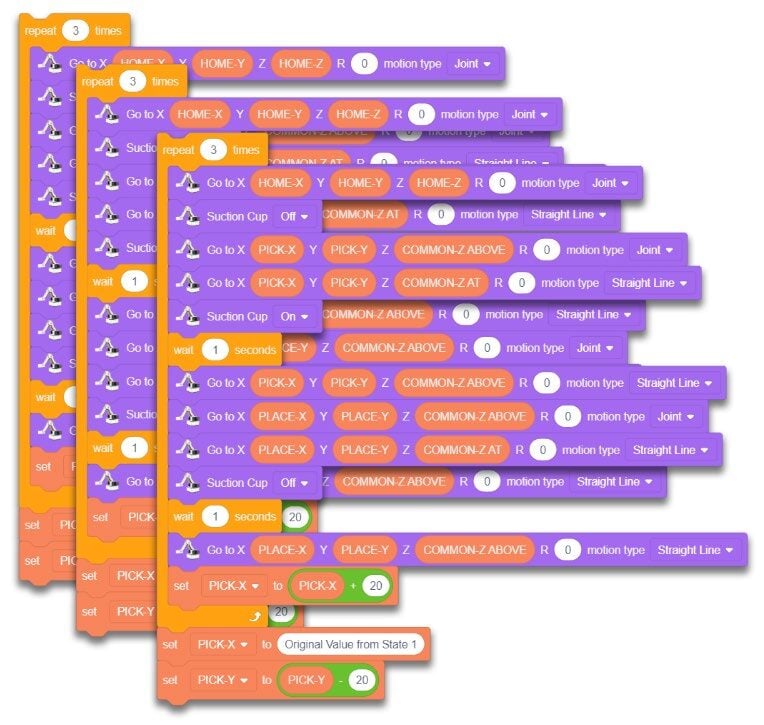
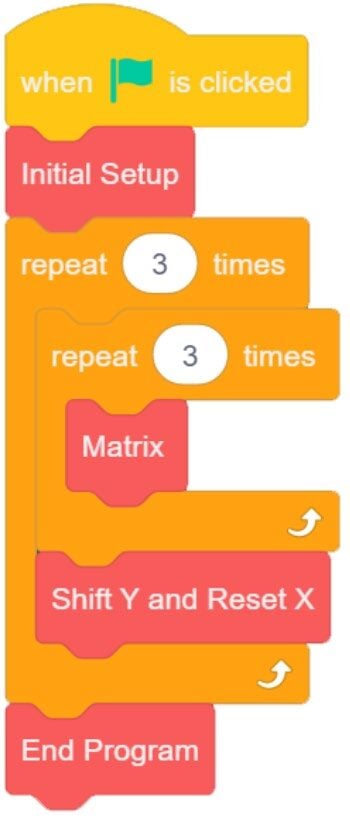
There must be a better way to keep the program simpler, shorter, and easier to edit… if we notice that we are duplicating the exact same program three times… can we just REPEAT the REPEAT LOOP 3 times? Drag over a second REPEAT LOOP and drag all of the entire original REPEAT LOOP inside of it (a nested loop, or a loop inside of another loop).

Duplicate and add one final SuctionCup Off and a final Go To Home to end the code.
Add this to the program, then try to run it.

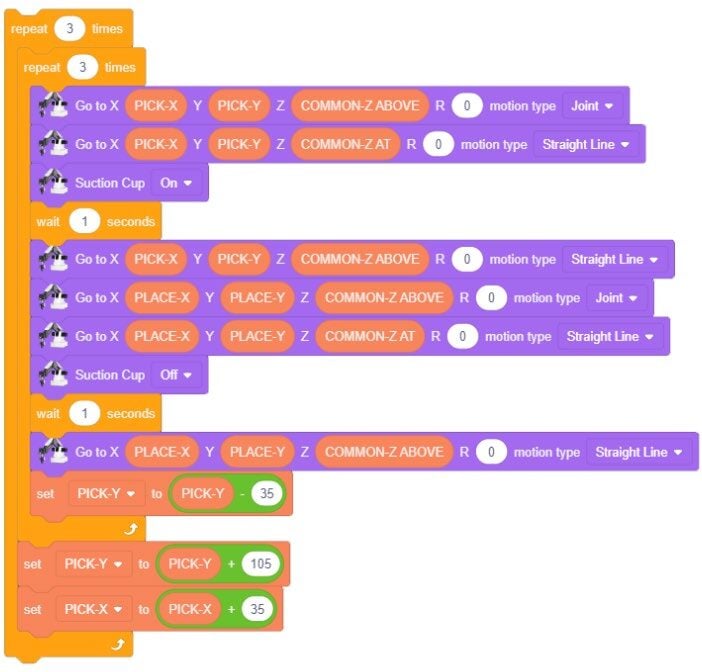
The program still seems very long even though variables and loops were used to make it shorter and simpler.
The next step is to clean up the program even further with a block of code called a function or void. Blockly programs refer to this code as creating MY BLOCKS. A function is a named section of a program that performs a task or a group of tasks. It can also be considered a procedure or a routine and can greatly simplify otherwise complicated programs. In other programming languages they might be called subroutines.
When a program calls MY BLOCKS to run, the program pauses, runs the MY BLOCK, and then returns to the program where it left off.
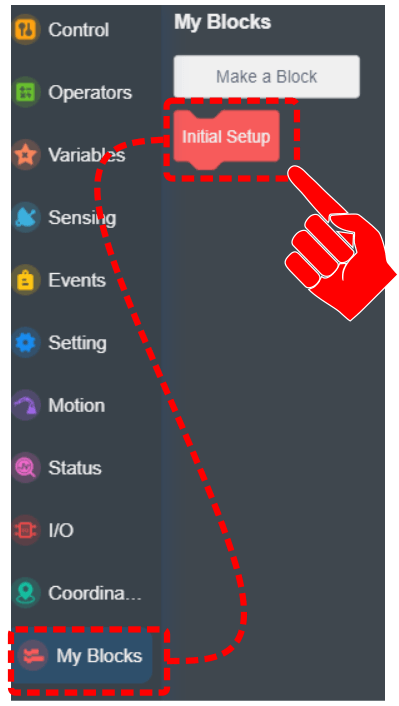
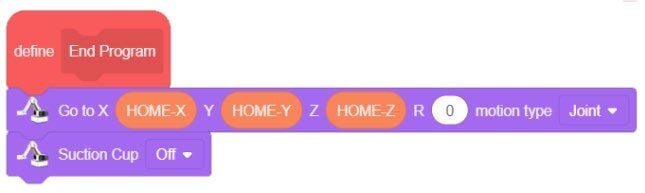
Click on “Make a Block” from the My Blocks toolbar.
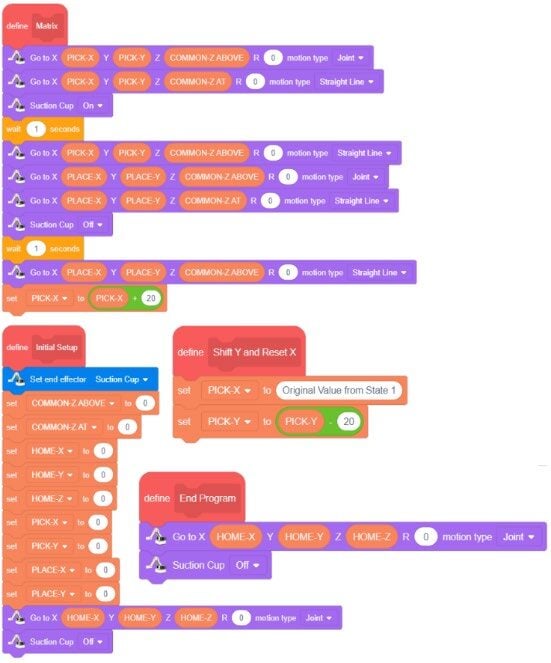
Name the first MY BLOCK nitial Setup

Once the new MY BLOCK is named, a new header will appear in the programing area.
Drag all of the setup code over and attach it to our new header.
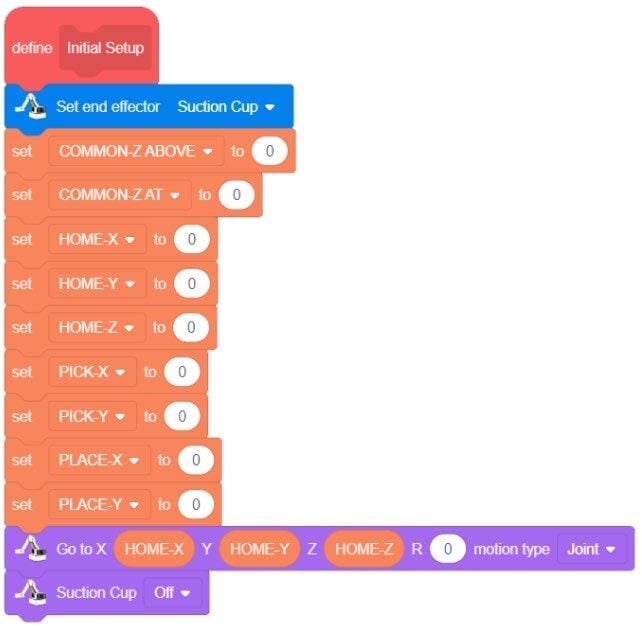
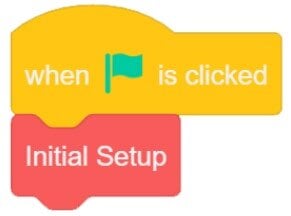
Now that the MY BLOCK is defined and the tasks are added to it, we need to add the ability for the main program to call the MY BLOCK to run. Drag the new block from the “My Blocks” tool bar over to the program area and attach it to the WHEN STARTED
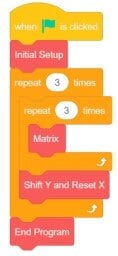
Step 13 – Clean Up with My Blocks
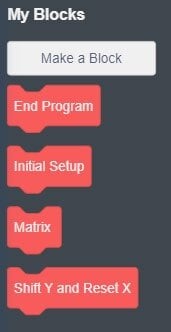
Create additional MyBlocks to make the program even clearer:
- Initial Setup
- Matrix – program for one full row
- Shift Y and Reset X
- End Program
Drag each section of the program over to its new header, then call these blocks in the main program under WHEN STARTED.
MY BLOCKS just float in the programming environment unattached to the main program. They are essentially separate mini programs to be called by the main program.
Step 14 – Test & Troubleshoot
Run the program once all My Blocks are in place and see if it works correctly. If it does not work, troubleshoot it until it does.
Teaching Tips:
CONCLUSION
- In your own words, define a variable.
- In your own words, define a MY BLOCK (Function/VOID).
- Explain what would have to be done to palletize two layers using bullet points or a step-by-step list below.
GOING BEYOND
- Use a switch as an input to make the robot wait until you move the block from the Place position and hit the switch.
- Move a row of three cubes to another row (Matrix to Matrix).
- Develop a program that will run the entire process in reverse – take a block from a common location and distribute them into a 3×3 matrix (palletizing).
- Take the cubes from a common location and stack them in a column vertically using variables for the height.
Teacher Initials _________