Lesson Modules
Teaching Tips:
Observe Module Overview
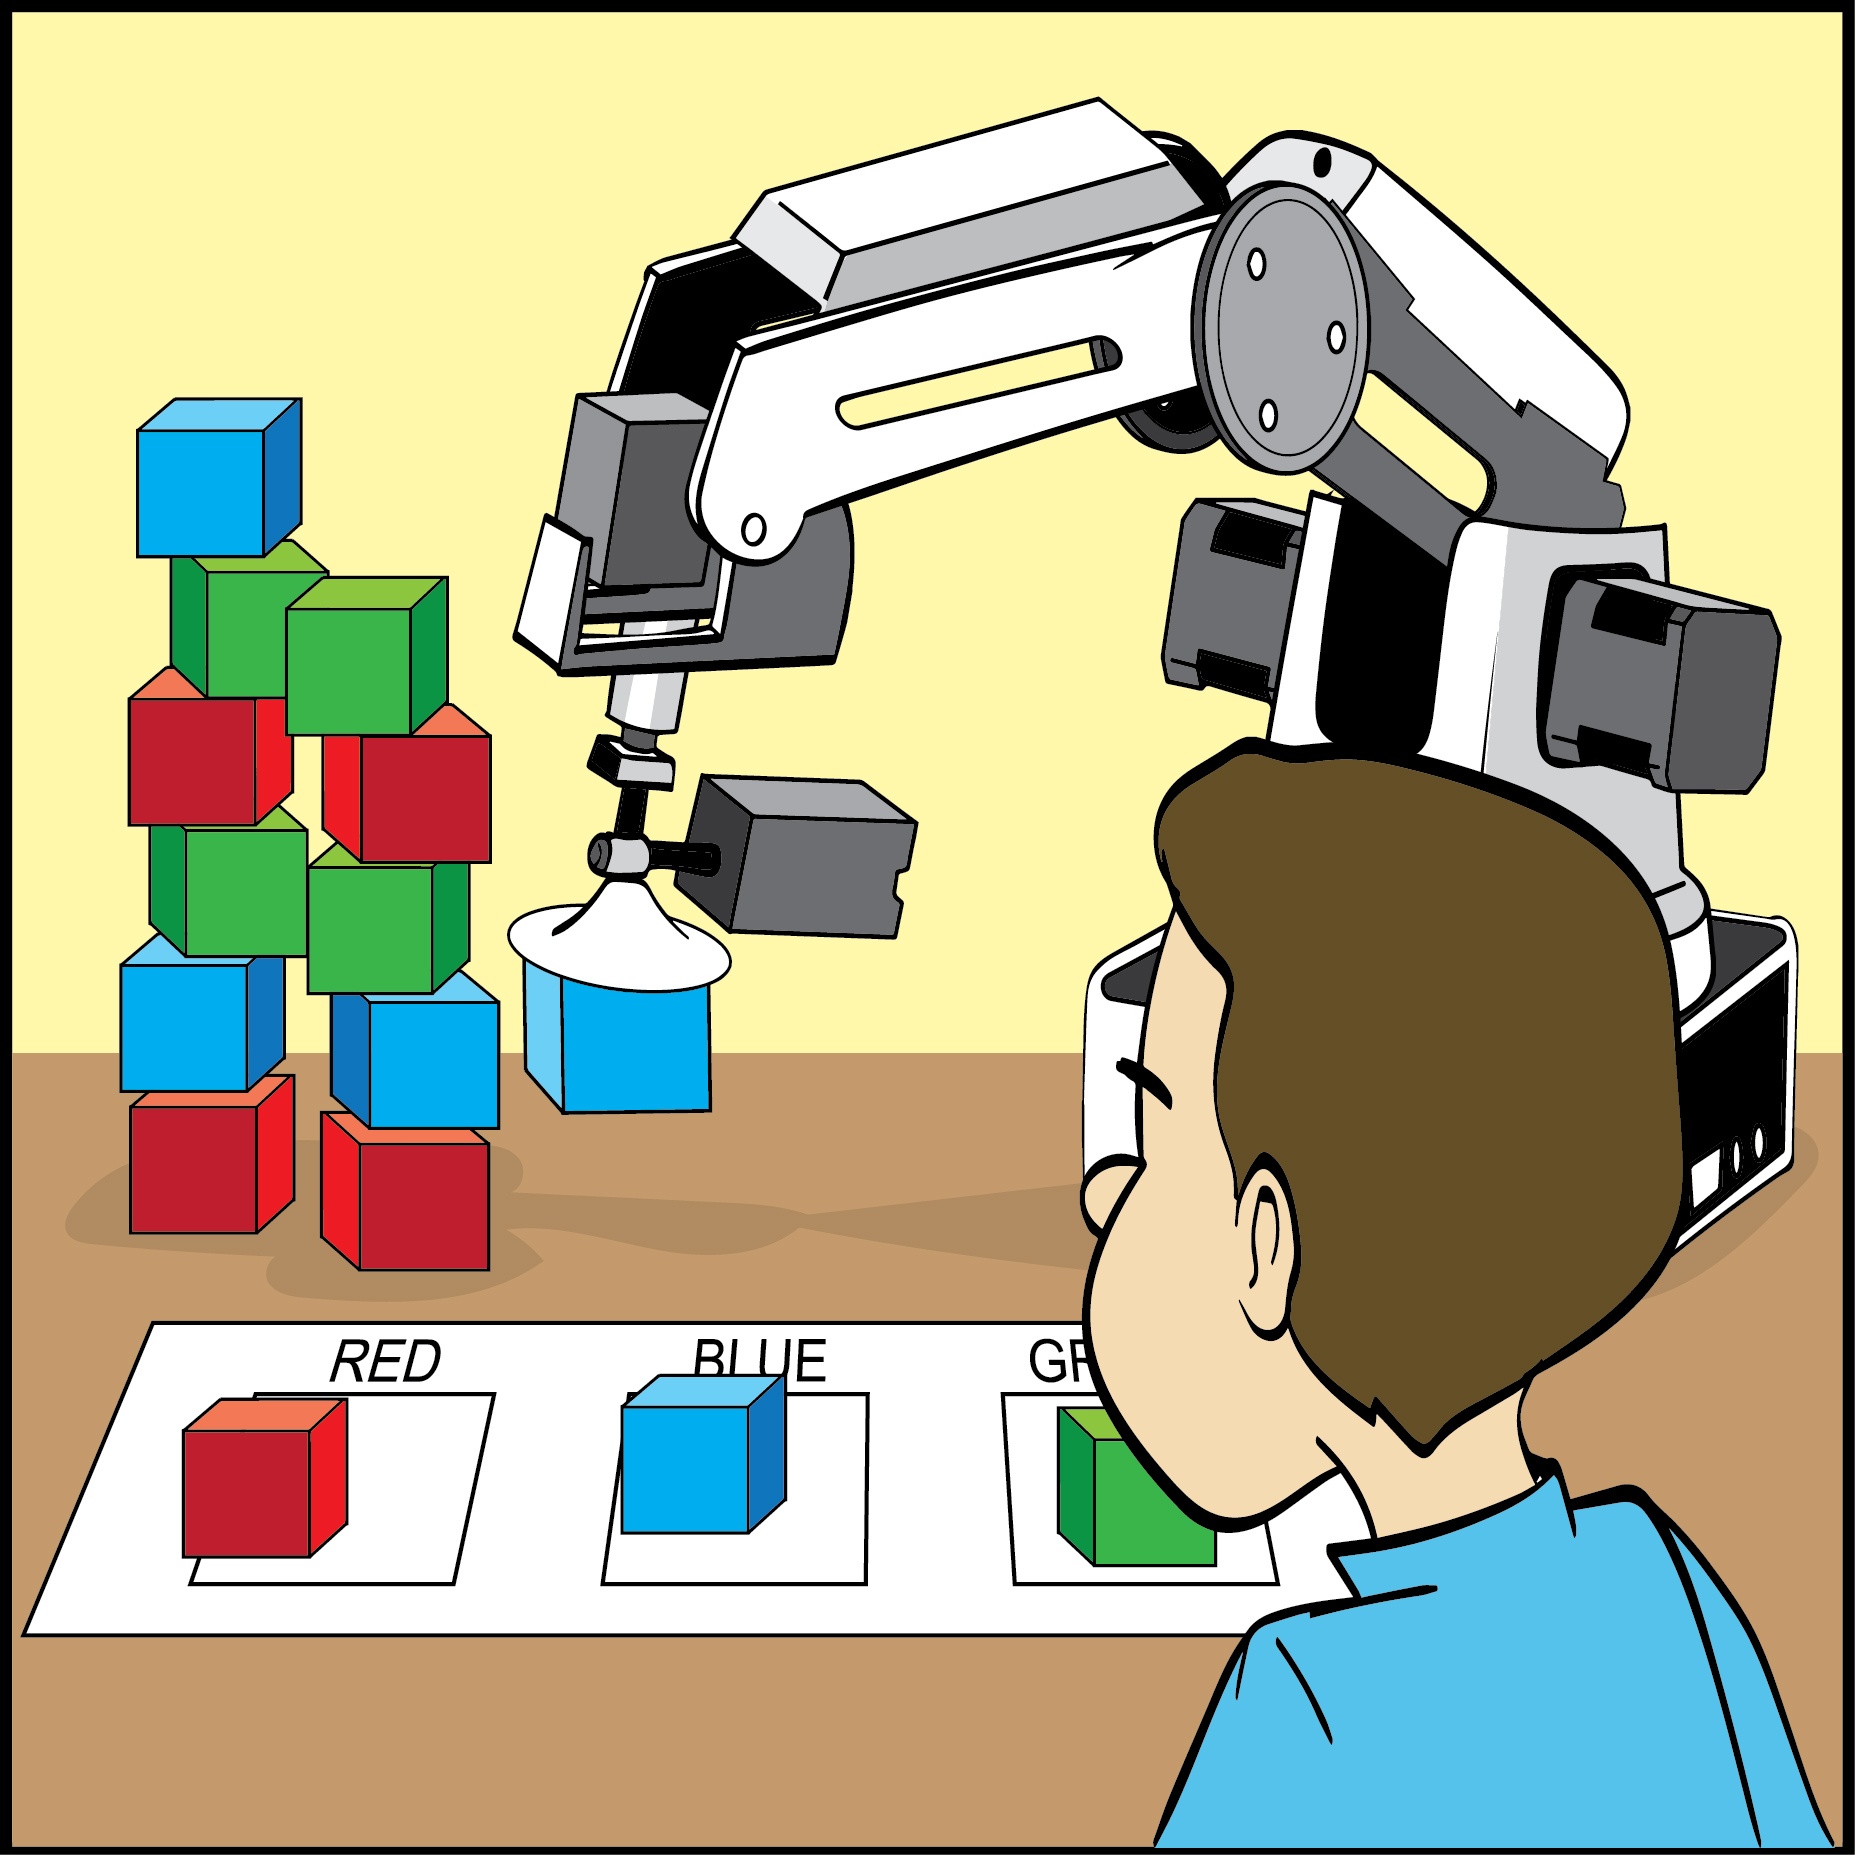
- Teacher will grab student’s attention by asking them to look at the video.
- They are to ask themselves what is happening and what technology is being used. While at the same time the teacher will be demonstrating how it’s being used in a real-world situation.
Lesson Overview
- Ensure the Dobot firmware and software is updated to the latest version. This will reduce troubleshooting.
- This lesson can be done individually or in groups. Depending on size of class or number of robots. If several students per robot, you might want to assign them separate responsibilities for full engagement.
- This lesson can take between 1 to 2 class periods depending on coding knowledge of students with Blockly ,Script, and Dobot in general.
- This lesson and skills is considered medium and will be built upon to higher levels in the next lessons.
- Having students start in the Power ON homing position is recommended, so that every student or group has their Dobot(s) start from the same spot.
- Remind students that in this project they are to pick an x,y,z coordinate spot where they will be feeding Dobot the containers or cubes. In the challenge they will be automating the entire process.
- The perfect distance between the object and color sensor will need to be determined by students as every sensor might be +/- off some millimeters. Average distance is .5 – 1 cm for optimal sensing.
- When programming remind students about turning on and off suction cup. As well as telling Dobot what port their color sensor is plugged into as there are different models.
- We included a code sample of the process as show on videos for the class project and the automation challenge.
- Have them recall what they learned in lesson 2.
Materials Needed:
Here is a lesson plan for your records.
Print this Pick and Place handout students will need during the Prototype module.
Use this code solution as a reference for grading.
Here is a detailed explination of the code solution. It is useful to help students who are stuck in the prototyping process.
Optional Materials:
Print this Key Terms vocab sheet to use as a reference dring class.
Teaching Tips:
Explore Module Overview
Student should be able to explain the new Key Terms they have learned and how they are applied.
Questions
- How does a color sensor work?
- How can it be applied in a real world product or situation?
- How can I modify the code?
Higher order thinking question
- How can you improve the code to make Dobot work more efficiently?
Key Terms
- Color Sensor – This type of sensor can identify the color of an object by the amount of light the object reflects. Color sensors will detect the intensity of Red, Green and Blue in the color of the object and send it to microcontroller for further processing.
- Light Dependent Resistor - An LDR is a component that has a (variable) resistance that changes with the light intensity that falls upon it. Every color detected creates a different brightness therefore identifying which color the object is.
- Microcontroller - A microcontroller (MCU for microcontroller unit, or UC for μ-controller) is a small computer on a single integrated circuit. It is the brain of the robot where the programming commands and sensor values are processed.
- Servo Motors - DC motors that are equipped with a servo mechanism for controlling precise angular position. They usually have a rotation limit ranging from 90° to 180°.
- Input ports – It connects the microcontroller either to internal or external devices. For example, where you plug in the attachments to Dobot those are the input ports.
- Function - A named section of a program that performs a specific task.
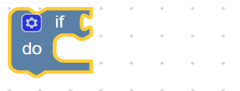
- If-do command – A conditional statement performs different computations or actions depending on whether a programmer-specified condition evaluates to true or false.
Teaching Tips:
Prototype Module Overview
Each group or individual is to program Dobot with the following guidelines:
- Dobot must PICK up a cube
- Dobot must transport the cube to the color sensor for identification of Red, Green, or Blue.
- Dobot must place down the cube inside the corresponding color box in PLACE handout
Before starting the prototyping challenge, all students should have this code completed:
Questions and Answers
1. What command and variables do we need to put next after the delay?
JumpTo command with the sensor variables
2. What do you think we mean by call it?
It means that by inserting the name of the function as a command, as illustrated, Dobot will jump to execute those codes and come back!
Functions are NOT attached to main code as illustrated.
Remember!! It’s like a separate program that is activated when called.
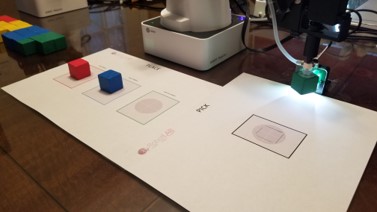
Set up your robot
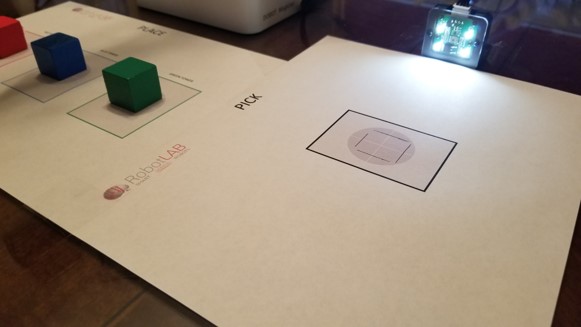
| 1 | Arrange Dobot, blocks, color sensor, and PLACE/PICK handouts as shown. Make sure DobotStudio is running on computer with blockly. Tape down the handouts and color sensor to avoid any movement. As any movement can throw of coordinates in the code. |
| 2 | Trace one of the cubes with a pencil/pen in the middle of the PICK circle as shown. This will allow you to see precise location where Dobot will pickup cubes. |
| 3 | Using the unlock button on the arm, position Dobot on top of a cube on the PICK location. Make sure the suction cup is firmly press down for maximum suction when activation code later. 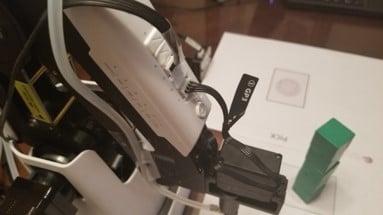 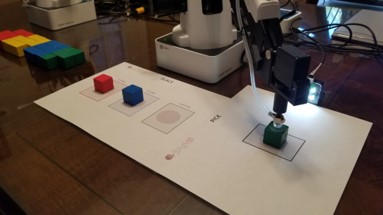 |
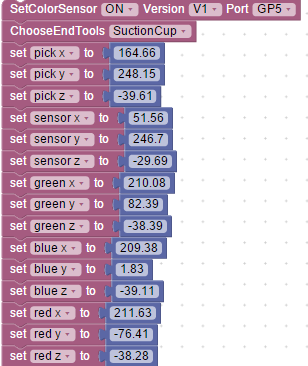
| 4 | Look at coordinates for this exact PICK location on the operation panel. Your coordinates will vary!! Start your code by creating 3 variables, one for each coordinate. Name them as you see shown.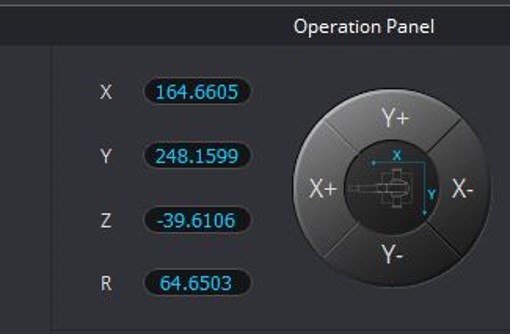 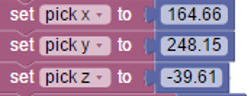 |
| 5 | Using the operation panel turn ON the suction cup and maneuver the arm towards the color sensor by using the unlock button. Make sure cube is not touching table or sensor, should be a couple of centimeters away from both. |
| 6 | Create three more variables for this color sensor location as shown.Remember: the values shown will vary on your setup.Once done, you may turn OFF suction cup.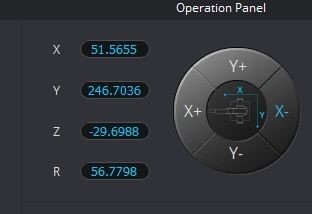 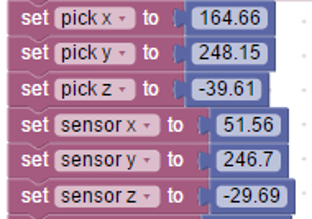 |
| 7 | Maneuver the arm towards the center of the cube in green box of the PLACE handout by using the unlock button. Create the variables for this location as shown.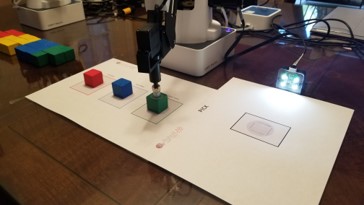 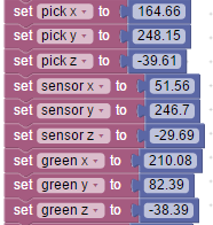 |
| 8 | Maneuver the arm towards the center of the cube in blue box of the PLACE handout by using the unlock button. Create the variables for this location as shown.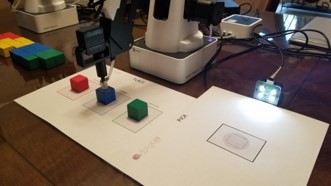 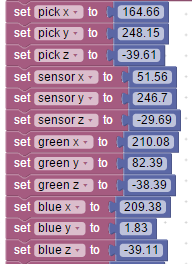 |
| 9 | Maneuver the arm towards the center of the cube in red box of the PLACE handout by using the unlock button. Create the variables for this location as shown. 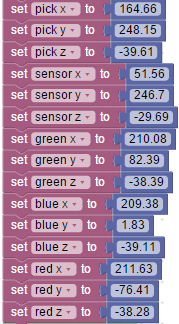 |
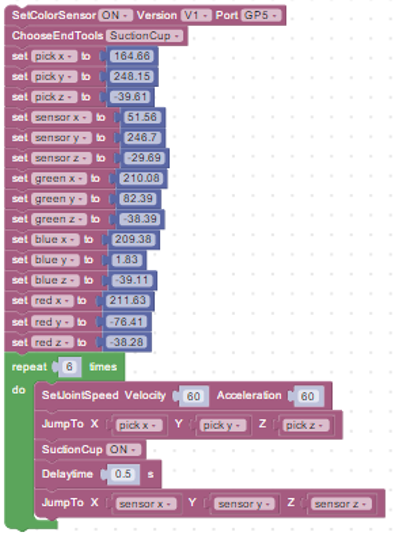
| 10 | We now need to add these two commands on the top of the code.The first line is to turn ON the color sensor, what version of sensor you are using, and in what port it’s connected.The second line tells Dobot what attachment you will be using in your code. Now that we have all our configurations command and needed variables set, we can start with creating a loop to repeat the PICK and PLACE tasks as we did in lesson 2. |
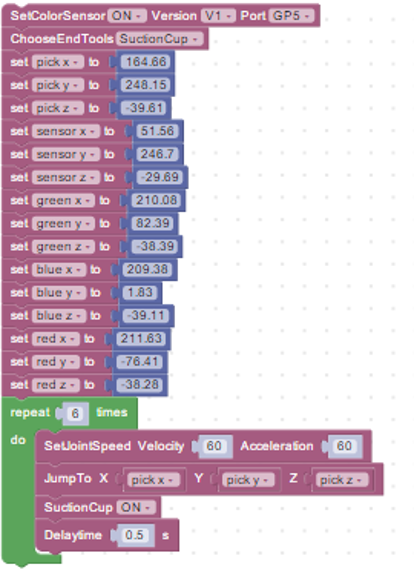
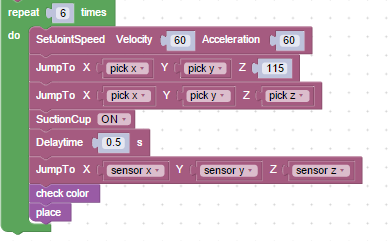
| 11 | Lets start by creating our loop that will repeat the process for a total of 6 blocks.The first command is to set the speed and acceleration of the motors.The second line, we have Dobot jump to the highest point of PICK spot. This helps with avoiding knocking down towers as the arm comes back for more cubes.The 3rd line drops the arm to the exact PICK location we stored in the variables earlier.Then it will turn ON suction and wait .5 seconds. |


Your code up to now should resemble something like this:
Using Functions
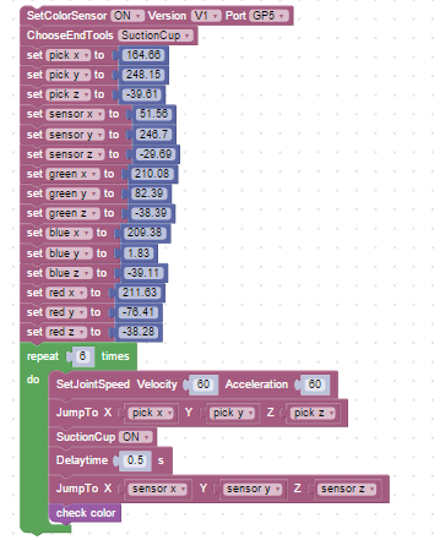
| 12 | In the loop, once it has picked up the cube from the PICK box we need it taken to the color sensor.
What command and variables do we need to put next after the delay?
|
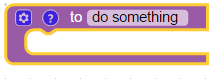
| 13 | Next, we will need to know and learn a new command. A command that will make the code more organized and easier to understand.It is called a Function!
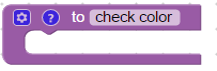
These group of commands will only be responsible for activating the color sensor and checking the color.If you recall, the last command we put in the loop was to make Dobot jump to the color sensor with exact coordinates.Since these codes will be executed next we should include the commands to identify the color. |
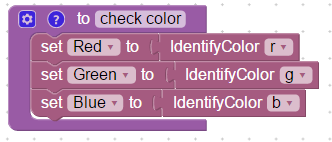
| 14 | The first step in this process is to have this function create variables where Dobot (microcontroller) will store either a 0 or a 1 as we learned earlier. We create variables named “Red”, “Green”, and “Blue” and have them set to the value sent by the color sensor with the command IndentifyColor.
What do you think we mean by call it?
|
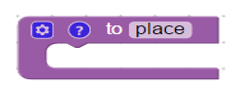
| 15 | Now we need one more function. This function will be named place. It will be responsible for placing the cubes in the corresponding PLACE colored box.As of right now we have code to pick up, check color, and now we just need to place.
|

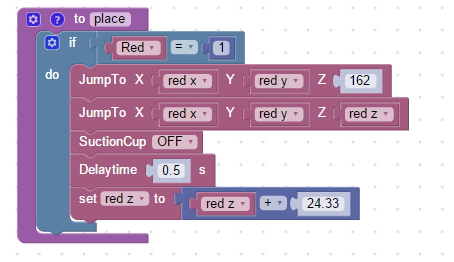
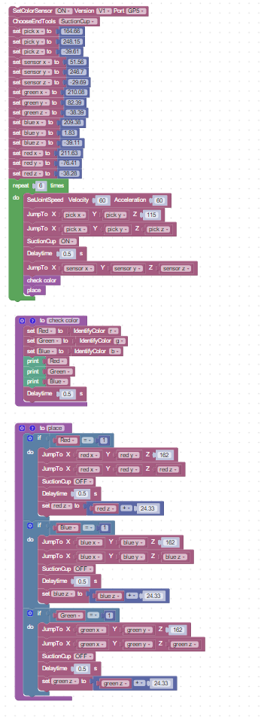
Finishing up your code
Lets follow the order. It should look familiar since it’s what we covered in lesson 2.
The 1st command will jump to the highest point of the tower. We need this so that Dobot doesn’t knock over the other towers as it moves around.
The 2nd command will direct to the very next location the cube belongs. The x and y will be staying the same compared to the Z (the height) which will be changing constantly as we covered in lesson 2.
The 3rd and 4th commands are to turn OFF the suction cup and give it some time.
The 5th command you should be familiar with as it’s what makes the Z coordinate increase 1 cube length each time.

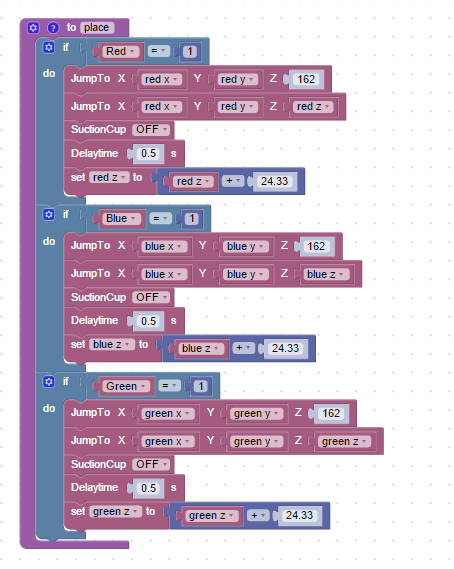
Your last function, once completed with all 3 color variables should look something similar to this example:
See this video for an example of the functionality.
Remember to call it!
Now you are ready for the prototyping challenge!
Teaching Tips:
Reflect Module Overview
- Review with class on why robots are becoming more popular. Advantages of robots compared to humans.
- The most common parts found in a robotic arm color sensing system and how they work.
- Review key vocabulary with students.
- Have to students reflect and rate their performance as robot programmers. How many failed attempts? How much time? What was the perfect color sensing distance setting?
- Discussing on how much time it might of taken programmers in the field to get everything working as efficiently and safely as possible.
Questions and Answers
- The importance of robotics in 21st century is increasing day by day to reduce what?
- The importance of robotics in 21st century is increasing day by day to reduce human mistakes in their daily tasks because of their ability to do much difficult tasks.
- When the robot is programmed it will do the exact same operations ______ and _______.
- Day and night.
- One job which a robot would be able to perform is sorting objects into categories for instance by ______, ______ or _______.
- Color, shape, or size.
- A color sorting robot will usually comprises of a __________, ___________and ______________.
- Color sensor, stepper & servo motors, and microcontrollers.
- ________detects the specified color of the object and the __________ reads this from the data at its _________.
- Color sensor , microcontroller, input ports.
- A color sorting robot is a system having a capability to identify the color of an object and ______________________________.
- place it at a desired location.
- The values sent to the microcontroller by the color sensor are sent in forms of ?
- 1’s and 0’s.
- A ________ is a named section of a program that performs a specific task.
- function
- How do we execute a function?
- We call it.
- How does the if-do logic command work?
- Performs different computations or actions depending on whether a programmer-specified condition evaluates to true or false.
- day/night
- powered on/off
- fast/slow
- with/without humans
- 1’s
- 0’s
- 1’s and 0’s.
- 1’s and 2’s.
- chunk
- byte
- model
- function
- Ask it
- Call it
- Reference it